How to Migrate Process Builder/Workflow to Flow
Salesforce has officially ended support for Workflow Rules and Process Builder on December 31, 2025. Your existing Process Builders may still run, but they won’t receive bug fixes or Salesforce support anymore. That makes migration to Flow a reliability + risk-reduction move, not just “cleanup.”
The good news: Salesforce provides a Migrate to Flow tool that converts many Process Builders into record-triggered Flows. The tool gives you a working skeleton, but you still need to review and optimize the Flow after migration.
Below is a quick guide to help your team migrate all existing automations to Salesforce Flows.
Please note that the migration has two steps:
- Workflow to Flow
- Process Builder to Flow
Workflow to Flow
Some of your Process Builders are actually linked to old Workflow Rules.
When you go to Setup and search for “Migrate to Flow”, Salesforce automatically shows a list of all active Workflow Rules and Processes.
You will see a page where all active Process Builders appear.
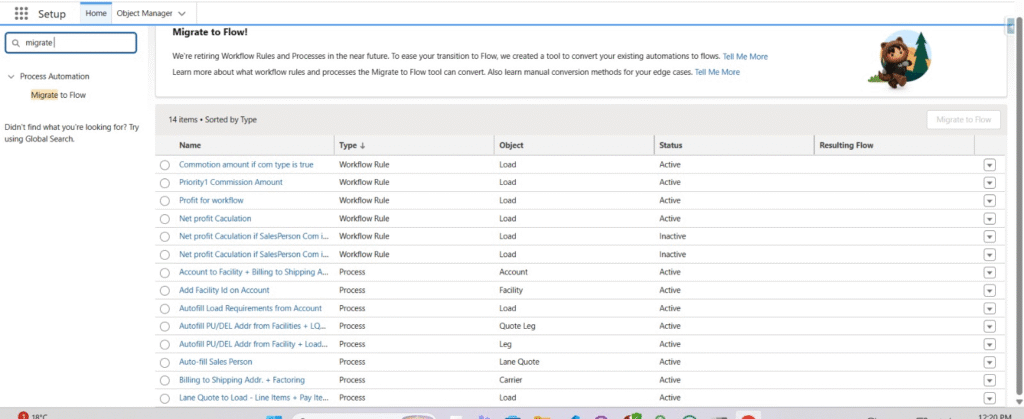
You can simply select the ones you want and click “Migrate to Flow”.
Salesforce will generate their equivalent Flow automatically, and the migration will complete quickly.
Process Builder to Flow
1) Introduction: What’s Changing and Why It Matters
- You can’t create new Process Builders anymore, and support ends Dec 31, 2025.
- Flow is now Salesforce’s main automation engine. It supports faster execution, better debugging, scheduled paths, subflows, and ongoing new features.
- Migration is a chance to:
- remove old automation debt,
- simplify logic,
- and improve performance.
2) Pre-Check: Identify What Can or Cannot Be Migrated
Before clicking “Migrate,” spend 10–15 minutes auditing the Process Builder.
Do you have to do these pre-checks?
If your Process Builder is tiny (1–2 criteria, only updates a field): you can skip the deep check and just migrate + review quickly.
If it has scheduled actions, multiple criteria, or weird actions (chatter, emails, tasks, create records): yes, do the check or you might miss logic that doesn’t migrate.
So think of this as a safety check, not extra work.
2.1 Inventory your Process Builder
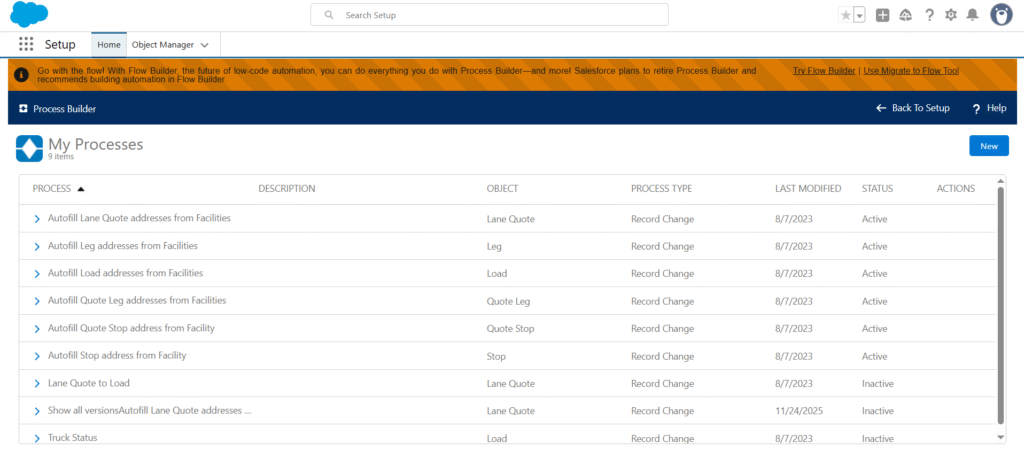
Step A) Open the Process Builder
Setup → Process Builder → click your process name.
You’ll see a canvas like this:
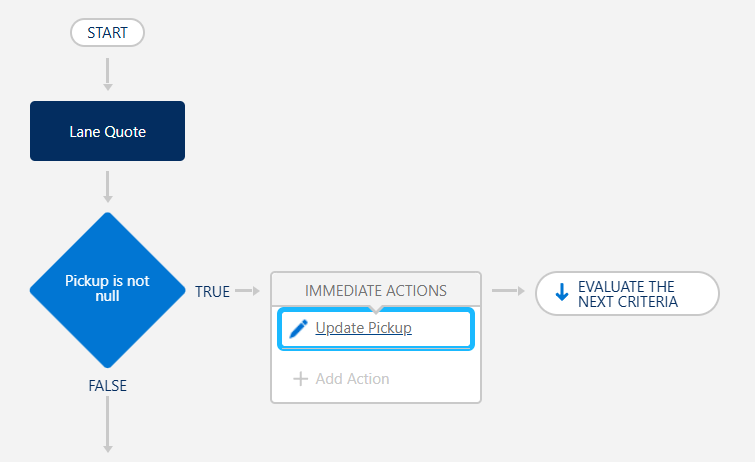
Step B) Find what Object it runs on
At the very top of the PB canvas, under the process name, you’ll see:
- The Object name
Step C) List your criteria / nodes
On the canvas, every diamond shape is a criteria (condition).
Step D) List the Immediate Actions
Click each criteria diamond.
On the right side (or below the criteria) you’ll see a box called:
IMMEDIATE ACTIONS
Step E) Check if you have Scheduled Actions
Still inside each criteria, look for a section called:
SCHEDULED ACTIONS
If you see it, it means the PB waits “X days/hours after” before doing something.
✅ If Scheduled Actions exists, write:
- which criteria it belongs to
- what the scheduled action does
(e.g., “after 2 days, update status”)
If you scroll a bit inside the right panel and you don’t see a section called SCHEDULED ACTIONS, then this PB has no scheduled actions and you can migrate all criteria at once.
Step F) Note any special/advanced actions
While you’re looking at actions, note if you see anything like:
- Post to Chatter
- Submit for Approval
- Launch Flow / Apex
- Anything that looks non-simple
✅ Just list them because some may not migrate cleanly.
2.2 Scheduled actions rule
What the tool does now:
If your PB has scheduled actions, Salesforce converts them into Scheduled Paths in Flow.
So:
PB scheduled action ➝ Flow scheduled path ✅
Why “one criteria at a time” matters:
If you migrate multiple criteria together, Salesforce sometimes skips scheduled actions and only migrates the immediate stuff.
So the safe method is:
- Migrate criteria #1 alone (if it has scheduled actions)
- then criteria #2 alone
- etc.
If your PB has zero scheduled actions, ignore this rule — migrate all criteria together.
2.2.1 If a Process Builder doesn’t show up in the Migration Tool
Sometimes you open Setup → Migrate to Flow and your Process Builder is missing (or you see 0 eligible items). This usually means the PB is read-only / managed package, or not eligible for automatic conversion.
Clone it, then migrate the clone
- Open the Process Builder you want to migrate.
- Click Clone (top-right).
- Save the clone with a new name (example: “PB – AutoFill Lane Quote (Clone)”).
- Activate the clone only in a sandbox for testing.
- Don’t activate in production yet, or you may double-run automation.
- Go back to Setup → Migrate to Flow.
- The cloned (unmanaged) PB should now appear in the list.
- Migrate the clone, then continue with the steps in Section 3.
If the Process Builder still doesn’t appear after cloning, the tool can’t convert that logic. Rebuild it manually as a Record-Triggered Flow.
2.3 Decide: migrate or rebuild?
Use this quick rule:
- Simple PB (few nodes, standard actions): migrate first, then clean up.
- Complex PB (many criteria, unsupported actions, messy branching): consider rebuilding manually in Flow for a cleaner result.
3) How to Use the Migration Tool (Step-by-Step)
Step 1 — Open the Migration Tool
- Go to Setup
- In Quick Find, type “Migrate to Flow”
- Open Migrate to Flow
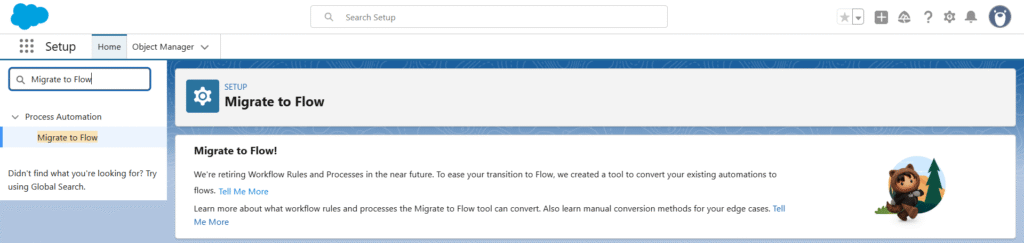
Step 2 — Select the Process Builder
- You’ll see a list of existing Process Builders.
- Click the PB you want to migrate.
- The “Migrate to Flow” button becomes active. Click it.

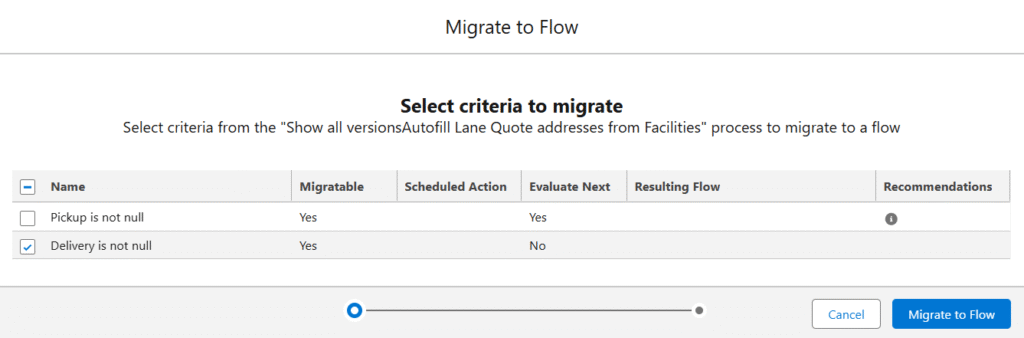
Step 3 — Choose criteria to migrate
After you click Migrate to Flow, Salesforce shows a list of your Process Builder criteria (the diamond steps). This screen decides which criteria will be converted into the new Flow.
- Review each row
- Migratable = Yes means Salesforce can convert it.
- If you see Migratable = No, that criteria must be rebuilt manually in Flow.
- Check the “Scheduled Action” column
- If a criteria has a Scheduled Action, migrate only that one criteria at a time.
(Scheduled actions convert into Scheduled Paths, but only cleanly when migrated separately.) - If the Scheduled Action column is empty, you can migrate multiple criteria together.
- If a criteria has a Scheduled Action, migrate only that one criteria at a time.
- Look at “Evaluate Next”
- Evaluate Next = Yes means the Process Builder continues to check the next criteria after this one runs.
- To keep the same behavior in Flow, select all criteria that are part of this chain.
- Select the criteria
- In most cases, select all rows so the new Flow matches the full Process Builder logic.
- Only select one row if you are intentionally splitting logic into separate Flows.
- Click Migrate to Flow to generate the Flow.
Then continue to Step 4 to open and review it in Flow Builder.
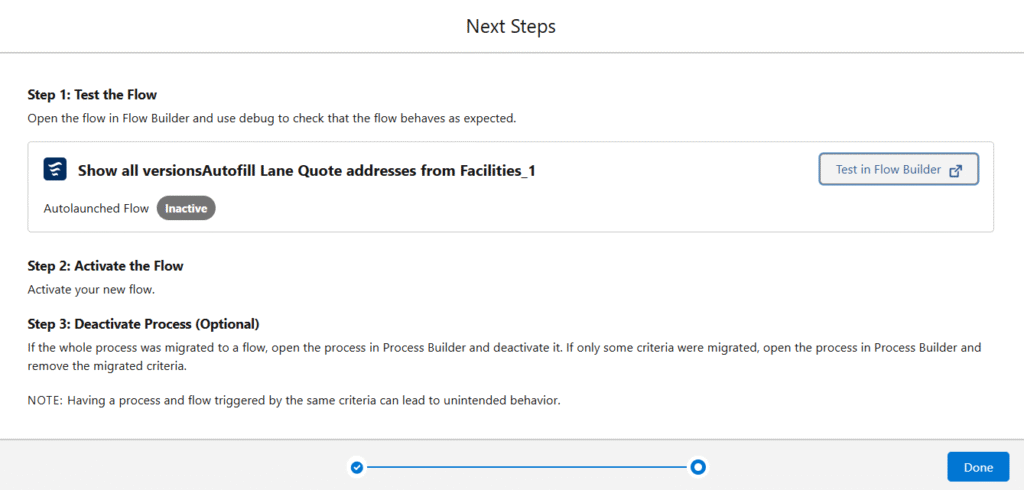
Step 4 — Open the new Flow
After migration finishes:
- Click “Test in Flow Builder.”
- Salesforce opens your newly generated Flow.
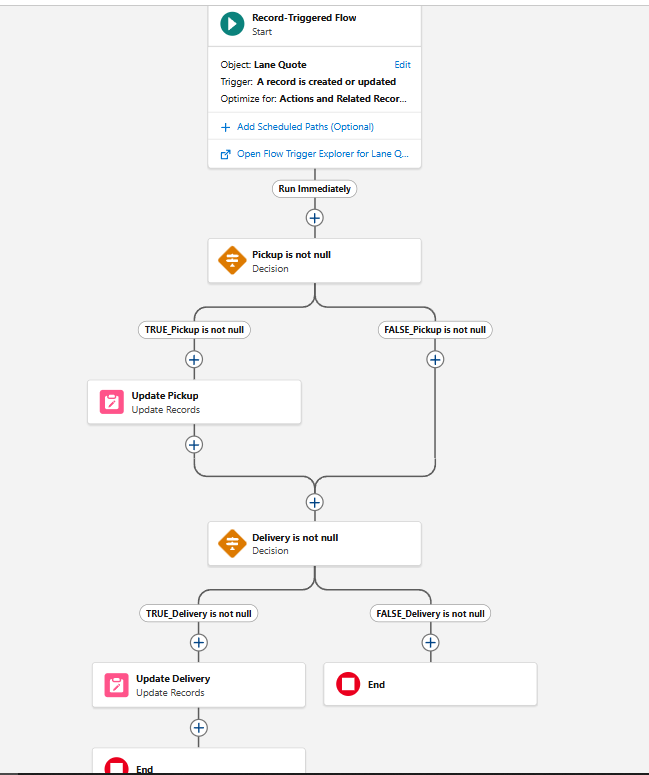
You should see:
- A Record-Triggered Flow,
- A Decision element representing your PB nodes,
- Create/Update actions matching PB steps,
- Scheduled Paths if applicable.
4) Post-Migration Clean-Up (Very Important)
The migration tool creates a working Flow, but it usually needs a little cleanup before you activate it. Think of this step as “tidying the room” so the Flow is easy to understand, safe to run, and easy to support later.
4.1 Rename the elements
Migration names are often generic (“Decision 1”, “Update Records 2”). Rename them so anyone can read the Flow later without guessing.
How to rename:
- Open your migrated Flow in Flow Builder.
- Click an element on the canvas.
- A right panel opens. Find the Label field at the top.
- Replace it with a clearer name
- Click Save
4.2 Remove or merge duplicated actions (if any)
Sometimes the migration creates multiple Update/Create elements that do almost the same thing. This is common when several criteria do similar updates.
How to check duplicates:
- Look at your Flow and find actions that feel repeated (ex: two “Update Pickup” blocks).
- Click each one and compare the fields being updated in the right panel.
- If the updates are nearly identical → you can merge.
How to merge duplicates:
- Keep the cleaner action block.
- Delete the duplicate block (click it → trash icon).
- Connect both branches into the kept block.
- If one branch needs a different value:
- Add an Assignment before the update to change that one value.
4.3 Move repeated logic into a Subflow (only when needed)
You don’t need subflows for small Flows.
Use a subflow only if the same logic appears in 3+ places, or you expect reuse later.
How to create a subflow:
- Go to Setup → Flows → New Flow.
- Choose Autolaunched Flow (No Trigger).
- Build the repeated logic inside it (example: “update pickup fields”).
- If the subflow needs data from the main Flow:
- Go to Manager tab → New Resource → Variable
- Mark it Available for input
- Save + Activate the subflow.
How to call a subflow in your main Flow:
- In your migrated Flow, click the + where the repeated logic should run.
- Select Subflow.
- Pick your subflow name.
- Map its input variables (pass the record or ID).
- Click Done → Save.
4.4 Add fault paths (error handling)
Process Builder hides failures. Flow doesn’t.
For every Create/Update action:
- Open the element
- Add a Fault connector
- Log or notify via:
- Email alert,
- Platform event logger,
- Custom error record.
Even a basic fault email is better than silent failure.
4.5 Check Flow order (if you have multiple flows on the object)
If more than one Record-Triggered Flow runs on the same object, execution order matters.
How to check order:
- In your Flow, click the Start card.
- Click Open Flow Trigger Explorer for [Object].
- You’ll see all Flows for that object.
- Review the order:
- “Before Save” Flows run first
- “After Save” Flows run later
- If needed, click Edit Order and rearrange.
- Save the order.
5) Testing and Deployment
5.1 Test in a sandbox first (always)
Use a sandbox or dev org and test with real scenarios.
Test:
- Happy path (criteria matches)
- Non-match path
- Bulk updates (data loader / import)
- Scheduled path timing if used
5.2 Validate results against the old PB
Compare:
- Did the same records get created/updated?
- Were the same fields set?
- Did timing behave the same?
5.3 Activate Flow, then deactivate PB
- Activate the Flow
- Go back to Process Builder
- Deactivate the original process
Do not leave both active or you’ll double-run automation.
5.4 Monitor after rollout
After moving to production:
- Watch Flow error emails
- Check debug logs if needed
- Review automation performance in high-volume cases
Quick Checklist Summary
- Review PB criteria and actions
- Confirm it’s eligible / clone if missing
- Migrate (one criteria at a time only if scheduled actions exist)
- Rename + simplify elements
- Add fault paths
- Test in sandbox
- Activate Flow
- Deactivate PB
- Monitor in production