Linehaul Integration
Connect carriers and linehaul operations directly into FTM.cloud.
FTM’s Linehaul integration streamlines how carriers are onboarded, managed, and updated in Salesforce. By connecting with MyCarrierPackets (MCP), this integration automates data flow between carriers, dispatch, and back-office teams, eliminating manual entry and ensuring your linehaul operations always run smoothly.
What is Linehaul Integration?
Linehaul refers to the long-distance movement of freight, often between distribution centers, ports, or hubs. Managing this process requires constant coordination with carriers, accurate documentation, and real-time updates.
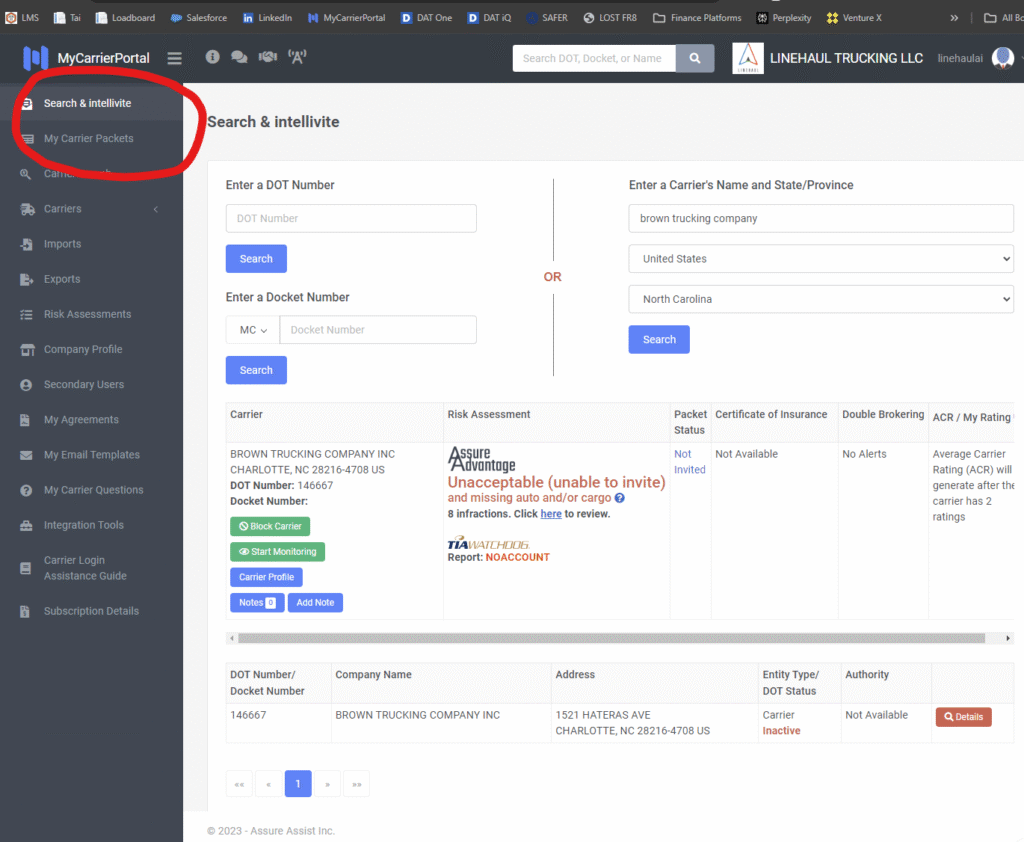
The Linehaul integration connects Salesforce and FTM.cloud with carrier packet systems like MyCarrierPackets. This allows carriers to submit onboarding packets, insurance details, preferred lanes, and factoring information directly into your TMS. With webhook-based automation, any carrier updates in MCP are immediately reflected in Salesforce, ensuring your records stay accurate and up to date.
Benefits of the Integration
- Automated Carrier Onboarding: Eliminate manual data entry with direct MyCarrierPackets integration.
- Real-Time Updates: Sync carrier insurance, factoring, and compliance details automatically.
- Streamlined Operations: Dispatchers and back-office staff have instant access to the latest carrier information.
- Custom Workflows: Use Flows or Process Builder to extend the integration into billing, safety, or load assignment processes.
- Scalable & Secure: OAuth and Named Credentials ensure data integrity while supporting enterprise security standards.
Prerequisites
Before beginning setup, make sure you have:
- ✅ Salesforce Admin access
- ✅ Sandbox login for testing
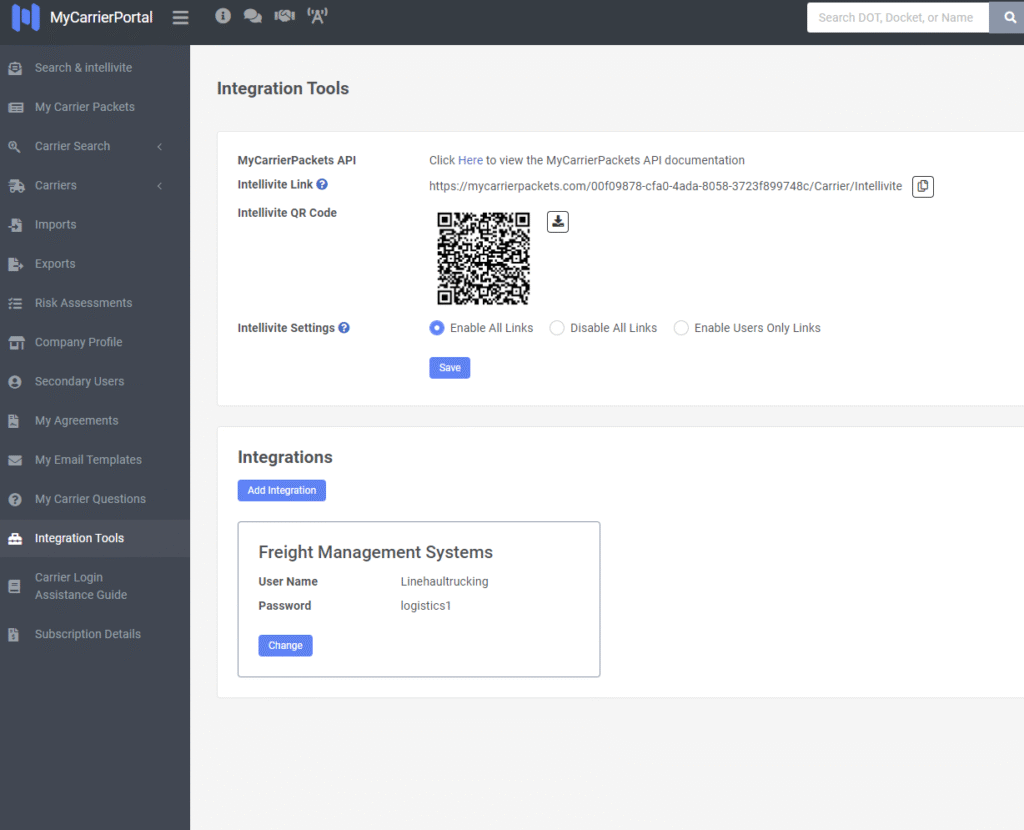
- ✅ MyCarrierPackets API credentials
- ✅ Integration user configured with correct permissions
Sandbox Access
Use these credentials for testing in the sandbox:
- Username: [sandbox username]
- Password: [sandbox password]
Step-by-Step Integration Guide
1. Configure Named Credentials
- In Salesforce, go to Setup → Security → Named Credentials
- Click New Named Credential
- Enter the following:
- Label:
LinehaulAPI - URL:
https://sandbox.mycarrierpackets.com/api - Identity Type: Named Principal
- Authentication Protocol: Password Authentication
- Label:
- Enter your sandbox username and password
- Save
2. Create New Required Fields
Add new custom fields to your Carrier object to capture Linehaul and MCP data. Examples include:
| Field Name | Type | Description |
Preferred_Lanes__c | Text | Carrier’s preferred operating lanes |
Number_of_Trailers__c | Number | Available trailers for linehaul |
Cargo_Insurance__c | Currency | Insurance coverage amount |
Factoring_Company__c | Lookup | Factoring company associated with carrier |
Linehaul_Status__c | Picklist | Current carrier onboarding status |
3. Connected Apps & OAuth Setup
- Navigate to Setup → App Manager → New Connected App
- Enter the app name (e.g.,
Linehaul Integration) - Configure OAuth settings with scopes:
- Access and manage your data (api)
- Perform requests on your behalf (refresh_token, offline_access)
- Add callback URL for the integration
- Save and note the Client ID and Client Secret
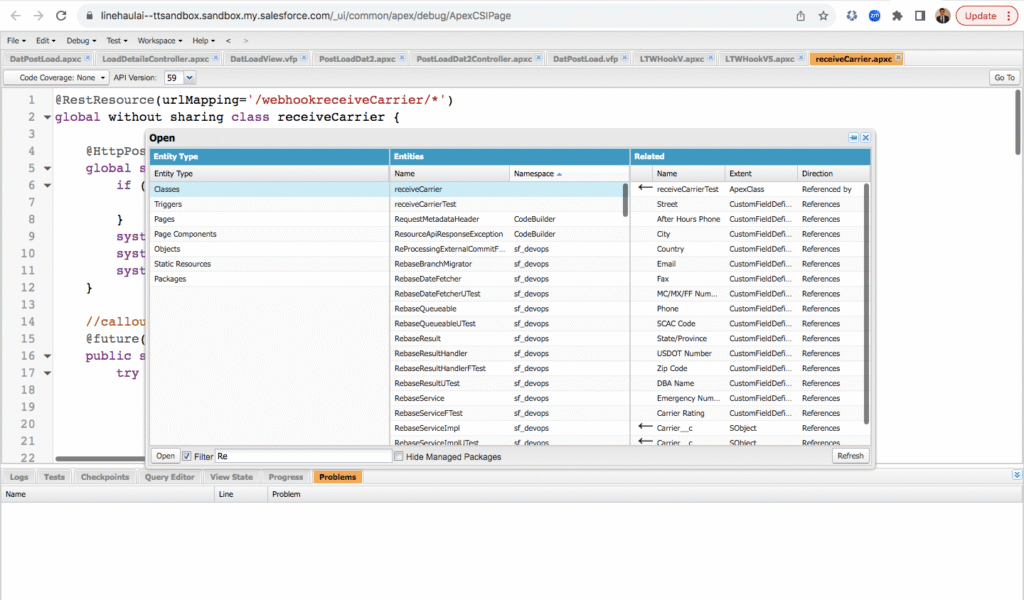
4. APEX Code for API Callouts
Create an Apex class to manage MCP webhook payloads and Linehaul API requests.
📎 Example: LinehaulService.cls
public with sharing class LinehaulService {
@AuraEnabled
public static String getCarrierDetails(String carrierId) {
HttpRequest req = new HttpRequest();
req.setEndpoint(‘callout:LinehaulAPI/carriers/’ + carrierId);
req.setMethod(‘GET’);
Http http = new Http();
HttpResponse res = http.send(req);
return res.getBody();
}
}
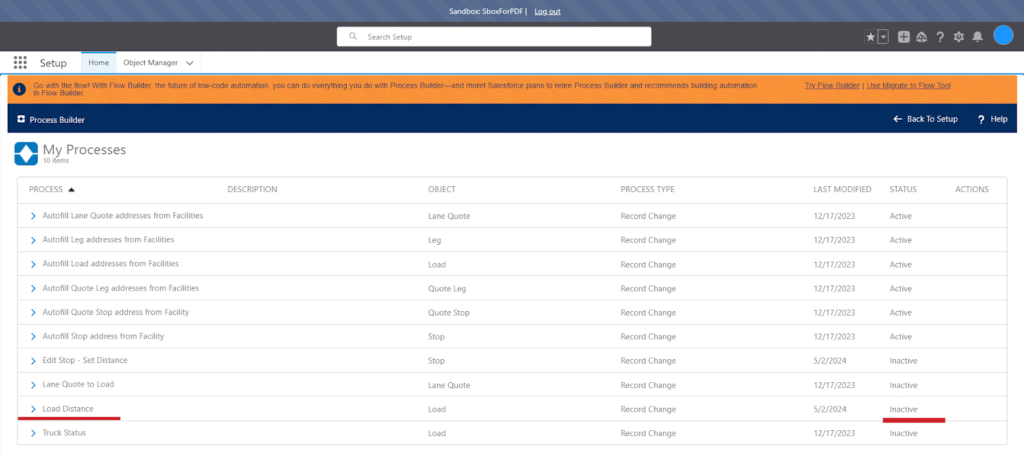
5. Automation with Flow / Process Builder
- Create a Record-Triggered Flow on the Carrier object
- Trigger when a carrier record is created or updated
- Call the
LinehaulServiceApex class to sync MCP data automatically
6. Add Button to Layout
- Navigate to Object Manager → Carrier → Page Layout
- Add a button labeled “Sync Linehaul Data”
- Map returned MCP/Linehaul fields such as
Preferred_Lanes__c,Cargo_Insurance__c, andFactoring_Company__c
7. Configure Sharing Settings
Ensure correct access for integration users:
- Carrier object: Read/Write
- Insurance & Factoring fields: Visible to Admins and Dispatchers
- Apex classes: Enabled for integration user profiles
8. VFP Code (Optional UI)
If you want to display carrier onboarding data in a custom UI:
📎 Attach the Visualforce Page (VFP) code as .txt file
Deployment
Once your integration is configured and tested in Sandbox, you’ll need to move the setup into Production. Deployment for the Linehaul integration follows Salesforce best practices and requires both metadata migration and API credential updates.
1. Prepare Change Sets
From Sandbox:
- Go to Setup → Outbound Change Sets
- Create a new change set (e.g.,
Linehaul_Integration_v1) - Add the following components:
- Custom Fields (
Preferred_Lanes__c,Cargo_Insurance__c, etc.) - Named Credentials (
LinehaulAPI) - Apex Classes (
LinehaulService.cls, webhook handlers, test classes) - Visualforce Pages (if used)
- Flows or Process Builder automations
- Custom Buttons and Layout changes
- Custom Fields (
- Upload the change set to Production

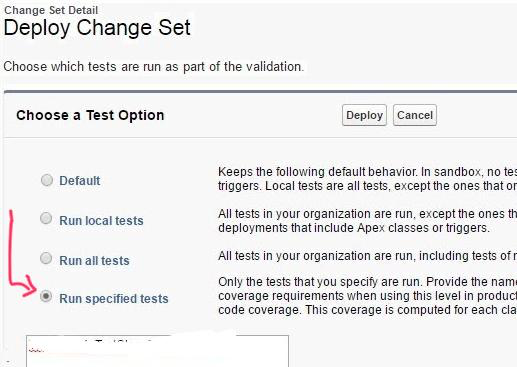
2. Validate and Deploy in Production
- In Production, go to Inbound Change Sets
- Select the uploaded change set and click Validate
- Confirm all tests run successfully
- Deploy the change set
3. Update Production Credentials
In Production:
- Replace Sandbox Username & Password with Production credentials in Named Credentials
- Update the endpoint from
https://sandbox.mycarrierpackets.com/apitohttps://www.mycarrierpackets.com/api - Confirm the OAuth Connected App is active and assigned to the correct profiles
4. Post-Deployment Testing
After deployment, perform these tests in Production:
- Carrier Onboarding: Create a new carrier via MyCarrierPackets and verify it syncs into Salesforce
- Webhook Updates: Update insurance or factoring details in MCP and confirm Salesforce records update automatically
- Manual Sync Button: Test the “Sync Linehaul Data” button to ensure Apex callouts return live data
- Flows: Verify Record-Triggered Flows update fields correctly
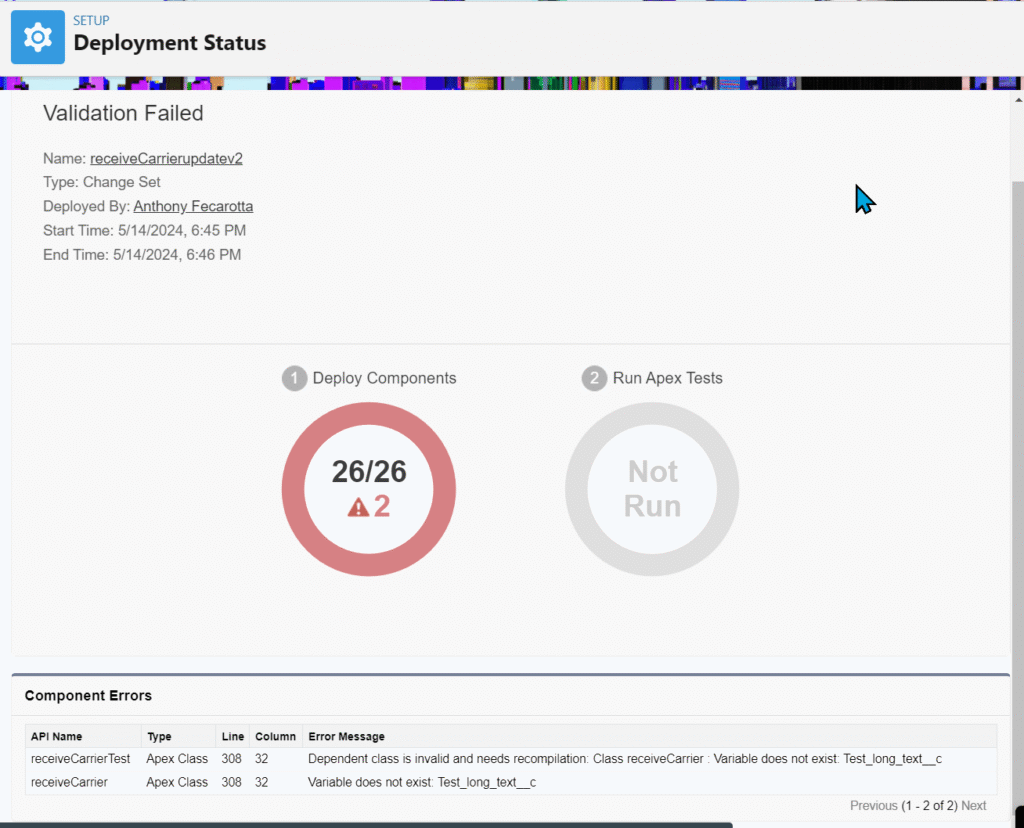
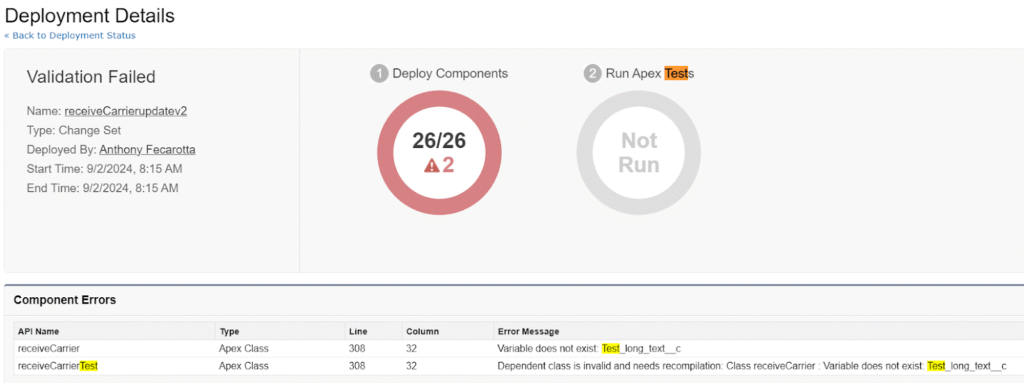
5. Common Deployment Issues
| Issue | Solution |
| Test class failures | Ensure all Apex classes include valid test coverage |
| INVALID_SESSION_ID after deployment | Refresh OAuth token and re-authenticate Named Credential |
| Custom field missing on Production | Double-check that all fields were included in the change set |
| Webhook not firing | Verify endpoint is correct and production domain is whitelisted in MCP |
✅ With deployment complete, your Linehaul integration is now live and syncing data automatically between MyCarrierPackets and Salesforce.
Troubleshooting
| Issue | Solution |
| INVALID_SESSION_ID error | Re-authenticate OAuth or refresh Named Credential |
| Carrier updates not syncing | Confirm webhook is enabled in MCP |
| Fields not mapping | Verify custom field API names in Flow/APEX |
.
Need Help?
📩 Contact the FTM integration team at [email protected] for assistance with configuration, deployment, or troubleshooting.