Turn Vehicle Visibility Into Transportation Workflows
Satrack provides real-time visibility into vehicles and fleet activity. FTM connects that information to dispatch operations, customer visibility, transportation workflows, and reporting inside Salesforce.
Location Data Is Only The Beginning
Vehicle visibility becomes significantly more valuable when it connects to transportation records, customer communication, and operational workflows.
A vehicle location shows where something is. FTM connects that position to the load it belongs to, the customer expecting it, the dispatcher managing it, and the operational record that tracks everything from booking through billing.
Location data is an input. Transportation intelligence is the outcome. FTM provides the connection between the two.
Built For Global Transportation Operations
FTM supports transportation operations across North America, South America, Europe, Africa, and Asia. Satrack helps organizations maintain vehicle visibility across fleets while FTM manages the transportation workflows surrounding those operations.
Geofencing And Operational Automation
Use Satrack location events to automate transportation workflows when vehicles arrive, depart, or enter predefined locations.
Vehicle location data becomes more valuable when it triggers operational actions. FTM helps transportation teams use vehicle location and geofence events to automate workflows, customer communication, and transportation operations.
Visibility Beyond Tracking
Transportation teams need more than vehicle location. They need the operational context that makes location data meaningful.
One Transportation Record
Vehicle location, driver activity, shipment status, customer updates, dispatch activity, reporting, and documentation can remain connected through the same transportation record inside Salesforce.
FTM runs natively on Salesforce. Not integrated with Salesforce. Not synced to Salesforce. Built inside the Salesforce data model, so every load record, carrier record, customer record, and fleet data point lives in the same environment your business already uses.
When Satrack location data enters FTM, it does not sit in isolation. It becomes part of the same load record used by dispatch, customer service, finance, and leadership. Existing Salesforce licenses are not required. Salesforce can be provisioned as part of the FTM implementation.
Vehicle visibility and transportation visibility become the same visibility.
From Vehicle Visibility To Billing
Vehicle location data does not have to stop at visibility. When connected to FTM, a delivery event can trigger document collection, AutoFill, and invoice generation in the same workflow.
Geofence events from Satrack mark when a vehicle arrives or departs a delivery location. That event can trigger document collection inside FTM, including proof of delivery and rate confirmation.
AutoFill reads those documents and populates the load record, customer charge, and carrier pay item automatically. The visibility event at the end of the trip becomes the billing action at the start of the invoice.
This connects transportation visibility directly to revenue generation, without manual data entry between the delivery and the invoice.
Explore AutoFillHow Satrack Data Flows Into FTM
A supporting visual for how Satrack tracking data connects to transportation workflows inside FTM.
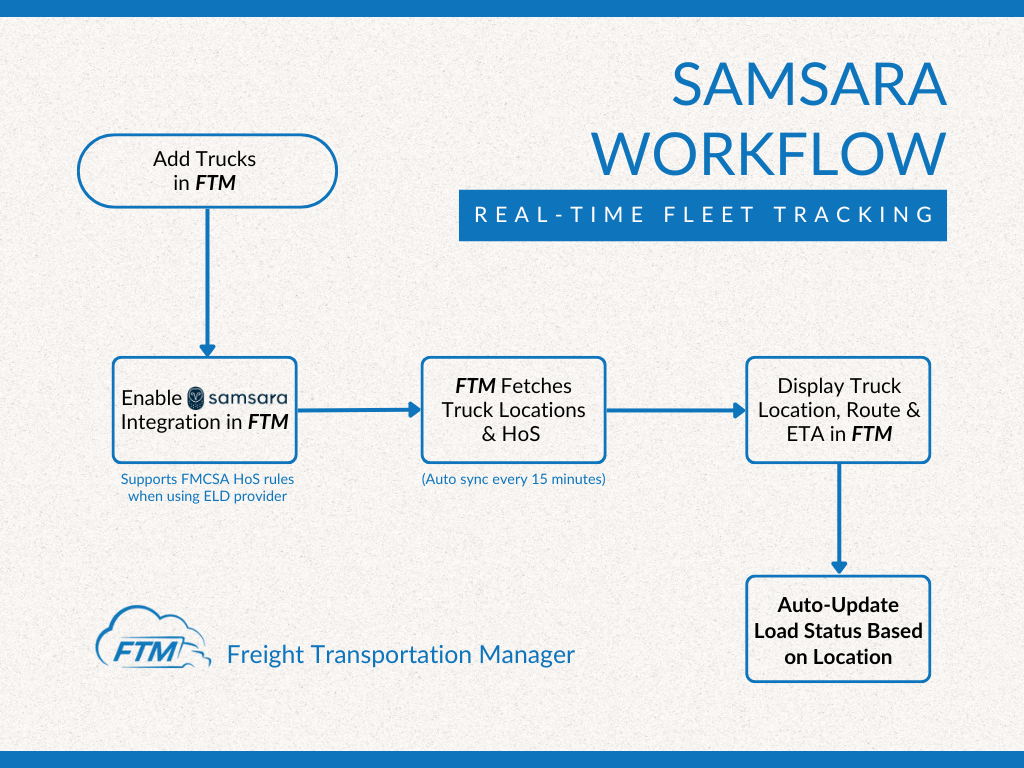
Example Satrack workflow inside FTM, connecting vehicle tracking data to transportation operations.
Visibility Beyond Telematics Access
Some carriers use external telematics systems that are not directly available to brokers or shippers. FTM can support additional driver location request workflows when direct visibility is unavailable.
Both paths return location data to the same Dispatch Console. The choice of method depends on which carriers are on which loads, not a fixed integration requirement.
Questions teams ask before connecting Satrack.
For questions specific to your fleet, a transportation specialist can walk through your use case.
Turn Vehicle Visibility Into Transportation Intelligence.
See how Satrack data can connect to dispatch operations, customer visibility, reporting, and transportation workflows inside FTM.