QuickBooks Integration
Easily sync your FTM invoices with QuickBooks Online to streamline your accounting workflows. Our QuickBooks integration allows you to push invoices directly from FTM into QuickBooks, update payment statuses, and maintain a seamless link between your financial records and transportation operations.
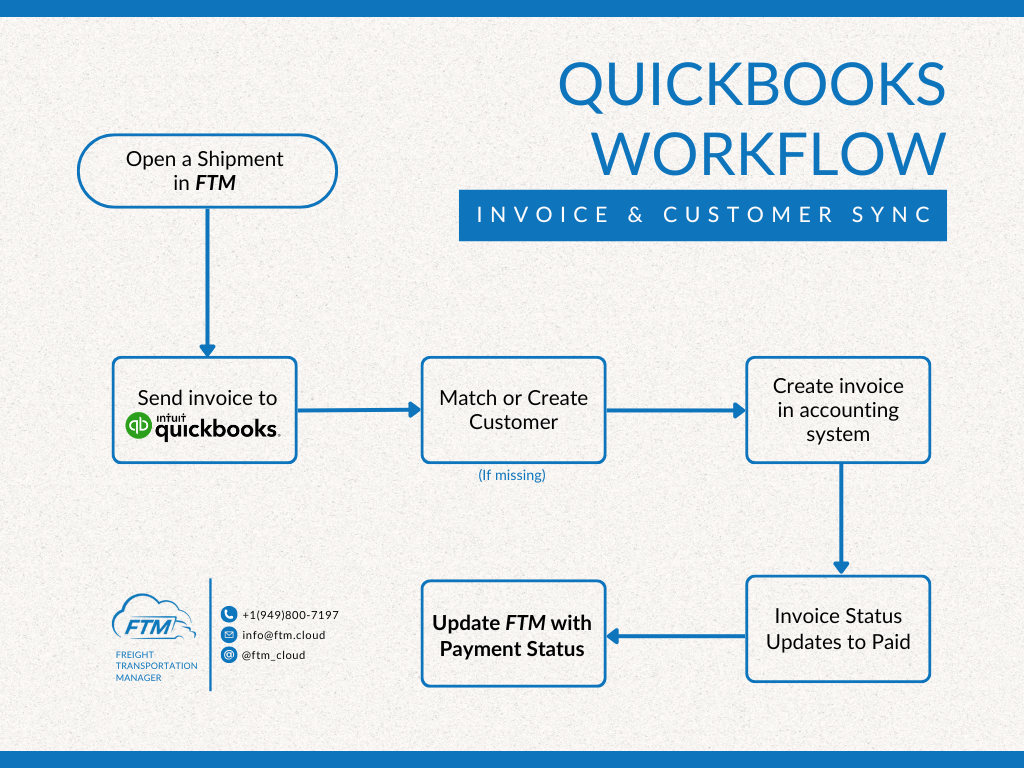
Benefits of the Integration
- Automatic syncing of invoices from FTM to QuickBooks
- Real-time balance updates every 15 minutes
- Payment status updates from QuickBooks to FTM
- Line item mapping, including additional charges and product-level breakdowns
- Customization for customer IDs, product codes, and payment terms
- Easy switching between sandbox and production environments
Prerequisites
Before you begin, make sure the following are completed:
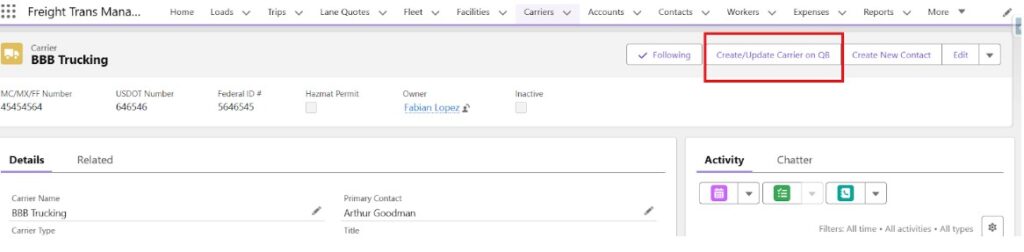
Create and update Account on QB:
This Visualforce page is the UI button screen that triggers your two Apex classes to sync an
Account → QuickBooks Customer
<apex:page standardcontroller="Account" extensions="QuickBooksAccountUpdate,QuickBooksAccountUpdate2" tabStyle="Account" lightningStylesheets="true">
<style>
.customerError { font-weight: bold; list-style: none; }
.invoiceError { color: red; font-weight: strong; }
.bkg-inv { background-color: #eee; }
.products tr { border: solid 1px #efefef; }
.container { padding: 0% 5%;}
.text { padding: 1%;}
</style>
<script>
function launchWindow()
{
// window.top.location.reload();
};
function redir() {
window.location = "/{!Ac.Id}";
}
</script>
<apex:pageMessages /><br />
<apex:form >
<apex:outputPanel id="allPanel">
<script>
window.onload=function()
{
doInit();
};
</script>
<div class="container">
<h2>Create/Update Customer on QuickBooks</h2>
<div class="bkg-inv">
<div class="text">
<table width="100%">
<tr>
<td>
<span style="text-align: left; vertical-align: top; font-size: 1.5em; font-weight: bold;">Customer: <apex:outputField value="{!Account.Name}"/></span><br /><!-- (Conf. #)-->
</td>
<td style="text-align: right; padding-right:5%;">
<span></span><br />
</td>
</tr>
</table>
<br /><br />
<table width="100%">
<tr>
<td width="30%">
<b>Billing Address:</b><br />
<apex:outputField value="{!Account.BillingStreet}"/><br />
<apex:outputPanel ><apex:outputText value="{!Account.BillingCity}"/>, <apex:outputText value=" {!Account.BillingState}"/> <apex:outputText value=" {!Account.BillingPostalCode}"/></apex:outputPanel><br />
<apex:outputField value="{!Account.BillingCountry}"/><br /><br />
</td>
<td width="30%" style="vertical-align: top;"><b>Email:</b><br /><apex:outputText value=" {!Account.Accounting_Email__c}"/></td>
<td width="30%" style="vertical-align: top;"><b>Phone:</b><br /><apex:outputText value=" {!Account.Accounting_Phone__c}"/></td>
</tr>
</table>
</div>
</div>
<br />
<apex:commandButton onComplete="redir();" value="Back" />
<apex:commandButton value="Create/Update Customer** OLD" action="{!send}" />
<apex:commandButton value="Create/Update Customer ON New QuickBooks" action="{!send2}" />
<br/> <br/> <br/> <br/>
</div>
</apex:outputPanel>
</apex:form>
</apex:page>
Visualforce controller-style Apex class:
public class QuickBooksAccountUpdate{
public string Termss;
public Account Ac {get; set;}
public id AcID {get; set;}
//public Account acct {get; set;}
//public Boolean cid {get; set;}
public string qbcustomerid;
public string msg;
public integer taxcodeid;
//public id loadid {get; set;} //for unit test
public List<Customer> clist;
public List<Customer> clist2;
public string cname;//for unit test
public string cnames;//for unit test
public string cnames2;//for unit test
public string cnames3;//for unit test
public string invbody3;//for unit test
public string invbody_x;//for unit test
//Apex classes from QB Customer Object
public class BillAddr {
public String Id;
public String Line1;
public String City;
public string Country;
public String CountrySubDivisionCode;
public String PostalCode;
//public String Lat;
//public String Long_Z; //in json: Long
}
public class CurrencyRef {
public String value;
public String name;
}
public class Cust { //this needs to be in a class for json deserialization to work
public QueryResponse QueryResponse;
public String time_x; //time is an apex reserved word, replaced it with time_x in the response string
}
public class PrimaryPhone {
public String FreeFormNumber;
}
public class Customer {
public Boolean Taxable;
public BillAddr BillAddr;
//public BillAddr ShipAddr;
public Boolean Job;
public Boolean BillWithParent;
public Double Balance;
public Double BalanceWithJobs;
public CurrencyRef CurrencyRef;
public String PreferredDeliveryMethod;
public String domain;
public Boolean sparse;
public String Id;
public String SyncToken;
public MetaData MetaData;
public String GivenName;
public String FamilyName;
public String FullyQualifiedName;
public String CompanyName;
public String DisplayName;
public String PrintOnCheckName;
public Boolean Active;
public PrimaryPhone PrimaryPhone;
//public PrimaryEmailAddr PrimaryEmailAddr;
}
public class MetaData {
public String CreateTime;
public String LastUpdatedTime;
}
public class QueryResponse {
public List<Customer> Customer;
public Integer startPosition;
public Integer maxResults;
}
//public class PrimaryEmailAddr {
//public String Address;
//}
//end QB Customer Object classes
//Apex classes from QB Invoice Object
public class BillAddr_i { //rename to avoid duplicate class
public String Id;
public String Line1;
public String Line2;
public String City;
public String Country;
public String CountrySubDivisionCode;
public String PostalCode;
public String Lat;
public String Long_Z; // in json: Long
}
public class CurrencyRef_i {
public String value;
public String name;
}
public class Invoice {
public Integer Deposit;
public Boolean AllowIPNPayment;
public Boolean AllowOnlinePayment;
public Boolean AllowOnlineCreditCardPayment;
public Boolean AllowOnlineACHPayment;
public String EInvoiceStatus;
public String ECloudStatusTimeStamp;
public String domain;
public Boolean sparse;
public String Id;
public String SyncToken;
public MetaData_i MetaData_i;
public List<CustomField> CustomField;
public String DocNumber;
public String TxnDate;
public CurrencyRef_i CurrencyRef_i;
//public Integer ExchangeRate;
public List<LinkedTxn> LinkedTxn;
public List<Line> Line;
//public TxnTaxDetail TxnTaxDetail; //
public CurrencyRef CustomerRef;
public TaxCodeRef CustomerMemo; //
public BillAddr_i BillAddr_i;
//public BillAddr ShipAddr;
public TaxCodeRef SalesTermRef; //
public String DueDate;
//public String GlobalTaxCalculation; //
public Double TotalAmt;
public Double HomeTotalAmt;
public Boolean ApplyTaxAfterDiscount; //USA
public String PrintStatus;
public String EmailStatus;
public BillEmail BillEmail;
public Double Balance; //use Double instead of Integer, otherwise errors with decimals
//public Double HomeBalance;
public DeliveryInfo DeliveryInfo;
public BillAddr_Z ShipAddr;
}
public class BillEmail {
public String Address;
}
public class DeliveryInfo {
public String DeliveryType;
public String DeliveryTime;
}
public class BillAddr_Z {
public String Id;
public String Line1;
public String Line2;
public String City;
public String CountrySubDivisionCode;
public String PostalCode;
}
public class SalesItemLineDetail {
public CurrencyRef ItemRef;
public Double UnitPrice; //use Double instead of Integer, otherwise errors with decimals
public Integer Qty; //
public CurrencyRef ItemAccountRef;
public TaxCodeRef TaxCodeRef; //
}
public class Line_Z {
public String Id;
public Integer LineNum;
public Double Amount; //use Double instead of Integer, otherwise errors with decimals
public String DetailType;
public SalesItemLineDetail SalesItemLineDetail;
public CustomField SubTotalLineDetail;
}
public class Line_Y {
public String Id;
public Integer LineNum;
public Double Amount; //use Double instead of Integer, otherwise errors with decimals
public String DetailType;
public SalesItemLineDetail SalesItemLineDetail;
public CustomField SubTotalLineDetail;
}
public class Line_X {
public String Id;
public Integer LineNum;
public Double Amount; //use Double instead of Integer, otherwise errors with decimals
public String DetailType;
public SalesItemLineDetail SalesItemLineDetail;
public CustomField SubTotalLineDetail;
}
public class Line_W {
public String Id;
public Integer LineNum;
public Double Amount; //use Double instead of Integer, otherwise errors with decimals
public String DetailType;
public SalesItemLineDetail SalesItemLineDetail;
public CustomField SubTotalLineDetail;
}
public class Inv {
public QueryResponse_i QueryResponse_i;
public String time_i;
}
/*public class TaxLine { /////
public Double Amount;
public String DetailType;
//public TaxLineDetail TaxLineDetail;
}*/
public class Line {
public String Id;
public Integer LineNum;
//public String Description;
public Double Amount; //use Double instead of Integer, otherwise errors with decimals
public String DetailType;
public SalesItemLineDetail SalesItemLineDetail;
public LinkedTxn SubTotalLineDetail;
}
public class TaxCodeRef { //
public String value;
}
public class MetaData_i {
public String CreateTime;
public String LastUpdatedTime;
}
/*public class TaxLineDetail {
public TaxCodeRef TaxRateRef;
public Boolean PercentBased;
public Double TaxPercent; //Changed from Integer to Double, otherwise errors with decimals
public Double NetAmountTaxable;
}*/
public class QueryResponse_i { //rename to avoid duplicate class
public List<Invoice> Invoice;
public Integer startPosition;
public Integer maxResults;
public Integer totalCount;
}
public class CustomField {
public String DefinitionId;
public String Type_Z; // in json: Type
public String Name;
public String StringValue;
}
//public class BillEmail {
//public String Address;
//}
public class LinkedTxn {
public String TxnId;
public String TxnType;
}
/*public class TxnTaxDetail {
public Double TotalTax;
public List<TaxLine> TaxLine;
}*/
//end QB Invoice Object classes
public QuickBooksAccountUpdate(ApexPages.StandardController stdController) {
AcID = ApexPages.currentPage().getParameters().get('id');
clist = new List<Customer>();
clist2 = new List<Customer>();
Ac = [select Id, Name,BillingState,BillingCity,BillingStreet,Phone,BillingPostalCode,BillingCountry,Accounting_Phone__c,Accounting_Email__c,LQB_QB_Id__c
from Account
where Id = :AcID];
system.debug('Account :'+Ac);
}
//create invoice in QB
public PageReference send() {
system.debug('Account :'+Ac);
//if customer fields are blank on Account, prompt error msg before creating new customer
if(Ac.Accounting_Phone__c != null && Ac.BillingStreet != null && Ac.BillingCity != null) {
HttpRequest reqcust = new HttpRequest();
//Prep customer name (spaces + 's) for query to work
string cnam = Ac.Name;
String cname = cnam.replace('&', '%26');
String cnames = cname.replace(' ', '%20');
String cnames2 = cnames.replace('\'s', '%5c%27s');
String cnames3 = cnames2.replace('é', '%C3%A9');
reqcust.setEndpoint('callout:QuickBooks/query?query=select%20%2a%20from%20Customer%20Where%20DisplayName%20%3d%20%27'+ cnames3 +'%27');
reqcust.setHeader('Accept','application/json');
reqcust.setMethod('GET');
reqcust.setTimeout(2000); // timeout in milliseconds
Http httpc = new Http();
HTTPResponse rescust = httpc.send(reqcust);
//System.debug(rescust.toString());
String custbody = rescust.getBody();
String custbody_x = custbody.replace('"time":', '"time_x":'); //time is an apex reserved word, replaced it with time_x
system.debug('EEE: ' + custbody_x);
//If no errors in query response, deserialize json string response and assign variables to values. Return QB Customer ID
if (rescust.getStatusCode() >= 200 && rescust.getStatusCode() < 300) {
QuickBooksAccountUpdate.Cust c = (QuickBooksAccountUpdate.Cust)JSON.deserialize(custbody_x, QuickBooksAccountUpdate.Cust.class);
system.debug('Will see: ' + c);
QueryResponse q = c.QueryResponse;
system.debug('Will see: ' + q);
List<Customer> clist = q.Customer;
system.debug('Will see: ' + clist);
//if Customer does not exist in QB, create new Customer in QB
if(clist == null) {
string CustomerEmailAdd;
if(Ac.Accounting_Email__c != null ) {
CustomerEmailAdd= Ac.Accounting_Email__c;
}else{
CustomerEmailAdd = '';
}
string BillingPostalCode;
if(Ac.BillingPostalCode != null ) {
BillingPostalCode= Ac.BillingPostalCode;
}else{
BillingPostalCode = '';
}
string BillingCountry;
if(Ac.BillingCountry != null ) {
BillingCountry= Ac.BillingCountry;
}else{
BillingCountry = '';
}
string BillingState;
if(Ac.BillingState != null ) {
BillingState= Ac.BillingState;
}else{
BillingState = '';
}
JSONGenerator genc = JSON.createGenerator(true);
genc.writeStartObject(); //{
genc.writeStringField('DisplayName', Ac.Name);
genc.writeFieldName('PrimaryEmailAddr');
genc.writeStartObject(); //{
genc.writeStringField('Address', CustomerEmailAdd);
genc.writeEndObject(); //}
genc.writeFieldName('PrimaryPhone');
genc.writeStartObject(); //{
genc.writeStringField('FreeFormNumber', Ac.Accounting_Phone__c);
genc.writeEndObject(); //}
genc.writeStringField('CompanyName', Ac.Name);
genc.writeFieldName('BillAddr');
genc.writeStartObject(); //{
genc.writeStringField('CountrySubDivisionCode', BillingState);
genc.writeStringField('City', Ac.BillingCity);
genc.writeStringField('PostalCode', BillingPostalCode);
genc.writeStringField('Line1', Ac.BillingStreet);
genc.writeStringField('Country', BillingCountry);
genc.writeEndObject(); //}
genc.writeEndObject(); //}
String qbnewc = genc.getAsString();
//Sending the http body with JSON
HttpRequest req = new HttpRequest();
req.setEndpoint('callout:QuickBooks/customer');
req.setHeader('Content-Type','application/json');
req.setMethod('POST');
req.setHeader('Cache-Control', 'no-cache');
req.setTimeout(2000); //timeout in milliseconds
req.setBody(qbnewc);
Http http = new Http();
HTTPResponse res = http.send(req);
System.debug('Response: ' + res);
//getQBCustomer();
if (res.getStatusCode() >= 200 && res.getStatusCode() < 300 && Ac.LQB_QB_Id__c == null || Ac.LQB_QB_Id__c == '') {
HttpRequest reqcust2 = new HttpRequest();
reqcust2.setEndpoint('callout:QuickBooks/query?query=select%20%2a%20from%20Customer%20Where%20DisplayName%20%3d%20%27'+ cnames2 +'%27');
reqcust2.setHeader('Accept','application/json');
reqcust2.setMethod('GET');
reqcust2.setTimeout(2000); // timeout in milliseconds
Http httpc2 = new Http();
HTTPResponse rescust2 = httpc2.send(reqcust2);
//System.debug(rescust.toString());
String custbody2 = rescust2.getBody();
String custbody2_x = custbody2.replace('"time":', '"time_x":'); //time is an apex reserved word, replaced it with time_x
system.debug('EEE: ' + custbody2_x);
//If no errors in query response, deserialize json string response and assign variables to values. Return QB Customer ID
if (rescust2.getStatusCode() >= 200 && rescust2.getStatusCode() < 300) {
QuickBooksAccountUpdate.Cust c2 = (QuickBooksAccountUpdate.Cust)JSON.deserialize(custbody2_x, QuickBooksAccountUpdate.Cust.class);
system.debug('Will see: ' + c2);
QueryResponse q2 = c2.QueryResponse;
system.debug('Will see: ' + q2);
List<Customer> clist2 = q2.Customer;
system.debug('Will see: ' + clist2);
if (!Test.isRunningTest()) {
for(Customer qbc : clist2) {
String SyncToken = qbc.SyncToken;
String CustomerID = qbc.Id;
qbcustomerid = qbc.Id;
updateAccountQBCustomerId(Ac.Id, qbcustomerid);
ApexPages.addMessage(new ApexPages.message(ApexPages.Severity.CONFIRM, 'Customer has been added to QB.'));
}
}
}
}
else {
ApexPages.addMessage(new ApexPages.message(ApexPages.Severity.error, 'There was an Error on Creating the Customer, Please contact the administrator.'));
}
}
else { //customer exists in QB
for(Customer qbc : clist) {
String SyncToken = qbc.SyncToken;
String CustomerID = qbc.Id;
system.debug('Customer val: ' + qbc.DisplayName);
//check if Customer exists in QB, if it does, grab Customer Id from QB
if(qbc.DisplayName == Ac.Name) {
string CustomerEmailAdd;
if(Ac.Accounting_Email__c != null ) {
CustomerEmailAdd= Ac.Accounting_Email__c;
}else{
CustomerEmailAdd = '';
}
string BillingPostalCode;
if(Ac.BillingPostalCode != null ) {
BillingPostalCode= Ac.BillingPostalCode;
}else{
BillingPostalCode = '';
}
string BillingCountry;
if(Ac.BillingCountry != null ) {
BillingCountry= Ac.BillingCountry;
}else{
BillingCountry = '';
}
string BillingState;
if(Ac.BillingState != null ) {
BillingState= Ac.BillingState;
}else{
BillingState = '';
}
String jsonString;
// Create a JSON generator
JSONGenerator genc = JSON.createGenerator(true);
// Start building the JSON object
genc.writeStartObject(); //{
genc.writeStringField('domain', 'QBO');
genc.writeFieldName('PrimaryEmailAddr');
genc.writeStartObject(); //{
genc.writeStringField('Address', CustomerEmailAdd);
genc.writeEndObject(); //}
genc.writeStringField('DisplayName', Ac.Name);
genc.writeStringField('FullyQualifiedName', Ac.Name);
genc.writeFieldName('PrimaryPhone');
genc.writeStartObject(); //{
genc.writeStringField('FreeFormNumber', Ac.Accounting_Phone__c);
genc.writeEndObject(); //}
genc.writeBooleanField('Active', true);
genc.writeFieldName('BillAddr');
genc.writeStartObject(); //{
genc.writeStringField('CountrySubDivisionCode', BillingState);
genc.writeStringField('City', Ac.BillingCity);
genc.writeStringField('PostalCode', BillingPostalCode);
genc.writeStringField('Line1', Ac.BillingStreet);
genc.writeStringField('Country', BillingCountry);
genc.writeEndObject(); //}
genc.writeStringField('SyncToken', SyncToken);
genc.writeStringField('CompanyName', Ac.Name);
genc.writeStringField('Id', CustomerID);
genc.writeEndObject(); //}
String qbnewc = genc.getAsString();
//Sending the http body with JSON
HttpRequest req = new HttpRequest();
req.setEndpoint('callout:QuickBooks/customer');
req.setHeader('Content-Type','application/json');
req.setMethod('POST');
req.setHeader('Cache-Control', 'no-cache');
req.setTimeout(2000); //timeout in milliseconds
req.setBody(qbnewc);
Http http = new Http();
HTTPResponse res = http.send(req);
System.debug('Response: ' + res);
if (res.getStatusCode() >= 200 && res.getStatusCode() < 300) {
qbcustomerid = qbc.Id;
updateAccountQBCustomerId(Ac.Id, qbCustomerId);
system.debug('great, but no page prompt: ' + qbc.Id);
ApexPages.addMessage(new ApexPages.message(ApexPages.Severity.CONFIRM, 'Customer has been Updated in QB.'));
// Update the Salesforce record here
} else {
ApexPages.addMessage(new ApexPages.message(ApexPages.Severity.error, 'There was an Error, Please contact the administrator.'));
}
//msg = 'Customer is in QB. Please refresh browser, and click button once more to create Invoice in QB.';
}
}
}
}//if query response error, prompt error msg
else {
ApexPages.addMessage(new ApexPages.message(ApexPages.Severity.error, 'There was a query issue in QB. Please contact your Administrator.'));
}
}//customer address/phone is not null
else {
ApexPages.addMessage(new ApexPages.message(ApexPages.Severity.error, 'Please make sure Customer\'s Phone and Billing Address is filled in under Accounting Information.'));
}
return null;
}
private static void updateAccountQBCustomerId(Id accountId, String qbCustomerId) {
if (qbcustomerid != null) {
Account accToUpdate = new Account(Id = accountId, QBCustomerID__c = qbCustomerId,LQB_QB_Error__c = 'Success');
update accToUpdate;
} else {
// Handle the case where qbcustomerid is null (optional)
System.debug('qbcustomerid is null. Update not performed.');
}
}
public String getName() {
return 'QuickBooksAccountUpdate';
}
}
========================================================================
Apex2:
public class QuickBooksAccountUpdate2{
public string Termss;
public Account Ac {get; set;}
public id AcID {get; set;}
//public Account acct {get; set;}
//public Boolean cid {get; set;}
public string qbcustomerid;
public string msg;
public integer taxcodeid;
//public id loadid {get; set;} //for unit test
public List<Customer> clist;
public List<Customer> clist2;
public string cname;//for unit test
public string cnames;//for unit test
public string cnames2;//for unit test
public string cnames3;//for unit test
public string invbody3;//for unit test
public string invbody_x;//for unit test
//Apex classes from QB Customer Object
public class BillAddr {
public String Id;
public String Line1;
public String City;
public string Country;
public String CountrySubDivisionCode;
public String PostalCode;
//public String Lat;
//public String Long_Z; //in json: Long
}
public class CurrencyRef {
public String value;
public String name;
}
public class Cust { //this needs to be in a class for json deserialization to work
public QueryResponse QueryResponse;
public String time_x; //time is an apex reserved word, replaced it with time_x in the response string
}
public class PrimaryPhone {
public String FreeFormNumber;
}
public class Customer {
public Boolean Taxable;
public BillAddr BillAddr;
//public BillAddr ShipAddr;
public Boolean Job;
public Boolean BillWithParent;
public Double Balance;
public Double BalanceWithJobs;
public CurrencyRef CurrencyRef;
public String PreferredDeliveryMethod;
public String domain;
public Boolean sparse;
public String Id;
public String SyncToken;
public MetaData MetaData;
public String GivenName;
public String FamilyName;
public String FullyQualifiedName;
public String CompanyName;
public String DisplayName;
public String PrintOnCheckName;
public Boolean Active;
public PrimaryPhone PrimaryPhone;
//public PrimaryEmailAddr PrimaryEmailAddr;
}
public class MetaData {
public String CreateTime;
public String LastUpdatedTime;
}
public class QueryResponse {
public List<Customer> Customer;
public Integer startPosition;
public Integer maxResults;
}
//public class PrimaryEmailAddr {
//public String Address;
//}
//end QB Customer Object classes
//Apex classes from QB Invoice Object
public class BillAddr_i { //rename to avoid duplicate class
public String Id;
public String Line1;
public String Line2;
public String City;
public String Country;
public String CountrySubDivisionCode;
public String PostalCode;
public String Lat;
public String Long_Z; // in json: Long
}
public class CurrencyRef_i {
public String value;
public String name;
}
public class Invoice {
public Integer Deposit;
public Boolean AllowIPNPayment;
public Boolean AllowOnlinePayment;
public Boolean AllowOnlineCreditCardPayment;
public Boolean AllowOnlineACHPayment;
public String EInvoiceStatus;
public String ECloudStatusTimeStamp;
public String domain;
public Boolean sparse;
public String Id;
public String SyncToken;
public MetaData_i MetaData_i;
public List<CustomField> CustomField;
public String DocNumber;
public String TxnDate;
public CurrencyRef_i CurrencyRef_i;
//public Integer ExchangeRate;
public List<LinkedTxn> LinkedTxn;
public List<Line> Line;
//public TxnTaxDetail TxnTaxDetail; //
public CurrencyRef CustomerRef;
public TaxCodeRef CustomerMemo; //
public BillAddr_i BillAddr_i;
//public BillAddr ShipAddr;
public TaxCodeRef SalesTermRef; //
public String DueDate;
//public String GlobalTaxCalculation; //
public Double TotalAmt;
public Double HomeTotalAmt;
public Boolean ApplyTaxAfterDiscount; //USA
public String PrintStatus;
public String EmailStatus;
public BillEmail BillEmail;
public Double Balance; //use Double instead of Integer, otherwise errors with decimals
//public Double HomeBalance;
public DeliveryInfo DeliveryInfo;
public BillAddr_Z ShipAddr;
}
public class BillEmail {
public String Address;
}
public class DeliveryInfo {
public String DeliveryType;
public String DeliveryTime;
}
public class BillAddr_Z {
public String Id;
public String Line1;
public String Line2;
public String City;
public String CountrySubDivisionCode;
public String PostalCode;
}
public class SalesItemLineDetail {
public CurrencyRef ItemRef;
public Double UnitPrice; //use Double instead of Integer, otherwise errors with decimals
public Integer Qty; //
public CurrencyRef ItemAccountRef;
public TaxCodeRef TaxCodeRef; //
}
public class Line_Z {
public String Id;
public Integer LineNum;
public Double Amount; //use Double instead of Integer, otherwise errors with decimals
public String DetailType;
public SalesItemLineDetail SalesItemLineDetail;
public CustomField SubTotalLineDetail;
}
public class Line_Y {
public String Id;
public Integer LineNum;
public Double Amount; //use Double instead of Integer, otherwise errors with decimals
public String DetailType;
public SalesItemLineDetail SalesItemLineDetail;
public CustomField SubTotalLineDetail;
}
public class Line_X {
public String Id;
public Integer LineNum;
public Double Amount; //use Double instead of Integer, otherwise errors with decimals
public String DetailType;
public SalesItemLineDetail SalesItemLineDetail;
public CustomField SubTotalLineDetail;
}
public class Line_W {
public String Id;
public Integer LineNum;
public Double Amount; //use Double instead of Integer, otherwise errors with decimals
public String DetailType;
public SalesItemLineDetail SalesItemLineDetail;
public CustomField SubTotalLineDetail;
}
public class Inv {
public QueryResponse_i QueryResponse_i;
public String time_i;
}
/*public class TaxLine { /////
public Double Amount;
public String DetailType;
//public TaxLineDetail TaxLineDetail;
}*/
public class Line {
public String Id;
public Integer LineNum;
//public String Description;
public Double Amount; //use Double instead of Integer, otherwise errors with decimals
public String DetailType;
public SalesItemLineDetail SalesItemLineDetail;
public LinkedTxn SubTotalLineDetail;
}
public class TaxCodeRef { //
public String value;
}
public class MetaData_i {
public String CreateTime;
public String LastUpdatedTime;
}
/*public class TaxLineDetail {
public TaxCodeRef TaxRateRef;
public Boolean PercentBased;
public Double TaxPercent; //Changed from Integer to Double, otherwise errors with decimals
public Double NetAmountTaxable;
}*/
public class QueryResponse_i { //rename to avoid duplicate class
public List<Invoice> Invoice;
public Integer startPosition;
public Integer maxResults;
public Integer totalCount;
}
public class CustomField {
public String DefinitionId;
public String Type_Z; // in json: Type
public String Name;
public String StringValue;
}
//public class BillEmail {
//public String Address;
//}
public class LinkedTxn {
public String TxnId;
public String TxnType;
}
/*public class TxnTaxDetail {
public Double TotalTax;
public List<TaxLine> TaxLine;
}*/
//end QB Invoice Object classes
public QuickBooksAccountUpdate2(ApexPages.StandardController stdController) {
AcID = ApexPages.currentPage().getParameters().get('id');
clist = new List<Customer>();
clist2 = new List<Customer>();
Ac = [select Id, Name,BillingState,BillingCity,BillingStreet,Phone,BillingPostalCode,BillingCountry,Accounting_Phone__c,Accounting_Email__c,LQB_QB_Id__c
from Account
where Id = :AcID];
system.debug('Account :'+Ac);
}
//create invoice in QB
public PageReference send2() {
system.debug('Account :'+Ac);
//if customer fields are blank on Account, prompt error msg before creating new customer
if(Ac.Accounting_Phone__c != null && Ac.BillingStreet != null && Ac.BillingCity != null) {
HttpRequest reqcust = new HttpRequest();
//Prep customer name (spaces + 's) for query to work
string cnam = Ac.Name;
String cname = cnam.replace('&', '%26');
String cnames = cname.replace(' ', '%20');
String cnames2 = cnames.replace('\'s', '%5c%27s');
String cnames3 = cnames2.replace('é', '%C3%A9');
reqcust.setEndpoint('callout:QuickBooks2/query?query=select%20%2a%20from%20Customer%20Where%20DisplayName%20%3d%20%27'+ cnames3 +'%27');
reqcust.setHeader('Accept','application/json');
reqcust.setMethod('GET');
reqcust.setTimeout(2000); // timeout in milliseconds
Http httpc = new Http();
HTTPResponse rescust = httpc.send(reqcust);
//System.debug(rescust.toString());
String custbody = rescust.getBody();
String custbody_x = custbody.replace('"time":', '"time_x":'); //time is an apex reserved word, replaced it with time_x
system.debug('EEE: ' + custbody_x);
//If no errors in query response, deserialize json string response and assign variables to values. Return QB Customer ID
if (rescust.getStatusCode() >= 200 && rescust.getStatusCode() < 300) {
QuickBooksAccountUpdate2.Cust c = (QuickBooksAccountUpdate2.Cust)JSON.deserialize(custbody_x, QuickBooksAccountUpdate2.Cust.class);
system.debug('Will see: ' + c);
QueryResponse q = c.QueryResponse;
system.debug('Will see: ' + q);
List<Customer> clist = q.Customer;
system.debug('Will see: ' + clist);
//if Customer does not exist in QB, create new Customer in QB
if(clist == null) {
string CustomerEmailAdd;
if(Ac.Accounting_Email__c != null ) {
CustomerEmailAdd= Ac.Accounting_Email__c;
}else{
CustomerEmailAdd = '';
}
string BillingPostalCode;
if(Ac.BillingPostalCode != null ) {
BillingPostalCode= Ac.BillingPostalCode;
}else{
BillingPostalCode = '';
}
string BillingCountry;
if(Ac.BillingCountry != null ) {
BillingCountry= Ac.BillingCountry;
}else{
BillingCountry = '';
}
string BillingState;
if(Ac.BillingState != null ) {
BillingState= Ac.BillingState;
}else{
BillingState = '';
}
JSONGenerator genc = JSON.createGenerator(true);
genc.writeStartObject(); //{
genc.writeStringField('DisplayName', Ac.Name);
genc.writeFieldName('PrimaryEmailAddr');
genc.writeStartObject(); //{
genc.writeStringField('Address', CustomerEmailAdd);
genc.writeEndObject(); //}
genc.writeFieldName('PrimaryPhone');
genc.writeStartObject(); //{
genc.writeStringField('FreeFormNumber', Ac.Accounting_Phone__c);
genc.writeEndObject(); //}
genc.writeStringField('CompanyName', Ac.Name);
genc.writeFieldName('BillAddr');
genc.writeStartObject(); //{
genc.writeStringField('CountrySubDivisionCode', BillingState);
genc.writeStringField('City', Ac.BillingCity);
genc.writeStringField('PostalCode', BillingPostalCode);
genc.writeStringField('Line1', Ac.BillingStreet);
genc.writeStringField('Country', BillingCountry);
genc.writeEndObject(); //}
genc.writeEndObject(); //}
String qbnewc = genc.getAsString();
//Sending the http body with JSON
HttpRequest req = new HttpRequest();
req.setEndpoint('callout:QuickBooks2/customer');
req.setHeader('Content-Type','application/json');
req.setMethod('POST');
req.setHeader('Cache-Control', 'no-cache');
req.setTimeout(2000); //timeout in milliseconds
req.setBody(qbnewc);
Http http = new Http();
HTTPResponse res = http.send(req);
System.debug('Response: ' + res);
//getQBCustomer();
if (res.getStatusCode() >= 200 && res.getStatusCode() < 300 && Ac.LQB_QB_Id__c == null || Ac.LQB_QB_Id__c == '') {
HttpRequest reqcust2 = new HttpRequest();
reqcust2.setEndpoint('callout:QuickBooks2/query?query=select%20%2a%20from%20Customer%20Where%20DisplayName%20%3d%20%27'+ cnames2 +'%27');
reqcust2.setHeader('Accept','application/json');
reqcust2.setMethod('GET');
reqcust2.setTimeout(2000); // timeout in milliseconds
Http httpc2 = new Http();
HTTPResponse rescust2 = httpc2.send(reqcust2);
//System.debug(rescust.toString());
String custbody2 = rescust2.getBody();
String custbody2_x = custbody2.replace('"time":', '"time_x":'); //time is an apex reserved word, replaced it with time_x
system.debug('EEE: ' + custbody2_x);
//If no errors in query response, deserialize json string response and assign variables to values. Return QB Customer ID
if (rescust2.getStatusCode() >= 200 && rescust2.getStatusCode() < 300) {
QuickBooksAccountUpdate2.Cust c2 = (QuickBooksAccountUpdate2.Cust)JSON.deserialize(custbody2_x, QuickBooksAccountUpdate2.Cust.class);
system.debug('Will see: ' + c2);
QueryResponse q2 = c2.QueryResponse;
system.debug('Will see: ' + q2);
List<Customer> clist2 = q2.Customer;
system.debug('Will see: ' + clist2);
if (!Test.isRunningTest()) {
for(Customer qbc : clist2) {
String SyncToken = qbc.SyncToken;
String CustomerID = qbc.Id;
qbcustomerid = qbc.Id;
updateAccountQBCustomerId(Ac.Id, qbcustomerid);
ApexPages.addMessage(new ApexPages.message(ApexPages.Severity.CONFIRM, 'Customer has been added to QB.'));
}
}
}
}
else {
ApexPages.addMessage(new ApexPages.message(ApexPages.Severity.error, 'There was an Error on Creating the Customer, Please contact the administrator.'));
}
}
else { //customer exists in QB
for(Customer qbc : clist) {
String SyncToken = qbc.SyncToken;
String CustomerID = qbc.Id;
system.debug('Customer val: ' + qbc.DisplayName);
//check if Customer exists in QB, if it does, grab Customer Id from QB
if(qbc.DisplayName == Ac.Name) {
string CustomerEmailAdd;
if(Ac.Accounting_Email__c != null ) {
CustomerEmailAdd= Ac.Accounting_Email__c;
}else{
CustomerEmailAdd = '';
}
string BillingPostalCode;
if(Ac.BillingPostalCode != null ) {
BillingPostalCode= Ac.BillingPostalCode;
}else{
BillingPostalCode = '';
}
string BillingCountry;
if(Ac.BillingCountry != null ) {
BillingCountry= Ac.BillingCountry;
}else{
BillingCountry = '';
}
string BillingState;
if(Ac.BillingState != null ) {
BillingState= Ac.BillingState;
}else{
BillingState = '';
}
String jsonString;
// Create a JSON generator
JSONGenerator genc = JSON.createGenerator(true);
// Start building the JSON object
genc.writeStartObject(); //{
genc.writeStringField('domain', 'QBO');
genc.writeFieldName('PrimaryEmailAddr');
genc.writeStartObject(); //{
genc.writeStringField('Address', CustomerEmailAdd);
genc.writeEndObject(); //}
genc.writeStringField('DisplayName', Ac.Name);
genc.writeStringField('FullyQualifiedName', Ac.Name);
genc.writeFieldName('PrimaryPhone');
genc.writeStartObject(); //{
genc.writeStringField('FreeFormNumber', Ac.Accounting_Phone__c);
genc.writeEndObject(); //}
genc.writeBooleanField('Active', true);
genc.writeFieldName('BillAddr');
genc.writeStartObject(); //{
genc.writeStringField('CountrySubDivisionCode', BillingState);
genc.writeStringField('City', Ac.BillingCity);
genc.writeStringField('PostalCode', BillingPostalCode);
genc.writeStringField('Line1', Ac.BillingStreet);
genc.writeStringField('Country', BillingCountry);
genc.writeEndObject(); //}
genc.writeStringField('SyncToken', SyncToken);
genc.writeStringField('CompanyName', Ac.Name);
genc.writeStringField('Id', CustomerID);
genc.writeEndObject(); //}
String qbnewc = genc.getAsString();
//Sending the http body with JSON
HttpRequest req = new HttpRequest();
req.setEndpoint('callout:QuickBooks2/customer');
req.setHeader('Content-Type','application/json');
req.setMethod('POST');
req.setHeader('Cache-Control', 'no-cache');
req.setTimeout(2000); //timeout in milliseconds
req.setBody(qbnewc);
Http http = new Http();
HTTPResponse res = http.send(req);
System.debug('Response: ' + res);
if (res.getStatusCode() >= 200 && res.getStatusCode() < 300) {
qbcustomerid = qbc.Id;
updateAccountQBCustomerId(Ac.Id, qbCustomerId);
system.debug('great, but no page prompt: ' + qbc.Id);
ApexPages.addMessage(new ApexPages.message(ApexPages.Severity.CONFIRM, 'Customer has been Updated in QB.'));
// Update the Salesforce record here
} else {
ApexPages.addMessage(new ApexPages.message(ApexPages.Severity.error, 'There was an Error, Please contact the administrator.'));
}
//msg = 'Customer is in QB. Please refresh browser, and click button once more to create Invoice in QB.';
}
}
}
}//if query response error, prompt error msg
else {
ApexPages.addMessage(new ApexPages.message(ApexPages.Severity.error, 'There was a query issue in QB. Please contact your Administrator.'));
}
}//customer address/phone is not null
else {
ApexPages.addMessage(new ApexPages.message(ApexPages.Severity.error, 'Please make sure Customer\'s Phone and Billing Address is filled in under Accounting Information.'));
}
return null;
}
private static void updateAccountQBCustomerId(Id accountId, String qbCustomerId) {
if (qbcustomerid != null) {
Account accToUpdate = new Account(Id = accountId, QBCustomerIDNEW__c = qbCustomerId,LQB_QB_Error__c = 'Success');
update accToUpdate;
} else {
// Handle the case where qbcustomerid is null (optional)
System.debug('qbcustomerid is null. Update not performed.');
}
}
public String getName() {
return 'QuickBooksAccountUpdate2';
}
}
“QuickBooksAccountUpdate2” is pointing to a different QuickBooks connection and saving the QB Id into a different Salesforce field:
public class QuickBooksAccountUpdate2{
public string Termss;
public Account Ac {get; set;}
public id AcID {get; set;}
//public Account acct {get; set;}
//public Boolean cid {get; set;}
public string qbcustomerid;
public string msg;
public integer taxcodeid;
//public id loadid {get; set;} //for unit test
public List<Customer> clist;
public List<Customer> clist2;
public string cname;//for unit test
public string cnames;//for unit test
public string cnames2;//for unit test
public string cnames3;//for unit test
public string invbody3;//for unit test
public string invbody_x;//for unit test
//Apex classes from QB Customer Object
public class BillAddr {
public String Id;
public String Line1;
public String City;
public string Country;
public String CountrySubDivisionCode;
public String PostalCode;
//public String Lat;
//public String Long_Z; //in json: Long
}
public class CurrencyRef {
public String value;
public String name;
}
public class Cust { //this needs to be in a class for json deserialization to work
public QueryResponse QueryResponse;
public String time_x; //time is an apex reserved word, replaced it with time_x in the response string
}
public class PrimaryPhone {
public String FreeFormNumber;
}
public class Customer {
public Boolean Taxable;
public BillAddr BillAddr;
//public BillAddr ShipAddr;
public Boolean Job;
public Boolean BillWithParent;
public Double Balance;
public Double BalanceWithJobs;
public CurrencyRef CurrencyRef;
public String PreferredDeliveryMethod;
public String domain;
public Boolean sparse;
public String Id;
public String SyncToken;
public MetaData MetaData;
public String GivenName;
public String FamilyName;
public String FullyQualifiedName;
public String CompanyName;
public String DisplayName;
public String PrintOnCheckName;
public Boolean Active;
public PrimaryPhone PrimaryPhone;
//public PrimaryEmailAddr PrimaryEmailAddr;
}
public class MetaData {
public String CreateTime;
public String LastUpdatedTime;
}
public class QueryResponse {
public List<Customer> Customer;
public Integer startPosition;
public Integer maxResults;
}
//public class PrimaryEmailAddr {
//public String Address;
//}
//end QB Customer Object classes
//Apex classes from QB Invoice Object
public class BillAddr_i { //rename to avoid duplicate class
public String Id;
public String Line1;
public String Line2;
public String City;
public String Country;
public String CountrySubDivisionCode;
public String PostalCode;
public String Lat;
public String Long_Z; // in json: Long
}
public class CurrencyRef_i {
public String value;
public String name;
}
public class Invoice {
public Integer Deposit;
public Boolean AllowIPNPayment;
public Boolean AllowOnlinePayment;
public Boolean AllowOnlineCreditCardPayment;
public Boolean AllowOnlineACHPayment;
public String EInvoiceStatus;
public String ECloudStatusTimeStamp;
public String domain;
public Boolean sparse;
public String Id;
public String SyncToken;
public MetaData_i MetaData_i;
public List<CustomField> CustomField;
public String DocNumber;
public String TxnDate;
public CurrencyRef_i CurrencyRef_i;
//public Integer ExchangeRate;
public List<LinkedTxn> LinkedTxn;
public List<Line> Line;
//public TxnTaxDetail TxnTaxDetail; //
public CurrencyRef CustomerRef;
public TaxCodeRef CustomerMemo; //
public BillAddr_i BillAddr_i;
//public BillAddr ShipAddr;
public TaxCodeRef SalesTermRef; //
public String DueDate;
//public String GlobalTaxCalculation; //
public Double TotalAmt;
public Double HomeTotalAmt;
public Boolean ApplyTaxAfterDiscount; //USA
public String PrintStatus;
public String EmailStatus;
public BillEmail BillEmail;
public Double Balance; //use Double instead of Integer, otherwise errors with decimals
//public Double HomeBalance;
public DeliveryInfo DeliveryInfo;
public BillAddr_Z ShipAddr;
}
public class BillEmail {
public String Address;
}
public class DeliveryInfo {
public String DeliveryType;
public String DeliveryTime;
}
public class BillAddr_Z {
public String Id;
public String Line1;
public String Line2;
public String City;
public String CountrySubDivisionCode;
public String PostalCode;
}
public class SalesItemLineDetail {
public CurrencyRef ItemRef;
public Double UnitPrice; //use Double instead of Integer, otherwise errors with decimals
public Integer Qty; //
public CurrencyRef ItemAccountRef;
public TaxCodeRef TaxCodeRef; //
}
public class Line_Z {
public String Id;
public Integer LineNum;
public Double Amount; //use Double instead of Integer, otherwise errors with decimals
public String DetailType;
public SalesItemLineDetail SalesItemLineDetail;
public CustomField SubTotalLineDetail;
}
public class Line_Y {
public String Id;
public Integer LineNum;
public Double Amount; //use Double instead of Integer, otherwise errors with decimals
public String DetailType;
public SalesItemLineDetail SalesItemLineDetail;
public CustomField SubTotalLineDetail;
}
public class Line_X {
public String Id;
public Integer LineNum;
public Double Amount; //use Double instead of Integer, otherwise errors with decimals
public String DetailType;
public SalesItemLineDetail SalesItemLineDetail;
public CustomField SubTotalLineDetail;
}
public class Line_W {
public String Id;
public Integer LineNum;
public Double Amount; //use Double instead of Integer, otherwise errors with decimals
public String DetailType;
public SalesItemLineDetail SalesItemLineDetail;
public CustomField SubTotalLineDetail;
}
public class Inv {
public QueryResponse_i QueryResponse_i;
public String time_i;
}
/*public class TaxLine { /////
public Double Amount;
public String DetailType;
//public TaxLineDetail TaxLineDetail;
}*/
public class Line {
public String Id;
public Integer LineNum;
//public String Description;
public Double Amount; //use Double instead of Integer, otherwise errors with decimals
public String DetailType;
public SalesItemLineDetail SalesItemLineDetail;
public LinkedTxn SubTotalLineDetail;
}
public class TaxCodeRef { //
public String value;
}
public class MetaData_i {
public String CreateTime;
public String LastUpdatedTime;
}
/*public class TaxLineDetail {
public TaxCodeRef TaxRateRef;
public Boolean PercentBased;
public Double TaxPercent; //Changed from Integer to Double, otherwise errors with decimals
public Double NetAmountTaxable;
}*/
public class QueryResponse_i { //rename to avoid duplicate class
public List<Invoice> Invoice;
public Integer startPosition;
public Integer maxResults;
public Integer totalCount;
}
public class CustomField {
public String DefinitionId;
public String Type_Z; // in json: Type
public String Name;
public String StringValue;
}
//public class BillEmail {
//public String Address;
//}
public class LinkedTxn {
public String TxnId;
public String TxnType;
}
/*public class TxnTaxDetail {
public Double TotalTax;
public List<TaxLine> TaxLine;
}*/
//end QB Invoice Object classes
public QuickBooksAccountUpdate2(ApexPages.StandardController stdController) {
AcID = ApexPages.currentPage().getParameters().get('id');
clist = new List<Customer>();
clist2 = new List<Customer>();
Ac = [select Id, Name,BillingState,BillingCity,BillingStreet,Phone,BillingPostalCode,BillingCountry,Accounting_Phone__c,Accounting_Email__c,LQB_QB_Id__c
from Account
where Id = :AcID];
system.debug('Account :'+Ac);
}
//create invoice in QB
public PageReference send2() {
system.debug('Account :'+Ac);
//if customer fields are blank on Account, prompt error msg before creating new customer
if(Ac.Accounting_Phone__c != null && Ac.BillingStreet != null && Ac.BillingCity != null) {
HttpRequest reqcust = new HttpRequest();
//Prep customer name (spaces + 's) for query to work
string cnam = Ac.Name;
String cname = cnam.replace('&', '%26');
String cnames = cname.replace(' ', '%20');
String cnames2 = cnames.replace('\'s', '%5c%27s');
String cnames3 = cnames2.replace('é', '%C3%A9');
reqcust.setEndpoint('callout:QuickBooks2/query?query=select%20%2a%20from%20Customer%20Where%20DisplayName%20%3d%20%27'+ cnames3 +'%27');
reqcust.setHeader('Accept','application/json');
reqcust.setMethod('GET');
reqcust.setTimeout(2000); // timeout in milliseconds
Http httpc = new Http();
HTTPResponse rescust = httpc.send(reqcust);
//System.debug(rescust.toString());
String custbody = rescust.getBody();
String custbody_x = custbody.replace('"time":', '"time_x":'); //time is an apex reserved word, replaced it with time_x
system.debug('EEE: ' + custbody_x);
//If no errors in query response, deserialize json string response and assign variables to values. Return QB Customer ID
if (rescust.getStatusCode() >= 200 && rescust.getStatusCode() < 300) {
QuickBooksAccountUpdate2.Cust c = (QuickBooksAccountUpdate2.Cust)JSON.deserialize(custbody_x, QuickBooksAccountUpdate2.Cust.class);
system.debug('Will see: ' + c);
QueryResponse q = c.QueryResponse;
system.debug('Will see: ' + q);
List<Customer> clist = q.Customer;
system.debug('Will see: ' + clist);
//if Customer does not exist in QB, create new Customer in QB
if(clist == null) {
string CustomerEmailAdd;
if(Ac.Accounting_Email__c != null ) {
CustomerEmailAdd= Ac.Accounting_Email__c;
}else{
CustomerEmailAdd = '';
}
string BillingPostalCode;
if(Ac.BillingPostalCode != null ) {
BillingPostalCode= Ac.BillingPostalCode;
}else{
BillingPostalCode = '';
}
string BillingCountry;
if(Ac.BillingCountry != null ) {
BillingCountry= Ac.BillingCountry;
}else{
BillingCountry = '';
}
string BillingState;
if(Ac.BillingState != null ) {
BillingState= Ac.BillingState;
}else{
BillingState = '';
}
JSONGenerator genc = JSON.createGenerator(true);
genc.writeStartObject(); //{
genc.writeStringField('DisplayName', Ac.Name);
genc.writeFieldName('PrimaryEmailAddr');
genc.writeStartObject(); //{
genc.writeStringField('Address', CustomerEmailAdd);
genc.writeEndObject(); //}
genc.writeFieldName('PrimaryPhone');
genc.writeStartObject(); //{
genc.writeStringField('FreeFormNumber', Ac.Accounting_Phone__c);
genc.writeEndObject(); //}
genc.writeStringField('CompanyName', Ac.Name);
genc.writeFieldName('BillAddr');
genc.writeStartObject(); //{
genc.writeStringField('CountrySubDivisionCode', BillingState);
genc.writeStringField('City', Ac.BillingCity);
genc.writeStringField('PostalCode', BillingPostalCode);
genc.writeStringField('Line1', Ac.BillingStreet);
genc.writeStringField('Country', BillingCountry);
genc.writeEndObject(); //}
genc.writeEndObject(); //}
String qbnewc = genc.getAsString();
//Sending the http body with JSON
HttpRequest req = new HttpRequest();
req.setEndpoint('callout:QuickBooks2/customer');
req.setHeader('Content-Type','application/json');
req.setMethod('POST');
req.setHeader('Cache-Control', 'no-cache');
req.setTimeout(2000); //timeout in milliseconds
req.setBody(qbnewc);
Http http = new Http();
HTTPResponse res = http.send(req);
System.debug('Response: ' + res);
//getQBCustomer();
if (res.getStatusCode() >= 200 && res.getStatusCode() < 300 && Ac.LQB_QB_Id__c == null || Ac.LQB_QB_Id__c == '') {
HttpRequest reqcust2 = new HttpRequest();
reqcust2.setEndpoint('callout:QuickBooks2/query?query=select%20%2a%20from%20Customer%20Where%20DisplayName%20%3d%20%27'+ cnames2 +'%27');
reqcust2.setHeader('Accept','application/json');
reqcust2.setMethod('GET');
reqcust2.setTimeout(2000); // timeout in milliseconds
Http httpc2 = new Http();
HTTPResponse rescust2 = httpc2.send(reqcust2);
//System.debug(rescust.toString());
String custbody2 = rescust2.getBody();
String custbody2_x = custbody2.replace('"time":', '"time_x":'); //time is an apex reserved word, replaced it with time_x
system.debug('EEE: ' + custbody2_x);
//If no errors in query response, deserialize json string response and assign variables to values. Return QB Customer ID
if (rescust2.getStatusCode() >= 200 && rescust2.getStatusCode() < 300) {
QuickBooksAccountUpdate2.Cust c2 = (QuickBooksAccountUpdate2.Cust)JSON.deserialize(custbody2_x, QuickBooksAccountUpdate2.Cust.class);
system.debug('Will see: ' + c2);
QueryResponse q2 = c2.QueryResponse;
system.debug('Will see: ' + q2);
List<Customer> clist2 = q2.Customer;
system.debug('Will see: ' + clist2);
if (!Test.isRunningTest()) {
for(Customer qbc : clist2) {
String SyncToken = qbc.SyncToken;
String CustomerID = qbc.Id;
qbcustomerid = qbc.Id;
updateAccountQBCustomerId(Ac.Id, qbcustomerid);
ApexPages.addMessage(new ApexPages.message(ApexPages.Severity.CONFIRM, 'Customer has been added to QB.'));
}
}
}
}
else {
ApexPages.addMessage(new ApexPages.message(ApexPages.Severity.error, 'There was an Error on Creating the Customer, Please contact the administrator.'));
}
}
else { //customer exists in QB
for(Customer qbc : clist) {
String SyncToken = qbc.SyncToken;
String CustomerID = qbc.Id;
system.debug('Customer val: ' + qbc.DisplayName);
//check if Customer exists in QB, if it does, grab Customer Id from QB
if(qbc.DisplayName == Ac.Name) {
string CustomerEmailAdd;
if(Ac.Accounting_Email__c != null ) {
CustomerEmailAdd= Ac.Accounting_Email__c;
}else{
CustomerEmailAdd = '';
}
string BillingPostalCode;
if(Ac.BillingPostalCode != null ) {
BillingPostalCode= Ac.BillingPostalCode;
}else{
BillingPostalCode = '';
}
string BillingCountry;
if(Ac.BillingCountry != null ) {
BillingCountry= Ac.BillingCountry;
}else{
BillingCountry = '';
}
string BillingState;
if(Ac.BillingState != null ) {
BillingState= Ac.BillingState;
}else{
BillingState = '';
}
String jsonString;
// Create a JSON generator
JSONGenerator genc = JSON.createGenerator(true);
// Start building the JSON object
genc.writeStartObject(); //{
genc.writeStringField('domain', 'QBO');
genc.writeFieldName('PrimaryEmailAddr');
genc.writeStartObject(); //{
genc.writeStringField('Address', CustomerEmailAdd);
genc.writeEndObject(); //}
genc.writeStringField('DisplayName', Ac.Name);
genc.writeStringField('FullyQualifiedName', Ac.Name);
genc.writeFieldName('PrimaryPhone');
genc.writeStartObject(); //{
genc.writeStringField('FreeFormNumber', Ac.Accounting_Phone__c);
genc.writeEndObject(); //}
genc.writeBooleanField('Active', true);
genc.writeFieldName('BillAddr');
genc.writeStartObject(); //{
genc.writeStringField('CountrySubDivisionCode', BillingState);
genc.writeStringField('City', Ac.BillingCity);
genc.writeStringField('PostalCode', BillingPostalCode);
genc.writeStringField('Line1', Ac.BillingStreet);
genc.writeStringField('Country', BillingCountry);
genc.writeEndObject(); //}
genc.writeStringField('SyncToken', SyncToken);
genc.writeStringField('CompanyName', Ac.Name);
genc.writeStringField('Id', CustomerID);
genc.writeEndObject(); //}
String qbnewc = genc.getAsString();
//Sending the http body with JSON
HttpRequest req = new HttpRequest();
req.setEndpoint('callout:QuickBooks2/customer');
req.setHeader('Content-Type','application/json');
req.setMethod('POST');
req.setHeader('Cache-Control', 'no-cache');
req.setTimeout(2000); //timeout in milliseconds
req.setBody(qbnewc);
Http http = new Http();
HTTPResponse res = http.send(req);
System.debug('Response: ' + res);
if (res.getStatusCode() >= 200 && res.getStatusCode() < 300) {
qbcustomerid = qbc.Id;
updateAccountQBCustomerId(Ac.Id, qbCustomerId);
system.debug('great, but no page prompt: ' + qbc.Id);
ApexPages.addMessage(new ApexPages.message(ApexPages.Severity.CONFIRM, 'Customer has been Updated in QB.'));
// Update the Salesforce record here
} else {
ApexPages.addMessage(new ApexPages.message(ApexPages.Severity.error, 'There was an Error, Please contact the administrator.'));
}
//msg = 'Customer is in QB. Please refresh browser, and click button once more to create Invoice in QB.';
}
}
}
}//if query response error, prompt error msg
else {
ApexPages.addMessage(new ApexPages.message(ApexPages.Severity.error, 'There was a query issue in QB. Please contact your Administrator.'));
}
}//customer address/phone is not null
else {
ApexPages.addMessage(new ApexPages.message(ApexPages.Severity.error, 'Please make sure Customer\'s Phone and Billing Address is filled in under Accounting Information.'));
}
return null;
}
private static void updateAccountQBCustomerId(Id accountId, String qbCustomerId) {
if (qbcustomerid != null) {
Account accToUpdate = new Account(Id = accountId, QBCustomerIDNEW__c = qbCustomerId,LQB_QB_Error__c = 'Success');
update accToUpdate;
} else {
// Handle the case where qbcustomerid is null (optional)
System.debug('qbcustomerid is null. Update not performed.');
}
}
public String getName() {
return 'QuickBooksAccountUpdate2';
}
}
- You have an active QuickBooks Online account.


- You have access to your QuickBooks Developer portal: https://developer.intuit.com
- Your Salesforce FTM environment is ready (production or sandbox).


- Each customer in your FTM system has a corresponding Customer QB ID (can be added manually).

Adding manually:

Step 1: Create or Access the QuickBooks App
2. Sign in and navigate to your Dashboard.
3. Under the Production Settings section on the left sidebar, click Keys & Credentials.


4. Complete all required fields, including the App Assessment Questionnaire.
Use your company website URL if needed for any required fields.

Important: If the App Assessment Questionnaire is not completed correctly, your app may be rejected by Intuit.
Step 2: Connect QuickBooks with FTM (Sandbox)
- Log in to your Salesforce sandbox environment.
- URL: https://test.salesforce.com
- Example credentials (replace with your own):
- Username: [email protected]
- Password: Exp2023*
- In the sandbox, click the QuickBooks button from the Invoice screen to send test data.
- Test multiple records to verify everything works properly before deploying to production.
- If any additional Line Items need to be sent, ensure each product has a valid Product ID from QuickBooks.


5. Once confirmed, refresh the Invoice page to ensure the QuickBooks ID has been attached.
Step 3: Connect QuickBooks with FTM (Production)
- Once testing is complete, set up your production connection:
- Log in to your QuickBooks Developer account.
- Navigate to Production Settings > Keys & Credentials.
- Retrieve your Client ID and Client Secret.
- Provide these credentials to the FTM team to enable production deployment.
- From your production Salesforce system, click the QuickBooks button on any Invoice to begin sending records.
Step 4: Customer Setup in FTM
Each Account in FTM must have a Customer QB ID to be pushed to QuickBooks.
- Navigate to the Accounts object in FTM.
- Locate the Customer QB ID field.
- Add the matching QuickBooks Customer ID manually, if not already populated.


Ensure that customer names in FTM exactly match those in QuickBooks to avoid syncing errors.
Step 5: Sending Invoices
When you’re ready to send invoices to QuickBooks:
- Open a Load record in FTM.
- Click the QuickBooks button to initiate the sync.
- The system will:
- Transfer the Rate as a Line Item.
- Include additional charges if Line Items and Product IDs are set.
- Apply Payment Terms (configured in the Customer Account).


4. Refresh the Invoice page after sending to confirm the record now includes the QuickBooks ID.

Create and update Carrier on QB:
This page is a QuickBooks Vendor sync tool for carriers, letting users click a button to create/update the carrier as a Vendor in either old or new QB connection, and store the QB Vendor ID back in Salesforce:
<apex:page standardcontroller="FreightTM__Carrier__c" extensions="QuickBooksCarrierCreatorUpdator,QuickBooksCarrierCreatorUpdater2" tabStyle="FreightTM__Carrier__c" lightningStylesheets="true">
<style>
.customerError { font-weight: bold; list-style: none; }
.invoiceError { color: red; font-weight: strong; }
.bkg-inv { background-color: #eee; }
.products tr { border: solid 1px #efefef; }
.container { padding: 0% 5%;}
.text { padding: 1%;}
</style>
<script>
function launchWindow()
{
// window.top.location.reload();
};
function redir() {
window.location = "/{!Ca.Id}";
}
</script>
<apex:pageMessages /><br />
<apex:form >
<apex:outputPanel id="allPanel">
<script>
window.onload=function()
{
doInit();
};
</script>
<div class="container">
<h2>Create/Update Carrier on QuickBooks</h2>
<div class="bkg-inv">
<div class="text">
<table width="100%">
<tr>
<td>
<span style="text-align: left; vertical-align: top; font-size: 1.5em; font-weight: bold;">Carrier: <apex:outputField value="{!FreightTM__Carrier__c.Name}"/></span><br /><!-- (Conf. #)-->
</td>
<td style="text-align: right; padding-right:5%;">
<span></span><br />
</td>
</tr>
</table>
<br /><br />
<table width="100%">
<tr>
<td width="30%">
<b>Billing Address:</b><br />
<apex:outputField value="{!FreightTM__Carrier__c.FreightTM__Billing_Address__c}"/><br />
<apex:outputPanel ><apex:outputText value="{!FreightTM__Carrier__c.FreightTM__Billing_City__c}"/>, <apex:outputText value=" {!FreightTM__Carrier__c.FreightTM__Billing_State_Province__c}"/> <apex:outputText value=" {!FreightTM__Carrier__c.FreightTM__Billing_Zip_Code__c}"/></apex:outputPanel><br />
<apex:outputField value="{!FreightTM__Carrier__c.FreightTM__Billing_Country__c}"/><br /><br />
</td>
<td width="30%" style="vertical-align: top;"><b>Email:</b><br /><apex:outputText value=" {!FreightTM__Carrier__c.FreightTM__Email__c}"/></td>
<td width="30%" style="vertical-align: top;"><b>Phone:</b><br /><apex:outputText value=" {!FreightTM__Carrier__c.FreightTM__Phone__c}"/></td>
<td width="30%" style="vertical-align: top;"><b>Terms:</b><br /><apex:outputText value=" {!FreightTM__Carrier__c.Payment_Terms__c}"/></td>
</tr>
</table>
</div>
</div>
<br />
<apex:commandButton onComplete="redir();" value="Back" />
<apex:commandButton value="Create/Update Carrier ** OLD **" action="{!send}" />
<apex:commandButton value="Create/Update Carrier ON New QuickBooks" action="{!send2}" />
<br/> <br/> <br/> <br/>
</div>
</apex:outputPanel>
</apex:form>
</apex:page>
This controller syncs an FTM carrier into QuickBooks as a Vendor (create if missing, update if exists), then stores the QB Vendor ID on the carrier record for future accounting workflows:
public class QuickBooksCarrierCreatorUpdator{
public string Termss;
public FreightTM__Carrier__c Ca {get; set;}
public id CaID {get; set;}
//public Account acct {get; set;}
//public Boolean cid {get; set;}
public string qbCarrierid;
public string msg;
public integer taxcodeid;
//public id loadid {get; set;} //for unit test
public List<Vendor> clist;
public List<Vendor> clist2;
public string cnam;//for unit test
public string cname;//for unit test
public string cnames;//for unit test
public string cnames2;//for unit test
public string invbody3;//for unit test
public string invbody_x;//for unit test
//Apex classes from QB Customer Object
public class BillAddr {
public String Id;
public String Line1;
public String City;
public string Country;
public String CountrySubDivisionCode;
public String PostalCode;
//public String Lat;
//public String Long_Z; //in json: Long
}
public class CurrencyRef {
public String value;
public String name;
}
public class Cust { //this needs to be in a class for json deserialization to work
public QueryResponse QueryResponse;
public String time_x; //time is an apex reserved word, replaced it with time_x in the response string
}
public class PrimaryPhone {
public String FreeFormNumber;
}
public class Customer {
public Boolean Taxable;
public BillAddr BillAddr;
//public BillAddr ShipAddr;
public Boolean Job;
public Boolean BillWithParent;
public Double Balance;
public Double BalanceWithJobs;
public CurrencyRef CurrencyRef;
public String PreferredDeliveryMethod;
public String domain;
public Boolean sparse;
public String Id;
public String SyncToken;
public MetaData MetaData;
public String GivenName;
public String FamilyName;
public String FullyQualifiedName;
public String CompanyName;
public String DisplayName;
public String PrintOnCheckName;
public Boolean Active;
public PrimaryPhone PrimaryPhone;
//public PrimaryEmailAddr PrimaryEmailAddr;
}
public class Vendor {
public Boolean Taxable;
public BillAddr BillAddr;
//public BillAddr ShipAddr;
public Boolean Job;
public Boolean BillWithParent;
public Double Balance;
public Double BalanceWithJobs;
public CurrencyRef CurrencyRef;
public String PreferredDeliveryMethod;
public String domain;
public Boolean sparse;
public String Id;
public String SyncToken;
public MetaData MetaData;
public String GivenName;
public String FamilyName;
public String FullyQualifiedName;
public String CompanyName;
public String DisplayName;
public String PrintOnCheckName;
public Boolean Active;
public PrimaryPhone PrimaryPhone;
//public PrimaryEmailAddr PrimaryEmailAddr;
}
public class MetaData {
public String CreateTime;
public String LastUpdatedTime;
}
public class QueryResponse {
public List<Vendor> Vendor;
public Integer startPosition;
public Integer maxResults;
}
//public class PrimaryEmailAddr {
//public String Address;
//}
//end QB Customer Object classes
//Apex classes from QB Invoice Object
public class BillAddr_i { //rename to avoid duplicate class
public String Id;
public String Line1;
public String Line2;
public String City;
public String Country;
public String CountrySubDivisionCode;
public String PostalCode;
public String Lat;
public String Long_Z; // in json: Long
}
public class CurrencyRef_i {
public String value;
public String name;
}
public class Invoice {
public Integer Deposit;
public Boolean AllowIPNPayment;
public Boolean AllowOnlinePayment;
public Boolean AllowOnlineCreditCardPayment;
public Boolean AllowOnlineACHPayment;
public String EInvoiceStatus;
public String ECloudStatusTimeStamp;
public String domain;
public Boolean sparse;
public String Id;
public String SyncToken;
public MetaData_i MetaData_i;
public List<CustomField> CustomField;
public String DocNumber;
public String TxnDate;
public CurrencyRef_i CurrencyRef_i;
//public Integer ExchangeRate;
public List<LinkedTxn> LinkedTxn;
public List<Line> Line;
//public TxnTaxDetail TxnTaxDetail; //
public CurrencyRef CustomerRef;
public TaxCodeRef CustomerMemo; //
public BillAddr_i BillAddr_i;
//public BillAddr ShipAddr;
public TaxCodeRef SalesTermRef; //
public String DueDate;
//public String GlobalTaxCalculation; //
public Double TotalAmt;
public Double HomeTotalAmt;
public Boolean ApplyTaxAfterDiscount; //USA
public String PrintStatus;
public String EmailStatus;
public BillEmail BillEmail;
public Double Balance; //use Double instead of Integer, otherwise errors with decimals
//public Double HomeBalance;
public DeliveryInfo DeliveryInfo;
public BillAddr_Z ShipAddr;
}
public class BillEmail {
public String Address;
}
public class DeliveryInfo {
public String DeliveryType;
public String DeliveryTime;
}
public class BillAddr_Z {
public String Id;
public String Line1;
public String Line2;
public String City;
public String CountrySubDivisionCode;
public String PostalCode;
}
public class SalesItemLineDetail {
public CurrencyRef ItemRef;
public Double UnitPrice; //use Double instead of Integer, otherwise errors with decimals
public Integer Qty; //
public CurrencyRef ItemAccountRef;
public TaxCodeRef TaxCodeRef; //
}
public class Line_Z {
public String Id;
public Integer LineNum;
public Double Amount; //use Double instead of Integer, otherwise errors with decimals
public String DetailType;
public SalesItemLineDetail SalesItemLineDetail;
public CustomField SubTotalLineDetail;
}
public class Line_Y {
public String Id;
public Integer LineNum;
public Double Amount; //use Double instead of Integer, otherwise errors with decimals
public String DetailType;
public SalesItemLineDetail SalesItemLineDetail;
public CustomField SubTotalLineDetail;
}
public class Line_X {
public String Id;
public Integer LineNum;
public Double Amount; //use Double instead of Integer, otherwise errors with decimals
public String DetailType;
public SalesItemLineDetail SalesItemLineDetail;
public CustomField SubTotalLineDetail;
}
public class Line_W {
public String Id;
public Integer LineNum;
public Double Amount; //use Double instead of Integer, otherwise errors with decimals
public String DetailType;
public SalesItemLineDetail SalesItemLineDetail;
public CustomField SubTotalLineDetail;
}
public class Inv {
public QueryResponse_i QueryResponse_i;
public String time_i;
}
/*public class TaxLine { /////
public Double Amount;
public String DetailType;
//public TaxLineDetail TaxLineDetail;
}*/
public class Line {
public String Id;
public Integer LineNum;
//public String Description;
public Double Amount; //use Double instead of Integer, otherwise errors with decimals
public String DetailType;
public SalesItemLineDetail SalesItemLineDetail;
public LinkedTxn SubTotalLineDetail;
}
public class TaxCodeRef { //
public String value;
}
public class MetaData_i {
public String CreateTime;
public String LastUpdatedTime;
}
/*public class TaxLineDetail {
public TaxCodeRef TaxRateRef;
public Boolean PercentBased;
public Double TaxPercent; //Changed from Integer to Double, otherwise errors with decimals
public Double NetAmountTaxable;
}*/
public class QueryResponse_i { //rename to avoid duplicate class
public List<Invoice> Invoice;
public Integer startPosition;
public Integer maxResults;
public Integer totalCount;
}
public class CustomField {
public String DefinitionId;
public String Type_Z; // in json: Type
public String Name;
public String StringValue;
}
//public class BillEmail {
//public String Address;
//}
public class LinkedTxn {
public String TxnId;
public String TxnType;
}
/*public class TxnTaxDetail {
public Double TotalTax;
public List<TaxLine> TaxLine;
}*/
//end QB Invoice Object classes
public QuickBooksCarrierCreatorUpdator(ApexPages.StandardController stdController) {
CaID = ApexPages.currentPage().getParameters().get('id');
clist = new List<Vendor>();
clist2 = new List<Vendor>();
Ca = [select Id, Name,ABA__c,About__c,Account__c,ACH__c,FreightTM__After_Hours_Phone__c,Bank__c,Bank_info_link__c,FreightTM__Billing_City__c,
FreightTM__Billing_Country__c,FreightTM__Billing_State_Province__c,FreightTM__Billing_Address__c,FreightTM__Billing_Zip_Code__c,
FreightTM__Cargo_Insurance_Amount__c,FreightTM__Cargo_Insurance_Expiration__c,Carrier_Package__c,Chassis__c,Chassis_Split__c,Check__c,
FreightTM__City__c,Contact__c, Contact_Email_1__c,Contact_Email_2__c,Contact_Name_1__c,Contact_Name_2__c,Contact_Phone_1__c,
Contact_Phone_2__c,FreightTM__Country__c,Delinquent_Carrier__c,Detention__c,Drayage__c,FreightTM__Email__c,Factor__c,Factor_NOA__c,Payment_Terms__c,Payment_Terms_QB_ID__c,
FreightTM__Fax__c,FreightTM__Federal_ID__c,FSC__c,FTL__c,FreightTM__Hazmat_Permit__c,Lane_Zones_from__c,Lane_Zones_To__c,
FreightTM__Liability_Insurance_Amount__c,FreightTM__MC_MX_FF_Number__c,FreightTM__Phone__c,FreightTM__Primary_Contact__c,LQB_QB_Company__c,LQB_QB_Id__c,LQB_QB_No__c,LQB_QB_Seq__c,LQB_QB_Error__c,
FreightTM__State_Province__c,State__c,FreightTM__Address__c,FreightTM__USDOT_Number__c,FreightTM__Zip_Code__c
from FreightTM__Carrier__c where Id = :CaID];
system.debug('Carrier :'+Ca);
}
//create invoice in QB
public PageReference send() {
system.debug('Carrier :'+Ca);
//if customer fields are blank on Account, prompt error msg before creating new customer
if(Ca.FreightTM__Phone__c != null && Ca.FreightTM__Billing_Address__c != null && Ca.FreightTM__Billing_Zip_Code__c != null) {
HttpRequest reqcust = new HttpRequest();
//Prep customer name (spaces + 's) for query to work
string cnam = Ca.Name;
String cname = cnam.replace('&', '%26');
String cnames = cname.replace(' ', '%20');
String cnames2 = cnames.replace('\'s', '%5c%27s');
reqcust.setEndpoint('callout:QuickBooks/query?query=select%20%2a%20from%20Vendor%20Where%20DisplayName%20%3d%20%27'+ cnames2 +'%27');
reqcust.setHeader('Accept','application/json');
reqcust.setMethod('GET');
reqcust.setTimeout(2000); // timeout in milliseconds
Http httpc = new Http();
HTTPResponse rescust = httpc.send(reqcust);
//System.debug(rescust.toString());
String custbody = rescust.getBody();
String custbody_x = custbody.replace('"time":', '"time_x":'); //time is an apex reserved word, replaced it with time_x
system.debug('EEE: ' + custbody_x);
//If no errors in query response, deserialize json string response and assign variables to values. Return QB Customer ID
if (rescust.getStatusCode() >= 200 && rescust.getStatusCode() < 300) {
QuickBooksCarrierCreatorUpdator.Cust c = (QuickBooksCarrierCreatorUpdator.Cust)JSON.deserialize(custbody_x, QuickBooksCarrierCreatorUpdator.Cust.class);
system.debug('Will see: ' + c);
QueryResponse q = c.QueryResponse;
system.debug('Will see: ' + q);
List<Vendor> clist = q.Vendor;
system.debug('Will see: ' + clist);
//if Customer does not exist in QB, create new Customer in QB
if(clist == null) {
string CarrierEmailAdd;
if(Ca.FreightTM__Email__c != null ) {
CarrierEmailAdd= Ca.FreightTM__Email__c;
}else{
CarrierEmailAdd = '';
}
string BillingPostalCode;
if(Ca.FreightTM__Billing_Zip_Code__c != null ) {
BillingPostalCode= Ca.FreightTM__Billing_Zip_Code__c;
}else{
BillingPostalCode = '';
}
string BillingCountry;
if(Ca.FreightTM__Billing_Country__c != null ) {
BillingCountry= Ca.FreightTM__Billing_Country__c;
}else{
BillingCountry = '';
}
string BillingState;
if(Ca.FreightTM__Billing_State_Province__c != null ) {
BillingState= Ca.FreightTM__Billing_State_Province__c;
}else{
BillingState = '';
}
String PaymentTermsID;
if(Ca.Payment_Terms_QB_ID__c != null) {
PaymentTermsID = Ca.Payment_Terms_QB_ID__c;
} else {
PaymentTermsID = '1'; // Default value if none of the conditions match
}
JSONGenerator genc = JSON.createGenerator(true);
genc.writeStartObject();
genc.writeStringField('DisplayName', Ca.Name);
genc.writeFieldName('PrimaryEmailAddr');
genc.writeStartObject();
genc.writeStringField('Address', CarrierEmailAdd);
genc.writeEndObject();
genc.writeFieldName('TermRef');
genc.writeStartObject();
genc.writeStringField('value', PaymentTermsID);
genc.writeEndObject();
genc.writeFieldName('PrimaryPhone');
genc.writeStartObject();
genc.writeStringField('FreeFormNumber', Ca.FreightTM__Phone__c);
genc.writeEndObject();
genc.writeFieldName('BillAddr');
genc.writeStartObject();
genc.writeStringField('Line1', Ca.FreightTM__Billing_Address__c);
genc.writeStringField('City', Ca.FreightTM__Billing_City__c);
genc.writeStringField('CountrySubDivisionCode', BillingState);
genc.writeStringField('PostalCode', BillingPostalCode);
genc.writeStringField('Country', BillingCountry);
genc.writeEndObject();
genc.writeEndObject();
String qbnewc = genc.getAsString();
//Sending the http body with JSON
HttpRequest req = new HttpRequest();
req.setEndpoint('callout:QuickBooks/vendor');
req.setHeader('Content-Type','application/json');
req.setMethod('POST');
req.setHeader('Cache-Control', 'no-cache');
req.setTimeout(2000); //timeout in milliseconds
req.setBody(qbnewc);
Http http = new Http();
HTTPResponse res = http.send(req);
System.debug('Response: ' + res);
//getQBCustomer();
if (res.getStatusCode() >= 200 && res.getStatusCode() < 300 && Ca.LQB_QB_Id__c == null || Ca.LQB_QB_Id__c == '') {
ApexPages.addMessage(new ApexPages.message(ApexPages.Severity.CONFIRM, 'Carrier has been added to QB.'));
HttpRequest reqcust2 = new HttpRequest();
reqcust2.setEndpoint('callout:QuickBooks/query?query=select%20%2a%20from%20Vendor%20Where%20DisplayName%20%3d%20%27'+ cnames2 +'%27');
reqcust2.setHeader('Accept','application/json');
reqcust2.setMethod('GET');
reqcust2.setTimeout(2000); // timeout in milliseconds
Http httpc2 = new Http();
HTTPResponse rescust2 = httpc2.send(reqcust2);
//System.debug(rescust.toString());
String custbody2 = rescust2.getBody();
String custbody2_x = custbody2.replace('"time":', '"time_x":'); //time is an apex reserved word, replaced it with time_x
system.debug('EEE: ' + custbody2_x);
//If no errors in query response, deserialize json string response and assign variables to values. Return QB Customer ID
if (rescust2.getStatusCode() >= 200 && rescust2.getStatusCode() < 300) {
QuickBooksCarrierCreatorUpdator.Cust c2 = (QuickBooksCarrierCreatorUpdator.Cust)JSON.deserialize(custbody2_x, QuickBooksCarrierCreatorUpdator.Cust.class);
system.debug('Will see: ' + c2);
QueryResponse q2 = c2.QueryResponse;
system.debug('Will see: ' + q2);
List<Vendor> clist2 = q2.Vendor;
system.debug('Will see: ' + clist2);
if (!Test.isRunningTest()) {
for(Vendor qbc : clist2) {
String SyncToken = qbc.SyncToken;
String CustomerID = qbc.Id;
qbCarrierid = qbc.Id;
updateCarrierQBCarrierId(Ca.Id, qbCarrierid);
system.debug('great, but no page prompt: ' + qbc.Id);
}
}
}
}else{
ApexPages.addMessage(new ApexPages.message(ApexPages.Severity.Error, 'There was a query issue and Updating the Carrier Record with QBID. Please contact your Administrator.'));
}
}
else { //customer exists in QB
for(Vendor qbc : clist) {
String SyncToken = qbc.SyncToken;
String CustomerID = qbc.Id;
system.debug('Customer val: ' + qbc.DisplayName);
system.debug('Customer val: ' + qbc.SyncToken);
system.debug('Customer val: ' + qbc.id);
//check if Customer exists in QB, if it does, grab Customer Id from QB
if(qbc.DisplayName == Ca.Name) {
string CarrierEmailAdd;
if(Ca.FreightTM__Email__c != null ) {
CarrierEmailAdd= Ca.FreightTM__Email__c;
}else{
CarrierEmailAdd = '';
}
string BillingPostalCode;
if(Ca.FreightTM__Billing_Zip_Code__c != null ) {
BillingPostalCode= Ca.FreightTM__Billing_Zip_Code__c;
}else{
BillingPostalCode = '';
}
string BillingCountry;
if(Ca.FreightTM__Billing_Country__c != null ) {
BillingCountry= Ca.FreightTM__Billing_Country__c;
}else{
BillingCountry = '';
}
string BillingState;
if(Ca.FreightTM__Billing_State_Province__c != null ) {
BillingState= Ca.FreightTM__Billing_State_Province__c;
}else{
BillingState = '';
}
String PaymentTermsID;
if(ca.Payment_Terms_QB_ID__c != null) {
PaymentTermsID = ca.Payment_Terms_QB_ID__c;
} else {
PaymentTermsID = '1'; // Default value if none of the conditions match
}
String jsonString;
// Create a JSON generator
JSONGenerator genc = JSON.createGenerator(true);
genc.writeStartObject(); //{
genc.writeStringField('domain', 'QBO');
genc.writeFieldName('PrimaryEmailAddr');
genc.writeStartObject(); //{
genc.writeStringField('Address', CarrierEmailAdd);
genc.writeEndObject(); //}
genc.writeFieldName('PrimaryPhone');
genc.writeStartObject(); //{
genc.writeStringField('FreeFormNumber', Ca.FreightTM__Phone__c);
genc.writeEndObject(); //}
genc.writeBooleanField('Active', true);
genc.writeFieldName('BillAddr');
genc.writeStartObject();
genc.writeStringField('Line1', Ca.FreightTM__Billing_Address__c);
genc.writeStringField('City', Ca.FreightTM__Billing_City__c);
genc.writeStringField('CountrySubDivisionCode', BillingState);
genc.writeStringField('PostalCode', BillingPostalCode);
genc.writeStringField('Country', BillingCountry);
genc.writeEndObject();
genc.writeFieldName('TermRef');
genc.writeStartObject();
genc.writeStringField('value', PaymentTermsID);
genc.writeEndObject();
genc.writeStringField('DisplayName', Ca.Name);
genc.writeStringField('SyncToken', SyncToken);
genc.writeStringField('Id', CustomerID);
genc.writeEndObject(); //}
String qbnewc = genc.getAsString();
//Sending the http body with JSON
HttpRequest req = new HttpRequest();
req.setEndpoint('callout:QuickBooks/vendor');
req.setHeader('Content-Type','application/json');
req.setMethod('POST');
req.setHeader('Cache-Control', 'no-cache');
req.setTimeout(2000); //timeout in milliseconds
req.setBody(qbnewc);
Http http = new Http();
HTTPResponse res = http.send(req);
System.debug('Response: ' + res);
if (res.getStatusCode() >= 200 && res.getStatusCode() < 300) {
qbCarrierid = qbc.Id;
updateCarrierQBCarrierId(Ca.Id, qbCarrierid);
system.debug('great: ' + qbc.Id);
ApexPages.addMessage(new ApexPages.message(ApexPages.Severity.CONFIRM, 'Carrier has been Updated in QB.'));
// Update the Salesforce record here
} else {
ApexPages.addMessage(new ApexPages.message(ApexPages.Severity.error, 'There was an Error on Updating the Carrier Record with The QBID, Please contact the administrator.'));
}
//msg = 'Customer is in QB. Please refresh browser, and click button once more to create Invoice in QB.';
}
}
}
}//if query response error, prompt error msg
else {
ApexPages.addMessage(new ApexPages.message(ApexPages.Severity.error, 'There was a query issue for getting the Carrier Info to update or create. Please contact your Administrator.'));
}
}//customer address/phone is not null
else {
ApexPages.addMessage(new ApexPages.message(ApexPages.Severity.error, 'Please make sure Carrier\'s Phone and Billing Address is filled in under Address Information.'));
}
return null;
}
private static void updateCarrierQBCarrierId(Id accountId, String qbCarrierid) {
if (qbCarrierid != null) {
FreightTM__Carrier__c CarrToUpdate = new FreightTM__Carrier__c(Id = accountId, LQB_QB_Id__c = qbCarrierid,LQB_QB_Error__c = 'Success');
update CarrToUpdate;
} else {
// Handle the case where qbcustomerid is null (optional)
System.debug('qbCarrierid is null. Update not performed.');
}
}
public String getName() {
return 'QuickBooksCarrierCreatorUpdator';
}
}
Creates/updates a QuickBooks Vendor for an FTM Carrier using the QuickBooks2 Named Credential, then stores the QB Vendor Id:
public class QuickBooksCarrierCreatorUpdater2{
public string Termss;
public FreightTM__Carrier__c Ca {get; set;}
public id CaID {get; set;}
//public Account acct {get; set;}
//public Boolean cid {get; set;}
public string qbCarrierid;
public string msg;
public integer taxcodeid;
//public id loadid {get; set;} //for unit test
public List<Vendor> clist;
public List<Vendor> clist2;
public string cnam;//for unit test
public string cname;//for unit test
public string cnames;//for unit test
public string cnames2;//for unit test
public string invbody3;//for unit test
public string invbody_x;//for unit test
//Apex classes from QB Customer Object
public class BillAddr {
public String Id;
public String Line1;
public String City;
public string Country;
public String CountrySubDivisionCode;
public String PostalCode;
//public String Lat;
//public String Long_Z; //in json: Long
}
public class CurrencyRef {
public String value;
public String name;
}
public class Cust { //this needs to be in a class for json deserialization to work
public QueryResponse QueryResponse;
public String time_x; //time is an apex reserved word, replaced it with time_x in the response string
}
public class PrimaryPhone {
public String FreeFormNumber;
}
public class Customer {
public Boolean Taxable;
public BillAddr BillAddr;
//public BillAddr ShipAddr;
public Boolean Job;
public Boolean BillWithParent;
public Double Balance;
public Double BalanceWithJobs;
public CurrencyRef CurrencyRef;
public String PreferredDeliveryMethod;
public String domain;
public Boolean sparse;
public String Id;
public String SyncToken;
public MetaData MetaData;
public String GivenName;
public String FamilyName;
public String FullyQualifiedName;
public String CompanyName;
public String DisplayName;
public String PrintOnCheckName;
public Boolean Active;
public PrimaryPhone PrimaryPhone;
//public PrimaryEmailAddr PrimaryEmailAddr;
}
public class Vendor {
public Boolean Taxable;
public BillAddr BillAddr;
//public BillAddr ShipAddr;
public Boolean Job;
public Boolean BillWithParent;
public Double Balance;
public Double BalanceWithJobs;
public CurrencyRef CurrencyRef;
public String PreferredDeliveryMethod;
public String domain;
public Boolean sparse;
public String Id;
public String SyncToken;
public MetaData MetaData;
public String GivenName;
public String FamilyName;
public String FullyQualifiedName;
public String CompanyName;
public String DisplayName;
public String PrintOnCheckName;
public Boolean Active;
public PrimaryPhone PrimaryPhone;
//public PrimaryEmailAddr PrimaryEmailAddr;
}
public class MetaData {
public String CreateTime;
public String LastUpdatedTime;
}
public class QueryResponse {
public List<Vendor> Vendor;
public Integer startPosition;
public Integer maxResults;
}
//public class PrimaryEmailAddr {
//public String Address;
//}
//end QB Customer Object classes
//Apex classes from QB Invoice Object
public class BillAddr_i { //rename to avoid duplicate class
public String Id;
public String Line1;
public String Line2;
public String City;
public String Country;
public String CountrySubDivisionCode;
public String PostalCode;
public String Lat;
public String Long_Z; // in json: Long
}
public class CurrencyRef_i {
public String value;
public String name;
}
public class Invoice {
public Integer Deposit;
public Boolean AllowIPNPayment;
public Boolean AllowOnlinePayment;
public Boolean AllowOnlineCreditCardPayment;
public Boolean AllowOnlineACHPayment;
public String EInvoiceStatus;
public String ECloudStatusTimeStamp;
public String domain;
public Boolean sparse;
public String Id;
public String SyncToken;
public MetaData_i MetaData_i;
public List<CustomField> CustomField;
public String DocNumber;
public String TxnDate;
public CurrencyRef_i CurrencyRef_i;
//public Integer ExchangeRate;
public List<LinkedTxn> LinkedTxn;
public List<Line> Line;
//public TxnTaxDetail TxnTaxDetail; //
public CurrencyRef CustomerRef;
public TaxCodeRef CustomerMemo; //
public BillAddr_i BillAddr_i;
//public BillAddr ShipAddr;
public TaxCodeRef SalesTermRef; //
public String DueDate;
//public String GlobalTaxCalculation; //
public Double TotalAmt;
public Double HomeTotalAmt;
public Boolean ApplyTaxAfterDiscount; //USA
public String PrintStatus;
public String EmailStatus;
public BillEmail BillEmail;
public Double Balance; //use Double instead of Integer, otherwise errors with decimals
//public Double HomeBalance;
public DeliveryInfo DeliveryInfo;
public BillAddr_Z ShipAddr;
}
public class BillEmail {
public String Address;
}
public class DeliveryInfo {
public String DeliveryType;
public String DeliveryTime;
}
public class BillAddr_Z {
public String Id;
public String Line1;
public String Line2;
public String City;
public String CountrySubDivisionCode;
public String PostalCode;
}
public class SalesItemLineDetail {
public CurrencyRef ItemRef;
public Double UnitPrice; //use Double instead of Integer, otherwise errors with decimals
public Integer Qty; //
public CurrencyRef ItemAccountRef;
public TaxCodeRef TaxCodeRef; //
}
public class Line_Z {
public String Id;
public Integer LineNum;
public Double Amount; //use Double instead of Integer, otherwise errors with decimals
public String DetailType;
public SalesItemLineDetail SalesItemLineDetail;
public CustomField SubTotalLineDetail;
}
public class Line_Y {
public String Id;
public Integer LineNum;
public Double Amount; //use Double instead of Integer, otherwise errors with decimals
public String DetailType;
public SalesItemLineDetail SalesItemLineDetail;
public CustomField SubTotalLineDetail;
}
public class Line_X {
public String Id;
public Integer LineNum;
public Double Amount; //use Double instead of Integer, otherwise errors with decimals
public String DetailType;
public SalesItemLineDetail SalesItemLineDetail;
public CustomField SubTotalLineDetail;
}
public class Line_W {
public String Id;
public Integer LineNum;
public Double Amount; //use Double instead of Integer, otherwise errors with decimals
public String DetailType;
public SalesItemLineDetail SalesItemLineDetail;
public CustomField SubTotalLineDetail;
}
public class Inv {
public QueryResponse_i QueryResponse_i;
public String time_i;
}
/*public class TaxLine { /////
public Double Amount;
public String DetailType;
//public TaxLineDetail TaxLineDetail;
}*/
public class Line {
public String Id;
public Integer LineNum;
//public String Description;
public Double Amount; //use Double instead of Integer, otherwise errors with decimals
public String DetailType;
public SalesItemLineDetail SalesItemLineDetail;
public LinkedTxn SubTotalLineDetail;
}
public class TaxCodeRef { //
public String value;
}
public class MetaData_i {
public String CreateTime;
public String LastUpdatedTime;
}
/*public class TaxLineDetail {
public TaxCodeRef TaxRateRef;
public Boolean PercentBased;
public Double TaxPercent; //Changed from Integer to Double, otherwise errors with decimals
public Double NetAmountTaxable;
}*/
public class QueryResponse_i { //rename to avoid duplicate class
public List<Invoice> Invoice;
public Integer startPosition;
public Integer maxResults;
public Integer totalCount;
}
public class CustomField {
public String DefinitionId;
public String Type_Z; // in json: Type
public String Name;
public String StringValue;
}
//public class BillEmail {
//public String Address;
//}
public class LinkedTxn {
public String TxnId;
public String TxnType;
}
/*public class TxnTaxDetail {
public Double TotalTax;
public List<TaxLine> TaxLine;
}*/
//end QB Invoice Object classes
public QuickBooksCarrierCreatorUpdater2(ApexPages.StandardController stdController) {
CaID = ApexPages.currentPage().getParameters().get('id');
clist = new List<Vendor>();
clist2 = new List<Vendor>();
Ca = [select Id, Name,ABA__c,About__c,Account__c,ACH__c,FreightTM__After_Hours_Phone__c,Bank__c,Bank_info_link__c,FreightTM__Billing_City__c,
FreightTM__Billing_Country__c,FreightTM__Billing_State_Province__c,FreightTM__Billing_Address__c,FreightTM__Billing_Zip_Code__c,
FreightTM__Cargo_Insurance_Amount__c,FreightTM__Cargo_Insurance_Expiration__c,Carrier_Package__c,Chassis__c,Chassis_Split__c,Check__c,
FreightTM__City__c,Contact__c, Contact_Email_1__c,Contact_Email_2__c,Contact_Name_1__c,Contact_Name_2__c,Contact_Phone_1__c,
Contact_Phone_2__c,FreightTM__Country__c,Delinquent_Carrier__c,Detention__c,Drayage__c,FreightTM__Email__c,Factor__c,Factor_NOA__c,Payment_Terms__c,Payment_Terms_QB_ID__c,
FreightTM__Fax__c,FreightTM__Federal_ID__c,FSC__c,FTL__c,FreightTM__Hazmat_Permit__c,Lane_Zones_from__c,Lane_Zones_To__c,
FreightTM__Liability_Insurance_Amount__c,FreightTM__MC_MX_FF_Number__c,FreightTM__Phone__c,FreightTM__Primary_Contact__c,LQB_QB_Company__c,LQB_QB_Id__c,LQB_QB_Id2__c,LQB_QB_No__c,LQB_QB_Seq__c,LQB_QB_Error__c,
FreightTM__State_Province__c,State__c,FreightTM__Address__c,FreightTM__USDOT_Number__c,FreightTM__Zip_Code__c
from FreightTM__Carrier__c where Id = :CaID];
system.debug('Carrier :'+Ca);
}
//create invoice in QB
public PageReference send2() {
system.debug('Carrier :'+Ca);
//if customer fields are blank on Account, prompt error msg before creating new customer
if(Ca.FreightTM__Phone__c != null && Ca.FreightTM__Billing_Address__c != null && Ca.FreightTM__Billing_Zip_Code__c != null) {
HttpRequest reqcust = new HttpRequest();
//Prep customer name (spaces + 's) for query to work
string cnam = Ca.Name;
String cname = cnam.replace('&', '%26');
String cnames = cname.replace(' ', '%20');
String cnames2 = cnames.replace('\'s', '%5c%27s');
reqcust.setEndpoint('callout:QuickBooks2/query?query=select%20%2a%20from%20Vendor%20Where%20DisplayName%20%3d%20%27'+ cnames2 +'%27');
reqcust.setHeader('Accept','application/json');
reqcust.setMethod('GET');
reqcust.setTimeout(2000); // timeout in milliseconds
Http httpc = new Http();
HTTPResponse rescust = httpc.send(reqcust);
//System.debug(rescust.toString());
String custbody = rescust.getBody();
String custbody_x = custbody.replace('"time":', '"time_x":'); //time is an apex reserved word, replaced it with time_x
system.debug('EEE: ' + custbody_x);
//If no errors in query response, deserialize json string response and assign variables to values. Return QB Customer ID
if (rescust.getStatusCode() >= 200 && rescust.getStatusCode() < 300) {
QuickBooksCarrierCreatorUpdater2.Cust c = (QuickBooksCarrierCreatorUpdater2.Cust)JSON.deserialize(custbody_x, QuickBooksCarrierCreatorUpdater2.Cust.class);
system.debug('Will see: ' + c);
QueryResponse q = c.QueryResponse;
system.debug('Will see: ' + q);
List<Vendor> clist = q.Vendor;
system.debug('Will see: ' + clist);
//if Customer does not exist in QB, create new Customer in QB
if(clist == null) {
string CarrierEmailAdd;
if(Ca.FreightTM__Email__c != null ) {
CarrierEmailAdd= Ca.FreightTM__Email__c;
}else{
CarrierEmailAdd = '';
}
string BillingPostalCode;
if(Ca.FreightTM__Billing_Zip_Code__c != null ) {
BillingPostalCode= Ca.FreightTM__Billing_Zip_Code__c;
}else{
BillingPostalCode = '';
}
string BillingCountry;
if(Ca.FreightTM__Billing_Country__c != null ) {
BillingCountry= Ca.FreightTM__Billing_Country__c;
}else{
BillingCountry = '';
}
string BillingState;
if(Ca.FreightTM__Billing_State_Province__c != null ) {
BillingState= Ca.FreightTM__Billing_State_Province__c;
}else{
BillingState = '';
}
String PaymentTermsID;
if(Ca.Payment_Terms_QB_ID__c != null) {
PaymentTermsID = Ca.Payment_Terms_QB_ID__c;
} else {
PaymentTermsID = '1'; // Default value if none of the conditions match
}
JSONGenerator genc = JSON.createGenerator(true);
genc.writeStartObject();
genc.writeStringField('DisplayName', Ca.Name);
genc.writeFieldName('PrimaryEmailAddr');
genc.writeStartObject();
genc.writeStringField('Address', CarrierEmailAdd);
genc.writeEndObject();
genc.writeFieldName('TermRef');
genc.writeStartObject();
genc.writeStringField('value', PaymentTermsID);
genc.writeEndObject();
genc.writeFieldName('PrimaryPhone');
genc.writeStartObject();
genc.writeStringField('FreeFormNumber', Ca.FreightTM__Phone__c);
genc.writeEndObject();
genc.writeFieldName('BillAddr');
genc.writeStartObject();
genc.writeStringField('Line1', Ca.FreightTM__Billing_Address__c);
genc.writeStringField('City', Ca.FreightTM__Billing_City__c);
genc.writeStringField('CountrySubDivisionCode', BillingState);
genc.writeStringField('PostalCode', BillingPostalCode);
genc.writeStringField('Country', BillingCountry);
genc.writeEndObject();
genc.writeEndObject();
String qbnewc = genc.getAsString();
//Sending the http body with JSON
HttpRequest req = new HttpRequest();
req.setEndpoint('callout:QuickBooks2/vendor');
req.setHeader('Content-Type','application/json');
req.setMethod('POST');
req.setHeader('Cache-Control', 'no-cache');
req.setTimeout(2000); //timeout in milliseconds
req.setBody(qbnewc);
Http http = new Http();
HTTPResponse res = http.send(req);
System.debug('Response: ' + res);
//getQBCustomer();
if (res.getStatusCode() >= 200 && res.getStatusCode() < 300 && Ca.LQB_QB_Id2__c == null || Ca.LQB_QB_Id2__c == '') {
ApexPages.addMessage(new ApexPages.message(ApexPages.Severity.CONFIRM, 'Carrier has been added to QB.'));
HttpRequest reqcust2 = new HttpRequest();
reqcust2.setEndpoint('callout:QuickBooks2/query?query=select%20%2a%20from%20Vendor%20Where%20DisplayName%20%3d%20%27'+ cnames2 +'%27');
reqcust2.setHeader('Accept','application/json');
reqcust2.setMethod('GET');
reqcust2.setTimeout(2000); // timeout in milliseconds
Http httpc2 = new Http();
HTTPResponse rescust2 = httpc2.send(reqcust2);
//System.debug(rescust.toString());
String custbody2 = rescust2.getBody();
String custbody2_x = custbody2.replace('"time":', '"time_x":'); //time is an apex reserved word, replaced it with time_x
system.debug('EEE: ' + custbody2_x);
//If no errors in query response, deserialize json string response and assign variables to values. Return QB Customer ID
if (rescust2.getStatusCode() >= 200 && rescust2.getStatusCode() < 300) {
QuickBooksCarrierCreatorUpdater2.Cust c2 = (QuickBooksCarrierCreatorUpdater2.Cust)JSON.deserialize(custbody2_x, QuickBooksCarrierCreatorUpdater2.Cust.class);
system.debug('Will see: ' + c2);
QueryResponse q2 = c2.QueryResponse;
system.debug('Will see: ' + q2);
List<Vendor> clist2 = q2.Vendor;
system.debug('Will see: ' + clist2);
if (!Test.isRunningTest()) {
for(Vendor qbc : clist2) {
String SyncToken = qbc.SyncToken;
String CustomerID = qbc.Id;
qbCarrierid = qbc.Id;
updateCarrierQBCarrierId(Ca.Id, qbCarrierid);
system.debug('great, but no page prompt: ' + qbc.Id);
}
}
}
}else{
ApexPages.addMessage(new ApexPages.message(ApexPages.Severity.Error, 'There was a query issue and Updating the Carrier Record with QBID. Please contact your Administrator.'));
}
}
else { //customer exists in QB
for(Vendor qbc : clist) {
String SyncToken = qbc.SyncToken;
String CustomerID = qbc.Id;
system.debug('Customer val: ' + qbc.DisplayName);
system.debug('Customer val: ' + qbc.SyncToken);
system.debug('Customer val: ' + qbc.id);
//check if Customer exists in QB, if it does, grab Customer Id from QB
if(qbc.DisplayName == Ca.Name) {
string CarrierEmailAdd;
if(Ca.FreightTM__Email__c != null ) {
CarrierEmailAdd= Ca.FreightTM__Email__c;
}else{
CarrierEmailAdd = '';
}
string BillingPostalCode;
if(Ca.FreightTM__Billing_Zip_Code__c != null ) {
BillingPostalCode= Ca.FreightTM__Billing_Zip_Code__c;
}else{
BillingPostalCode = '';
}
string BillingCountry;
if(Ca.FreightTM__Billing_Country__c != null ) {
BillingCountry= Ca.FreightTM__Billing_Country__c;
}else{
BillingCountry = '';
}
string BillingState;
if(Ca.FreightTM__Billing_State_Province__c != null ) {
BillingState= Ca.FreightTM__Billing_State_Province__c;
}else{
BillingState = '';
}
String PaymentTermsID;
if(ca.Payment_Terms_QB_ID__c != null) {
PaymentTermsID = ca.Payment_Terms_QB_ID__c;
} else {
PaymentTermsID = '1'; // Default value if none of the conditions match
}
String jsonString;
// Create a JSON generator
JSONGenerator genc = JSON.createGenerator(true);
genc.writeStartObject(); //{
genc.writeStringField('domain', 'QBO');
genc.writeFieldName('PrimaryEmailAddr');
genc.writeStartObject(); //{
genc.writeStringField('Address', CarrierEmailAdd);
genc.writeEndObject(); //}
genc.writeFieldName('PrimaryPhone');
genc.writeStartObject(); //{
genc.writeStringField('FreeFormNumber', Ca.FreightTM__Phone__c);
genc.writeEndObject(); //}
genc.writeBooleanField('Active', true);
genc.writeFieldName('BillAddr');
genc.writeStartObject();
genc.writeStringField('Line1', Ca.FreightTM__Billing_Address__c);
genc.writeStringField('City', Ca.FreightTM__Billing_City__c);
genc.writeStringField('CountrySubDivisionCode', BillingState);
genc.writeStringField('PostalCode', BillingPostalCode);
genc.writeStringField('Country', BillingCountry);
genc.writeEndObject();
genc.writeFieldName('TermRef');
genc.writeStartObject();
genc.writeStringField('value', PaymentTermsID);
genc.writeEndObject();
genc.writeStringField('DisplayName', Ca.Name);
genc.writeStringField('SyncToken', SyncToken);
genc.writeStringField('Id', CustomerID);
genc.writeEndObject(); //}
String qbnewc = genc.getAsString();
//Sending the http body with JSON
HttpRequest req = new HttpRequest();
req.setEndpoint('callout:QuickBooks2/vendor');
req.setHeader('Content-Type','application/json');
req.setMethod('POST');
req.setHeader('Cache-Control', 'no-cache');
req.setTimeout(2000); //timeout in milliseconds
req.setBody(qbnewc);
Http http = new Http();
HTTPResponse res = http.send(req);
System.debug('Response: ' + res);
if (res.getStatusCode() >= 200 && res.getStatusCode() < 300) {
qbCarrierid = qbc.Id;
updateCarrierQBCarrierId(Ca.Id, qbCarrierid);
system.debug('great: ' + qbc.Id);
ApexPages.addMessage(new ApexPages.message(ApexPages.Severity.CONFIRM, 'Carrier has been Updated in QB.'));
// Update the Salesforce record here
} else {
ApexPages.addMessage(new ApexPages.message(ApexPages.Severity.error, 'There was an Error on Updating the Carrier Record with The QBID, Please contact the administrator.'));
}
//msg = 'Customer is in QB. Please refresh browser, and click button once more to create Invoice in QB.';
}
}
}
}//if query response error, prompt error msg
else {
ApexPages.addMessage(new ApexPages.message(ApexPages.Severity.error, 'There was a query issue for getting the Carrier Info to update or create. Please contact your Administrator.'));
}
}//customer address/phone is not null
else {
ApexPages.addMessage(new ApexPages.message(ApexPages.Severity.error, 'Please make sure Carrier\'s Phone and Billing Address is filled in under Address Information.'));
}
return null;
}
private static void updateCarrierQBCarrierId(Id accountId, String qbCarrierid) {
if (qbCarrierid != null) {
FreightTM__Carrier__c CarrToUpdate = new FreightTM__Carrier__c(Id = accountId, LQB_QB_Id2__c = qbCarrierid,LQB_QB_Error__c = 'Success');
update CarrToUpdate;
} else {
// Handle the case where qbcustomerid is null (optional)
System.debug('qbCarrierid is null. Update not performed.');
}
}
public String getName() {
return 'QuickBooksCarrierCreatorUpdator2';
}
}
Create and update Carrier-Rate on QB:
Visualforce page:
<apex:page standardcontroller="Carrier_Rate__c" extensions="QuickBooksCarrierRate" tabStyle="Carrier_Rate__c" lightningStylesheets="true">
<style>
.customerError { font-weight: bold; list-style: none; }
.invoiceError { color: red; font-weight: strong; }
.bkg-inv { background-color: #eee; }
.products tr { border: solid 1px #efefef; }
.container { padding: 0% 5%;}
.text { padding: 1%;}
</style>
<script>
function launchWindow()
{
// window.top.location.reload();
};
function redir() {
window.location = "/{!Car.Id}";
}
</script>
<apex:pageMessages /><br />
<apex:form >
<apex:outputPanel id="allPanel">
<!--<apex:outputPanel rendered="{!NOT(cid)}">-->
<script>
window.onload=function()
{
doInit();
};
</script>
<apex:outputPanel rendered="{!car.Load_Id__r.New_QB__c == false }">
<table width="100%">
<tr>
<td align="Center" style="text-align: left; vertical-align: top; font-size: 1.5em; font-weight: bold;color: red;">
**************NEW QB CHECKBOX IS SET TO FALSE | THIS INVOICE WILL BE SENT TO OLD QB ACCOUNT**************
</td>
</tr>
</table>
</apex:outputPanel>
<div class="container">
<h2>Create/Update Carrier Rate/Bill to QuickBooks</h2>
<div class="bkg-inv">
<div class="text">
<table width="100%">
<tr>
<td>
<span style="text-align: left; vertical-align: top; font-size: 1.5em; font-weight: bold;">Bill Name: <apex:outputField value="{!Car.Load_Id_Name__c}"/></span><br /><!-- (Conf. #)-->
</td>
<td style="text-align: right; padding-right:5%;">
<span>BALANCE DUE</span><br />
<span style="font-size: 2em; font-weight: bold;"><apex:outputField value="{!Car.Rate__c}"/></span>
</td>
</tr>
</table>
<br /><br />
<b>Customer:</b><br />
<apex:outputField value="{!Car.Carrier__c}" />
<br /><br />
<table width="100%">
<tr>
<td width="30%">
<b>Billing Address:</b><br />
<apex:outputField value="{!Car.Carrier__r.FreightTM__Billing_Address__c}"/><br />
<apex:outputPanel ><apex:outputText value="{!Car.Carrier__r.FreightTM__Billing_City__c}"/>, <apex:outputText value=" {!Car.Carrier__r.FreightTM__Billing_State_Province__c}"/> <apex:outputText value=" {!Car.Carrier__r.FreightTM__Billing_Zip_Code__c}"/></apex:outputPanel><br />
<apex:outputField value="{!Car.Carrier__r.FreightTM__Billing_Country__c}"/><br /><br />
</td>
<td width="30%">
</td>
<td width="20%" style="vertical-align: top;"><b>Invoice Date:</b><br />{!MONTH(TODAY())}/{!DAY(TODAY())}/{!YEAR(TODAY())}</td>
<td width="20%" style="vertical-align: top;"><b>Terms:</b><br /><apex:outputField value="{!Car.Carrier__r.Payment_Terms__c}"/></td>
</tr>
</table>
<table width="100%">
<tr>
</tr>
</table>
</div>
</div>
<br /><br />
<table width="100%" class="products">
<tr>
<th width="25%"><h4>PRODUCT/SERVICE</h4></th>
<th width="35%"><h4>Type</h4></th>
<th width="10%"><h4>QTY</h4></th>
<th width="25%"><h4>AMOUNT</h4></th>
</tr>
<tr>
<td><apex:outputField value="{!Car.Product__r.name}"/></td>
<td><apex:outputField value="{!Car.Type__c}"/></td>
<td>1</td>
<td><apex:outputField value="{!Car.Rate__c}"/></td>
</tr>
</table>
<table width="100%">
<tr>
<td width="5%"> </td>
<td width="15%"> </td>
<td width="34%"> </td>
<td width="10%"> </td>
<td width="10%"> </td>
<td width="11%" style="text-align: left;"><h3>Total</h3></td>
<td width="15%" style="text-align: left;"><h3><apex:outputField value="{!Car.Rate__c}"/></h3></td>
</tr>
</table>
<br/>
<apex:commandButton onComplete="redir();" value="Back" />
<apex:commandButton value="Create/Update Carrier Rate/Bill" action="{!send}" />
<br/> <br/> <br/> <br/>
</div>
</apex:outputPanel>
</apex:form>
</apex:page>
creating or updating a QuickBooks “Bill” for a carrier pay item based on your record:
public class QuickBooksCarrierRate{
public string Termss;
public Carrier_Rate__c Car {get; set;}
public id CarId {get; set;}
public id loadId {get; set;}
public string qbcarrierid;
public string qbbillid;
public string msg;
public integer taxcodeid;
public List<Customer> clist;
public string cname;//for unit test
public string cnames;//for unit test
public string cnames2;//for unit test
public string invbody3;//for unit test
public string invbody_x;//for unit test
public date Billon;
public Bill bill { get; set; }
public String time_i { get; set; }
// ====== QBO helper types ======
public class MetaData_i { public String CreateTime { get; set; } public String LastUpdatedTime { get; set; } }
public class CurrencyRef_i { public String value { get; set; } public String name { get; set; } }
public class Line {
public String Id { get; set; }
public Integer LineNum { get; set; }
public String Description {get;set;}
public List<LinkedTxn> LinkedTxn {get;set;}
public Double Amount { get; set; }
public String DetailType { get; set; }
public ItemBasedExpenseLineDetail ItemBasedExpenseLineDetail { get; set; }
}
public class ItemBasedExpenseLineDetail {
public String BillableStatus { get; set; }
public ItemRef ItemRef { get; set; }
public Double UnitPrice { get; set; }
public Double Qty { get; set; }
public TaxCodeRef TaxCodeRef { get; set; }
}
public class ItemRef { public String value { get; set; } public String name { get; set; } }
public class TaxCodeRef { public String value { get; set; } }
public class VendorRef { public String value { get; set; } public String name { get; set; } }
public class APAccountRef { public String value { get; set; } public String name { get; set; } }
public class CurrencyRef { public String value; public String name; }
public class PrimaryPhone { public String FreeFormNumber; }
public class BillEmail { public String Address; }
public class DeliveryInfo { public String DeliveryType; public String DeliveryTime; }
public class SalesItemLineDetail {
public CurrencyRef ItemRef;
public Double UnitPrice;
public Double Qty;
public CurrencyRef ItemAccountRef;
public TaxCodeRef TaxCodeRef;
}
public class Inv {
public Bill Bill;
public QueryResponse_i QueryResponse_i;
public String time_i;
}
public class QueryResponse_i {
public List<Bill> Bill;
public Integer startPosition;
public Integer maxResults;
public Integer totalCount;
}
public class CustomField {
public String DefinitionId;
public String Type_Z; // in json: Type
public String Name;
public String StringValue;
}
public class LinkedTxn { public String TxnId; public String TxnType; }
public class Bill {
public String DueDate {get;set;}
public Double Balance {get;set;}
public String domain {get;set;}
public Boolean sparse {get;set;}
public String Id {get;set;}
public String SyncToken {get;set;}
public MetaData MetaData {get;set;}
public MetaData_i MetaData_i;
public String TxnDate {get;set;}
public List<CustomField> CustomField;
public CurrencyRef CurrencyRef {get;set;}
public List<Line> Line {get;set;}
public CurrencyRef VendorRef {get;set;}
public CurrencyRef APAccountRef {get;set;}
public Double TotalAmt {get;set;}
public String DocNumber;
}
public class Line_Y { public String Id; public Integer LineNum; public Double Amount; public String DetailType; public SalesItemLineDetail SalesItemLineDetail; public CustomField SubTotalLineDetail; }
public class Line_X { public String Id; public Integer LineNum; public Double Amount; public String DetailType; public SalesItemLineDetail SalesItemLineDetail; public CustomField SubTotalLineDetail; }
public class Line_W { public String Id; public Integer LineNum; public Double Amount; public String DetailType; public SalesItemLineDetail SalesItemLineDetail; public CustomField SubTotalLineDetail; }
public class AccountBasedExpenseLineDetail {
public CurrencyRef AccountRef {get;set;}
public String BillableStatus {get;set;}
public LastModifiedByRef TaxCodeRef {get;set;}
}
public class Cust { public QueryResponse QueryResponse {get;set;} public String time_x {get;set;} }
public class Line_Z { public String Id; public Integer LineNum; public Double Amount; public String DetailType; public SalesItemLineDetail SalesItemLineDetail; public CustomField SubTotalLineDetail; }
public class LastModifiedByRef { public String value {get;set;} }
public class MetaData { public String CreateTime {get;set;} public LastModifiedByRef LastModifiedByRef {get;set;} public String LastUpdatedTime {get;set;} }
public class QueryResponse { public List<Bill> Bill {get;set;} public Integer startPosition {get;set;} public Integer maxResults {get;set;} public Integer totalCount {get;set;} }
public QuickBooksCarrierRate(ApexPages.StandardController stdController) {
carId = ApexPages.currentPage().getParameters().get('id');
clist = new List<Customer>();
Car = [
select Id, Name, Accessorials__c,Balance_Due__c,Bill_Due__c,Bill_Due_2__c,Bill_Due_3__c,Bill_Reference__c,Billed_On__c,Billed_Status__c,
Carrier__c,Files__c,Credit_Limit_Net_days__c,Days_after_Bill_On__c,Extra_Charges__c,Fulfillment__c,Load_ID__c,Load_ID__r.NEW_QB__c,Load_Id_Name__c,NOA__c,
Overpayment__c,Partial_Payment__c,Payment_Date__c,Payment_Date_2__c,Payment_Method__c,Payment_Reference__c,Payment_Schedule__c,PRO__c,
PU__c,LQB_QB_Company__c,LQB_QB_Id__c,LQB_QB_No__c,LQB_QB_Seq__c,LQB_QB_Error__c,Rate__c,Remaining_Balance_Due__c,Type__c,Carrier__r.Payment_Terms__c,Carrier__r.Payment_Terms_QB_ID__c,
Carrier__r.LQB_QB_Id__c,Product__r.LQB_QB_Id__c,Carrier__r.LQB_QB_Id2__c,Product__r.LQB_QB_Id2__c,Product__r.name,Product__c,Carrier__r.FreightTM__Billing_Address__c,Carrier__r.FreightTM__Billing_City__c,
Carrier__r.FreightTM__Billing_State_Province__c,Carrier__r.FreightTM__Billing_Zip_Code__c,Carrier__r.FreightTM__Billing_Country__c,New_QuickBooks_ID__c
from Carrier_Rate__c
where id =: carId
];
}
// create/update Bill in QB
public PageReference send() {
try{
if(Car.Carrier__c == null || (Car.Carrier__r.LQB_QB_Id__c == null && Car.Load_ID__r.New_QB__c == false)) {
ApexPages.addMessage(new ApexPages.message(ApexPages.Severity.Error, 'Missing Old Carrier QB ID.'));
return null;
} else if(Car.Carrier__c == null || (Car.Carrier__r.LQB_QB_Id2__c == null && Car.Load_ID__r.New_QB__c == true)){
ApexPages.addMessage(new ApexPages.message(ApexPages.Severity.Error, 'Missing NEW Carrier QB ID. Please check the Assigned Carrier'));
return null;
} else {
string NEWQB ='';
string CarRateID ='';
if(Car.Load_ID__r.New_QB__c == True) {
NEWQB = 'QuickBooks2';
CarRateID = Car.New_QuickBooks_ID__c;
} else {
NEWQB = 'QuickBooks';
CarRateID = Car.LQB_QB_Id__c;
}
// ===================== CREATE =====================
if (String.isBlank(CarRateID)) {
datetime timenow = DateTime.now();
String formattedDateTime = timenow.format('yyyy-MM-dd');
String PaymentTermsID;
if(Car.Carrier__r.Payment_Terms_QB_ID__c != null) {
PaymentTermsID = Car.Carrier__r.Payment_Terms_QB_ID__c;
} else {
PaymentTermsID = '1';
}
JSONGenerator gen = JSON.createGenerator(true);
gen.writeStartObject(); // {
// ----------- CustomField: Bill Ref -----------
gen.writeFieldName('CustomField');
gen.writeStartArray();
gen.writeStartObject();
gen.writeStringField('DefinitionId', '1');
gen.writeStringField('Name', 'Bill Ref');
gen.writeStringField('Type', 'StringType');
gen.writeStringField('StringValue', (Car.Bill_Reference__c == null ? '' : Car.Bill_Reference__c));
gen.writeEndObject();
gen.writeEndArray();
// ----------- Line -----------
gen.writeFieldName('Line');
gen.writeStartArray();
String QBIDstring;
if(Car.Load_ID__r.New_QB__c == True ) {
QBIDstring = (Car.Product__c != null && Car.Product__r.LQB_QB_Id2__c != null) ? Car.Product__r.LQB_QB_Id2__c : '1';
} else {
QBIDstring = (Car.Product__c != null && Car.Product__r.LQB_QB_Id__c != null) ? Car.Product__r.LQB_QB_Id__c : '1';
}
gen.writeStartObject();
gen.writeNumberField('Amount', Car.Rate__c);
gen.writeStringField('DetailType', 'ItemBasedExpenseLineDetail');
gen.writeFieldName('ItemBasedExpenseLineDetail');
gen.writeStartObject();
gen.writeStringField('BillableStatus', 'NotBillable');
gen.writeFieldName('ItemRef');
gen.writeStartObject();
gen.writeStringField('value', QBIDstring);
gen.writeEndObject();
gen.writeNumberField('UnitPrice', Car.Rate__c);
gen.writeNumberField('Qty', 1);
gen.writeEndObject(); // ItemBasedExpenseLineDetail
gen.writeEndObject(); // Line[0]
gen.writeEndArray(); // Line
// ----------- Terms -----------
gen.writeFieldName('SalesTermRef');
gen.writeStartObject();
gen.writeStringField('value', PaymentTermsID);
gen.writeEndObject();
// ----------- VendorRef -----------
String CarrierID = (Car.Load_ID__r.New_QB__c == True) ? Car.Carrier__r.LQB_QB_Id2__c : Car.Carrier__r.LQB_QB_Id__c;
gen.writeFieldName('VendorRef');
gen.writeStartObject();
gen.writeStringField('value', CarrierID);
gen.writeEndObject();
// ----------- Header fields -----------
gen.writeStringField('DocNumber', Car.Load_Id_Name__c);
gen.writeStringField('TxnDate', formattedDateTime);
gen.writeEndObject(); // }
String jsonS = gen.getAsString();
System.debug(jsonS);
HttpRequest req = new HttpRequest();
req.setEndpoint('callout:'+NEWQB+'/bill');
req.setHeader('Content-Type','application/json');
req.setHeader('Accept', 'application/json');
req.setMethod('POST');
req.setTimeout(2000);
req.setbody(jsonS);
Http http = new Http();
HTTPResponse res = http.send(req);
System.debug(res);
String invbody = res.getBody();
system.debug(invbody);
String invbody2 = invbody.replace('"BillAddr":', '"BillAddr_i":');
String invbody3 = invbody2.replace('"Bill":', '"Bill":');
String invbody4 = invbody3.replace('"MetaData":', '"MetaData_i":');
String invbody5 = invbody4.replace('"CurrencyRef":', '"CurrencyRef_i":');
String invbody_x = invbody5.replace('"time":', '"time_i":');
system.debug('III: ' + invbody_x);
if (res.getStatusCode() >= 200 && res.getStatusCode() < 300) {
QuickBooksCarrierRate.Inv invt = (QuickBooksCarrierRate.Inv)JSON.deserialize(invbody_x, QuickBooksCarrierRate.Inv.class);
bill v = invt.bill;
if(v != null) {
qbBillid = v.ID;
Billon = Date.today();
if(Car.Load_ID__r.New_QB__c == True ) {
updateCarrierRate2(Car.Id,qbBillid,Billon);
} else {
updateCarrierRate(Car.Id,qbBillid,Billon);
}
ApexPages.addMessage(new ApexPages.message(ApexPages.Severity.Confirm, 'Carrier Rate has been created in QB.'));
}
} else {
ApexPages.addMessage(new ApexPages.message(ApexPages.Severity.ERROR, 'Carrier Rate could NOT be created in QB. Please contact your Administrator.'));
}
}
// ===================== UPDATE =====================
else {
JSONGenerator geni = JSON.createGenerator(true);
String invoicestr = geni.getAsString();
HttpRequest reqinv = new HttpRequest();
reqinv.setEndpoint('callout:'+NEWQB+'/query?query=select%20%2a%20from%20bill%20where%20Id%20%3d%20%27'+ CarRateID +'%27');
reqinv.setHeader('Accept','application/json');
reqinv.setMethod('GET');
reqinv.setTimeout(2000);
reqinv.setBody(invoicestr);
Http httpinv = new Http();
HTTPResponse resinv = httpinv.send(reqinv);
String invbody = resinv.getBody();
system.debug(invbody);
String invbody2 = invbody.replace('"BillAddr":', '"BillAddr_i":');
String invbody3 = invbody2.replace('"QueryResponse":', '"QueryResponse_i":');
String invbody4 = invbody3.replace('"MetaData":', '"MetaData_i":');
String invbody5 = invbody4.replace('"CurrencyRef":', '"CurrencyRef_i":');
String invbody_x = invbody5.replace('"time":', '"time_i":');
system.debug('III: ' + invbody_x);
if (resinv.getStatusCode() >= 200 && resinv.getStatusCode() < 300) {
QuickBooksCarrierRate.Inv invt = (QuickBooksCarrierRate.Inv)JSON.deserialize(invbody_x, QuickBooksCarrierRate.Inv.class);
QueryResponse_i v = invt.QueryResponse_i;
List<Bill> invlist = v.Bill;
if(invlist != null) {
for(Bill qbi : invlist) {
String synctoken = qbi.SyncToken;
String QBInvoiceID = qbi.ID;
String QBInvoiceDate = qbi.TxnDate;
String PaymentTermsID;
if(Car.Carrier__r.Payment_Terms_QB_ID__c != null) {
PaymentTermsID = Car.Carrier__r.Payment_Terms_QB_ID__c;
} else {
PaymentTermsID = '1';
}
JSONGenerator gen = JSON.createGenerator(true);
gen.writeStartObject();
// Header
gen.writeStringField('DocNumber', Car.Load_Id_Name__c);
gen.writeStringField('SyncToken', synctoken);
gen.writeStringField('domain', 'QBO');
gen.writeStringField('Id', QBInvoiceID);
// ----------- CustomField: Bill Ref (UPDATE) -----------
gen.writeFieldName('CustomField');
gen.writeStartArray();
gen.writeStartObject();
gen.writeStringField('DefinitionId', '1');
gen.writeStringField('Name', 'Bill Ref');
gen.writeStringField('Type', 'StringType');
gen.writeStringField('StringValue', (Car.Bill_Reference__c == null ? '' : Car.Bill_Reference__c));
gen.writeEndObject();
gen.writeEndArray();
// Terms
gen.writeFieldName('SalesTermRef');
gen.writeStartObject();
gen.writeStringField('value', PaymentTermsID);
gen.writeEndObject();
// VendorRef
String CarrierID = (Car.Load_ID__r.New_QB__c == True) ? Car.Carrier__r.LQB_QB_Id2__c : Car.Carrier__r.LQB_QB_Id__c;
gen.writeFieldName('VendorRef');
gen.writeStartObject();
gen.writeStringField('value', CarrierID);
gen.writeEndObject();
// Totals (optional)
gen.writeNumberField('TotalAmt', Car.Rate__c);
// Lines
gen.writeFieldName('Line');
gen.writeStartArray();
String QBIDstring;
if(Car.Load_ID__r.New_QB__c == True ) {
QBIDstring = (Car.Product__c != null && Car.Product__r.LQB_QB_Id2__c != null) ? Car.Product__r.LQB_QB_Id2__c : '1';
} else {
QBIDstring = (Car.Product__c != null && Car.Product__r.LQB_QB_Id__c != null) ? Car.Product__r.LQB_QB_Id__c : '1';
}
gen.writeStartObject();
gen.writeNumberField('Amount', Car.Rate__c);
gen.writeStringField('DetailType', 'ItemBasedExpenseLineDetail');
gen.writeFieldName('ItemBasedExpenseLineDetail');
gen.writeStartObject();
gen.writeStringField('BillableStatus', 'NotBillable');
gen.writeFieldName('ItemRef');
gen.writeStartObject();
gen.writeStringField('value', QBIDstring);
gen.writeEndObject();
gen.writeNumberField('UnitPrice', Car.Rate__c);
gen.writeNumberField('Qty', 1);
gen.writeEndObject(); // ItemBasedExpenseLineDetail
gen.writeEndObject(); // Line[0]
gen.writeEndArray(); // Line
gen.writeEndObject();
String jsonPayload = gen.getAsString();
System.debug(jsonPayload);
HttpRequest updateReq = new HttpRequest();
updateReq.setEndpoint('callout:'+NEWQB+'/bill');
updateReq.setHeader('Content-Type','application/json');
updateReq.setHeader('Accept', 'application/json');
updateReq.setMethod('POST');
updateReq.setBody(jsonPayload);
Http http = new Http();
HttpResponse updateRes = http.send(updateReq);
String invbodyt = updateRes.getBody();
system.debug(invbodyt);
if (updateRes.getStatusCode() >= 200 && updateRes.getStatusCode() < 300) {
qbBillid = QBInvoiceID;
Date dateValue = (QBInvoiceDate == null ? Date.today() : Date.valueOf(QBInvoiceDate));
Billon = dateValue;
if(Car.Load_ID__r.New_QB__c == True ) {
updateCarrierRate2(Car.Id,qbBillid,Billon);
} else {
updateCarrierRate(Car.Id,qbBillid,Billon);
}
ApexPages.addMessage(new ApexPages.message(ApexPages.Severity.CONFIRM, 'Carrier Rate/Bill has been Updated on QB.'));
} else {
ApexPages.addMessage(new ApexPages.message(ApexPages.Severity.ERROR, 'Carrier Rate/Bill could NOT be Updated in QB. Please contact your Administrator.'));
}
}
}
} else {
ApexPages.addMessage(new ApexPages.message(ApexPages.Severity.error, 'There was a query issue in QB for getting the Carrier Rate. Please contact your Administrator.'));
}
}
}
} catch(DmlException ex){
ApexPages.addMessages(ex);
}
return null;
}
public String getName() { return 'QuickBooksCarrierRate'; }
private static void updateCarrierRate(Id CarID,String qbBillid, date Billon) {
Carrier_Rate__c Loadrecupdate = new Carrier_Rate__c(Id = CarID,LQB_QB_Id__c =qbBillid,LQB_QB_Error__c = 'Success',Billed_On__c = Billon);
update Loadrecupdate;
}
private static void updateCarrierRate2(Id CarID,String qbBillid, date Billon) {
Carrier_Rate__c Loadrecupdate2 = new Carrier_Rate__c(Id = CarID,New_QuickBooks_ID__c =qbBillid,LQB_QB_Error__c = 'Success',Billed_On__c = Billon);
update Loadrecupdate2;
}
}
Create and update Invoice (Load) on QB:
Visualforce Page:
<apex:page standardcontroller="FreightTM__Load__c" extensions="InvoiceControllerUpdate" tabStyle="FreightTM__Load__c" lightningStylesheets="true">
<style>
.customerError { font-weight: bold; list-style: none; }
.invoiceError { color: red; font-weight: strong; }
.bkg-inv { background-color: #eee; }
.products tr { border: solid 1px #efefef; }
.container { padding: 0% 5%;}
.text { padding: 1%;}
</style>
<script>
function launchWindow()
{
// window.top.location.reload();
};
function redir() {
window.location = "/{!lo.Id}";
}
</script>
<apex:pageMessages /><br />
<apex:form >
<apex:outputPanel id="allPanel">
<!--<apex:outputPanel rendered="{!NOT(cid)}">-->
<script>
window.onload=function()
{
doInit();
};
</script>
<apex:outputPanel rendered="{!FreightTM__Load__c.New_QB__c == false}">
<table width="100%">
<tr>
<td align="Center" style="text-align: left; vertical-align: top; font-size: 1.5em; font-weight: bold;color: red;">
**************NEW QB CHECKBOX IS SET TO FALSE | THIS INVOICE WILL BE SENT TO OLD QB ACCOUNT**************
</td>
</tr>
</table>
</apex:outputPanel>
<div class="container">
<h2>Update Invoice on QuickBooks</h2>
<div class="bkg-inv">
<div class="text">
<table width="100%">
<tr>
<td>
<span style="text-align: left; vertical-align: top; font-size: 1.5em; font-weight: bold;">Invoice No: <apex:outputField value="{!lo.Name}"/></span><br /><!-- (Conf. #)-->
</td>
<td style="text-align: right; padding-right:5%;">
<span>BALANCE DUE</span><br />
<span style="font-size: 2em; font-weight: bold;"><apex:outputField value="{!lo.FreightTM__Total__c}"/></span>
</td>
</tr>
</table>
<br /><br />
<b>Customer:</b><br />
<apex:outputField value="{!lo.FreightTM__Customer__c}" />
<br /><br />
<table width="100%">
<tr>
<td width="30%">
<b>Billing Address:</b><br />
<apex:outputField value="{!lo.FreightTM__Customer__r.BillingStreet}"/><br />
<apex:outputPanel ><apex:outputText value="{!lo.FreightTM__Customer__r.BillingCity}"/>, <apex:outputText value=" {!lo.FreightTM__Customer__r.BillingState}"/> <apex:outputText value=" {!lo.FreightTM__Customer__r.BillingPostalCode}"/></apex:outputPanel><br />
<apex:outputField value="{!lo.FreightTM__Customer__r.BillingCountry}"/><br /><br />
</td>
<td width="30%">
<b>Shipping Address:</b><br />
<apex:outputText value="{!FreightTM__Load__c.FreightTM__DeliveryFacility__r.Name}" /><br />
<apex:outputField value="{!lo.FreightTM__DeliveryFacility__r.FreightTM__Street__c}"/><br />
<apex:outputPanel ><apex:outputText value="{!lo.FreightTM__DeliveryFacility__r.FreightTM__City__c}"/>, <apex:outputText value=" {!lo.FreightTM__DeliveryFacility__r.FreightTM__State__c}"/> <apex:outputText value=" {!lo.FreightTM__DeliveryFacility__r.FreightTM__Zip_Code__c}"/></apex:outputPanel><br />
<apex:outputField value="{!lo.FreightTM__DeliveryFacility__r.FreightTM__Country__c}"/><br /><br />
</td>
<td width="20%" style="vertical-align: top;"><b>Invoice Date:</b><br />{!MONTH(TODAY())}/{!DAY(TODAY())}/{!YEAR(TODAY())}</td>
<td width="20%" style="vertical-align: top;"><b>Terms:</b><br />
<apex:outputField value="{!lo.FreightTM__Customer__r.Payment_Terms__c}"/></td>
</tr>
</table>
<table width="100%">
<tr>
<td width="30%" style="vertical-align: top;"><b>SHIP DATE:</b> <br /><apex:outputText value="{0, date, MM'/'d'/'yyyy}"><apex:param value="{!lo.FreightTM__Delivery_Date__c}"/></apex:outputText></td>
<td width="40%" style="vertical-align: top;"><b>TRACKING NO.</b><br /><apex:outputField value="{!lo.FreightTM__Delivery_Remarks__c}"/></td><!-- Tracking_Number__c -->
</tr>
</table>
</div>
</div>
<br /><br />
<table width="100%" class="products">
<tr>
<th width="5%" style="padding-left: 1%;"><h4>#</h4></th>
<th width="15%"><h4>PRODUCT/SERVICE</h4></th>
<th width="35%"><h4>DESCRIPTION</h4></th>
<th width="5%"><h4>QTY</h4></th>
<th width="10%"><h4>RATE</h4></th>
<th width="25%"><h4>AMOUNT</h4></th>
<!--<th width="15%"><h4>SALES TAX</h4></th> -->
</tr>
<!-- <tr>
<td height="40" style="padding-left: 1%;">1</td>
<td>Rate</td>
<td><apex:outputPanel >Rate</apex:outputPanel></td>
<td>1</td>
<td><apex:outputField value="{!lo.FreightTM__Rate__c}"/></td>
<td><apex:outputField value="{!lo.FreightTM__Rate__c}"/></td>
</tr>-->
<apex:variable value="{!1}" var="rowNum"/>
<apex:repeat var="s" value="{!lo.FreightTM__Line_Items__r}">
<tr>
<td height="40" style="padding-left: 1%;"><apex:outputText value="{!FLOOR(rowNum)}"/><apex:variable var="rowNum" value="{!rowNum + 1}"/></td>
<td><apex:outputField value="{!s.Product__r.name}"/></td>
<td><apex:outputPanel ><apex:outputField value="{!lo.FreightTM__Container_Size__c}"/> -
<apex:outputField value="{!lo.FreightTM__PickupFacility__r.FreightTM__City__c}"/>, <apex:outputField value="{!lo.FreightTM__PickupFacility__r.FreightTM__State__c}"/>
to <apex:outputField value="{!lo.FreightTM__DeliveryFacility__r.FreightTM__City__c}"/>, <apex:outputField value="{!lo.FreightTM__DeliveryFacility__r.FreightTM__State__c}"/>
</apex:outputPanel></td>
<td><apex:outputField value="{!s.FreightTM__Number_of_Units__c}"/></td>
<td><apex:outputField value="{!s.FreightTM__Unit_Price__c}"/></td>
<td><apex:outputField value="{!s.FreightTM__Amount__c}"/></td>
</tr>
</apex:repeat>
</table>
<table width="100%">
<tr>
<td width="5%"> </td>
<td width="15%"> </td>
<td width="34%"> </td>
<td width="10%"> </td>
<td width="10%"> </td>
<td width="11%" style="text-align: left;"><h3>Total</h3></td>
<td width="15%" style="text-align: left;"><h3><apex:outputField value="{!lo.FreightTM__Total__c}"/></h3></td>
</tr>
</table>
<br/>
<apex:commandButton onComplete="redir();" value="Back" />
<apex:commandButton value="Update Invoice" action="{!send}" />
<br/> <br/> <br/> <br/>
</div>
</apex:outputPanel>
</apex:form>
</apex:page>
This controller is your customer billing integration:
Load line items → QuickBooks Invoice lines, stored back on the Load, with support for two QB companies (QuickBooks vs QuickBooks2):
public class InvoiceControllerUpdate{
public string Termss;
public FreightTM__Load__c lo {get; set;}
public id loadId {get; set;}
public string qbcustomerid;
public string qbInvoiceid;
public string msg;
public integer taxcodeid;
public List<Customer> clist;
public string cname;//for unit test
public string cnames;//for unit test
public string cnames2;//for unit test
public string invbody3;//for unit test
public string invbody_x;//for unit test
//Apex classes from QB Customer Object
public class BillAddr {
public String Id;
public String Line1;
public String City;
public string Country;
public String CountrySubDivisionCode;
public String PostalCode;
}
public class CurrencyRef {
public String value;
public String name;
}
public class Cust { //this needs to be in a class for json deserialization to work
public QueryResponse QueryResponse;
public String time_x; //time is an apex reserved word, replaced it with time_x in the response string
}
public class PrimaryPhone {
public String FreeFormNumber;
}
public class Customer {
public Boolean Taxable;
public BillAddr BillAddr;
public Boolean Job;
public Boolean BillWithParent;
public Double Balance;
public Double BalanceWithJobs;
public CurrencyRef CurrencyRef;
public String PreferredDeliveryMethod;
public String domain;
public Boolean sparse;
public String Id;
public String SyncToken;
public MetaData MetaData;
public String GivenName;
public String FamilyName;
public String FullyQualifiedName;
public String CompanyName;
public String DisplayName;
public String PrintOnCheckName;
public Boolean Active;
public PrimaryPhone PrimaryPhone;
}
public class MetaData {
public String CreateTime;
public String LastUpdatedTime;
}
public class QueryResponse {
public List<Customer> Customer;
public Integer startPosition;
public Integer maxResults;
}
//Apex classes from QB Invoice Object
public class BillAddr_i { //rename to avoid duplicate class
public String Id;
public String Line1;
public String Line2;
public String City;
public String Country;
public String CountrySubDivisionCode;
public String PostalCode;
public String Lat;
public String Long_Z; // in json: Long
}
public class CurrencyRef_i {
public String value;
public String name;
}
public class Invoice {
public Integer Deposit;
public Boolean AllowIPNPayment;
public Boolean AllowOnlinePayment;
public Boolean AllowOnlineCreditCardPayment;
public Boolean AllowOnlineACHPayment;
public String EInvoiceStatus;
public String ECloudStatusTimeStamp;
public String domain;
public Boolean sparse;
public String Id;
public String SyncToken;
public MetaData_i MetaData_i;
public List<CustomField> CustomField;
public String DocNumber;
public String TxnDate;
public CurrencyRef_i CurrencyRef_i;
public List<LinkedTxn> LinkedTxn;
public List<Line> Line;
public CurrencyRef CustomerRef;
public TaxCodeRef CustomerMemo; //
public BillAddr_i BillAddr_i;
public TaxCodeRef SalesTermRef; //
public String DueDate;
public Double TotalAmt;
public Double HomeTotalAmt;
public Boolean ApplyTaxAfterDiscount; //USA
public String PrintStatus;
public String EmailStatus;
public BillEmail BillEmail;
public Double Balance; //use Double instead of Integer, otherwise errors with decimals
public DeliveryInfo DeliveryInfo;
public BillAddr_Z ShipAddr;
}
public class BillEmail {
public String Address;
}
public class DeliveryInfo {
public String DeliveryType;
public String DeliveryTime;
}
public class BillAddr_Z {
public String Id;
public String Line1;
public String Line2;
public String City;
public String CountrySubDivisionCode;
public String PostalCode;
}
public class SalesItemLineDetail {
public CurrencyRef ItemRef;
public Double UnitPrice; //use Double instead of Integer, otherwise errors with decimals
public Double Qty; //
public CurrencyRef ItemAccountRef;
public TaxCodeRef TaxCodeRef; //
}
public class Line_Z {
public String Id;
public Integer LineNum;
public Double Amount; //use Double instead of Integer, otherwise errors with decimals
public String DetailType;
public SalesItemLineDetail SalesItemLineDetail;
public CustomField SubTotalLineDetail;
}
public class Line_Y {
public String Id;
public Integer LineNum;
public Double Amount; //use Double instead of Integer, otherwise errors with decimals
public String DetailType;
public SalesItemLineDetail SalesItemLineDetail;
public CustomField SubTotalLineDetail;
}
public class Line_X {
public String Id;
public Integer LineNum;
public Double Amount; //use Double instead of Integer, otherwise errors with decimals
public String DetailType;
public SalesItemLineDetail SalesItemLineDetail;
public CustomField SubTotalLineDetail;
}
public class Line_W {
public String Id;
public Integer LineNum;
public Double Amount; //use Double instead of Integer, otherwise errors with decimals
public String DetailType;
public SalesItemLineDetail SalesItemLineDetail;
public CustomField SubTotalLineDetail;
}
public class Inv {
public QueryResponse_i QueryResponse_i;
public String time_i;
}
public class Line {
public String Id;
public Integer LineNum;
public Double Amount; //use Double instead of Integer, otherwise errors with decimals
public String DetailType;
public SalesItemLineDetail SalesItemLineDetail;
public LinkedTxn SubTotalLineDetail;
}
public class TaxCodeRef { //
public String value;
}
public class MetaData_i {
public String CreateTime;
public String LastUpdatedTime;
}
public class QueryResponse_i { //rename to avoid duplicate class
public List<Invoice> Invoice;
public Integer startPosition;
public Integer maxResults;
public Integer totalCount;
}
public class CustomField {
public String DefinitionId;
public String Type_Z; // in json: Type
public String Name;
public String StringValue;
}
public class LinkedTxn {
public String TxnId;
public String TxnType;
}
public InvoiceControllerUpdate(ApexPages.StandardController stdController) {
loadId = ApexPages.currentPage().getParameters().get('id');
clist = new List<Customer>();
lo = [select Id, Name, (select Id, Name, FreightTM__Type__c, FreightTM__Description__c, FreightTM__Amount__c,Product__c,Product__r.name,
Product__r.LQB_QB_Id__c,Product__r.LQB_QB_Id2__c,//Freight_Component__r.QB_Id__c,Freight_Component__r.Freight_Component_Name__c, Freight_Component__r.name,
FreightTM__Unit_Price__c,FreightTM__Number_of_Units__c from FreightTM__Line_Items__r),
FreightTM__pickup_city__c, FreightTM__Pickup_State__c, FreightTM__Pickup_Country__c, FreightTM__Pickup_Arrival__c,
FreightTM__Load_Canceled__c,FreightTM__Container_Size__c,LQB_QB_Id__c,LQB_QB_error__c,
FreightTM__PickupFacility__r.FreightTM__City__c,FreightTM__PickupFacility__r.FreightTM__state__c,
FreightTM__DeliveryFacility__r.FreightTM__City__c,Balance_Due__c,Bill_Reference__c,FreightTM__Remarks__c,
FreightTM__DeliveryFacility__r.FreightTM__state__c,FreightTM__DeliveryFacility__r.FreightTM__Country__c,
FreightTM__DeliveryFacility__r.FreightTM__Zip_Code__c,FreightTM__DeliveryFacility__r.Name,
FreightTM__DeliveryFacility__r.FreightTM__Street__c,FreightTM__Pickup_Date__c,FreightTM__Delivery_Date__c,FreightTM__Delivery_Remarks__c, //Tracking_Number__c,FreightTM__Customer__r.Payment_Terms__c,
FreightTM__Confirmation_Number__c, FreightTM__Customer__c, FreightTM__Customer__r.Name, FreightTM__Customer__r.BillingAddress,
FreightTM__Customer__r.BillingStreet, FreightTM__Customer__r.BillingCity,
FreightTM__Customer__r.BillingState, FreightTM__Customer__r.BillingPostalCode, FreightTM__Customer__r.BillingCountry,
FreightTM__Customer__r.QBCustomerID__c,FreightTM__Customer__r.Payment_Terms__c,FreightTM__Customer__r.Accounting_Email__c,
FreightTM__Customer__r.ShippingAddress, FreightTM__Customer__r.ShippingStreet, FreightTM__Customer__r.ShippingCity,
FreightTM__Customer__r.FreightTM__General_Email__c,FreightTM__Customer__r.Net_Pay_Terms__c,
FreightTM__Customer__r.ShippingState, FreightTM__Customer__r.ShippingPostalCode, FreightTM__Customer__r.ShippingCountry,
FreightTM__Customer__r.Phone, New_QB__c,FreightTM__Customer__r.QBCustomerIDNEW__c,
FreightTM__Rate__c, FreightTM__Status__c, FreightTM__Delivery_city__c, FreightTM__Delivery_State__c, FreightTM__Delivery_Country__c,
FreightTM__Delivery_Departure__c, FreightTM__total__c,FreightTM__Customer__r.Payment_Terms_QB_ID__c,New_QuickBooks_ID__c
from FreightTM__Load__c
where Id = :loadId];
}
//create invoice in QB
public PageReference send() {
string NEWQB ='';
if(lo.New_QB__c == True) { NEWQB = 'QuickBooks2';}
else{ NEWQB = 'QuickBooks';}
try{
// validation for customer↔QB mapping
if(lo.FreightTM__Customer__c == null || lo.FreightTM__Customer__r.QBCustomerID__c == null && lo.New_QB__c == false) {
ApexPages.addMessage(new ApexPages.message(ApexPages.Severity.Error, 'Missing Old Customer QB.'));
return null;
} else if(lo.FreightTM__Customer__c == null || lo.FreightTM__Customer__r.QBCustomerIDNEW__c == null && lo.New_QB__c == true){
ApexPages.addMessage(new ApexPages.message(ApexPages.Severity.Error, 'Missing NEW Customer QB. Please check the Assigned Customer'));
return null;
}
else{
// check if invoice already exists in QB
JSONGenerator geni = JSON.createGenerator(true);
String invoicestr = geni.getAsString();
HttpRequest reqinv = new HttpRequest();
reqinv.setEndpoint('callout:'+NEWQB+'/query?query=select%20%2a%20from%20Invoice%20where%20DocNumber%20%3d%20%27'+ lo.name +'%27');
//reqinv.setEndpoint('callout:quickbooks/query?query=select%20%2a%20from%20Invoice%20where%20DocNumber%20%3d%20%27'+ lo.Load_Ref__c +'%27&minorversion=4');
reqinv.setHeader('Accept','application/json');
reqinv.setMethod('GET');
reqinv.setTimeout(2000); // timeout in milliseconds
reqinv.setBody(invoicestr);
Http httpinv = new Http();
HTTPResponse resinv = httpinv.send(reqinv);
String invbody = resinv.getBody();
String invbody2 = invbody.replace('"BillAddr":', '"BillAddr_i":'); //to avoid duplicate classes
String invbody3 = invbody2.replace('"QueryResponse":', '"QueryResponse_i":'); //to avoid duplicate classes
String invbody4 = invbody3.replace('"MetaData":', '"MetaData_i":'); //to avoid duplicate classes
String invbody5 = invbody4.replace('"CurrencyRef":', '"CurrencyRef_i":'); //to avoid duplicate classes
String invbody_x = invbody5.replace('"time":', '"time_i":'); //time is an apex reserved word, replaced it with time_i
system.debug('III: ' + invbody_x);
//If no errors in query response, deserialize json string response and assign variables to values.
if (resinv.getStatusCode() >= 200 && resinv.getStatusCode() < 300) {
InvoiceControllerUpdate.Inv invt = (InvoiceControllerUpdate.Inv)JSON.deserialize(invbody_x, InvoiceControllerUpdate.Inv.class);
system.debug('Invoice: ' + invt);
QueryResponse_i v = invt.QueryResponse_i;
system.debug('Invoice: ' + v);
List<Invoice> invlist = v.Invoice;
system.debug('Invoice: ' + invlist);
// ================= UPDATE EXISTING INVOICE =================
if(invlist != null) {
for(Invoice qbi : invlist) {
system.debug('Invoice val: ' + qbi.DocNumber);
//check if Invoice exists in QB, if it does, display msg
String synctoken = qbi.SyncToken;
String QBInvoiceID = qbi.ID;
String QBInvoiceDate = qbi.TxnDate;
if(qbi.DocNumber == lo.name || qbi.DocNumber == lo.FreightTM__Remarks__c) {
JSONGenerator gen = JSON.createGenerator(true);
gen.writeStartObject();
gen.writeStringField('TxnDate', QBInvoiceDate);
gen.writeStringField('domain', 'QBO');
// ---------- Lines (NEW + OLD QB) ----------
gen.writeFieldName('Line');
gen.writeStartArray();
if (lo.FreightTM__Line_Items__r != null) {
for(integer i = 0; i < lo.FreightTM__Line_Items__r.size(); i++) {
string QBIDstring;
if(lo.New_QB__c == True ) {
QBIDstring = (lo.FreightTM__Line_Items__r[i].Product__r.LQB_QB_Id2__c != null)
? lo.FreightTM__Line_Items__r[i].Product__r.LQB_QB_Id2__c : '1';
} else {
QBIDstring = (lo.FreightTM__Line_Items__r[i].Product__r.LQB_QB_Id__c != null)
? lo.FreightTM__Line_Items__r[i].Product__r.LQB_QB_Id__c : '1';
}
decimal UnitPrice = (lo.FreightTM__Line_Items__r[i].FreightTM__Unit_Price__c != null)
? lo.FreightTM__Line_Items__r[i].FreightTM__Unit_Price__c : 0;
Double Quantity = (lo.FreightTM__Line_Items__r[i].FreightTM__Number_of_Units__c != null)
? lo.FreightTM__Line_Items__r[i].FreightTM__Number_of_Units__c : 0;
decimal TotalPrice = (lo.FreightTM__Line_Items__r[i].FreightTM__Amount__c != null)
? lo.FreightTM__Line_Items__r[i].FreightTM__Amount__c : 0;
string ContainerSize = (lo.FreightTM__Container_Size__c != null) ? lo.FreightTM__Container_Size__c : '';
string PickupFacilityCity = (lo.FreightTM__PickupFacility__r.FreightTM__City__c != null) ? lo.FreightTM__PickupFacility__r.FreightTM__City__c : '';
string PickupFacilitystate = (lo.FreightTM__PickupFacility__r.FreightTM__state__c != null) ? lo.FreightTM__PickupFacility__r.FreightTM__state__c : '';
string DeliveryFacilityCity = (lo.FreightTM__DeliveryFacility__r.FreightTM__City__c != null) ? lo.FreightTM__DeliveryFacility__r.FreightTM__City__c : '';
string DeliveryFacilitystate = (lo.FreightTM__DeliveryFacility__r.FreightTM__state__c != null) ? lo.FreightTM__DeliveryFacility__r.FreightTM__state__c : '';
gen.writeStartObject();
gen.writeStringField('Description', ContainerSize + ' - ' + PickupFacilityCity + ', ' + PickupFacilitystate + ' to ' + DeliveryFacilityCity + ', ' + DeliveryFacilitystate);
gen.writeNumberField('Amount', TotalPrice);
gen.writeStringField('DetailType', 'SalesItemLineDetail');
gen.writeFieldName('SalesItemLineDetail');
gen.writeStartObject();
gen.writeFieldName('ItemRef');
gen.writeStartObject();
gen.writeStringField('value', QBIDstring);
gen.writeStringField('name', 'Services' );
gen.writeEndObject();
gen.writeNumberField('UnitPrice', UnitPrice );
gen.writeNumberField('Qty', Quantity );
gen.writeFieldName('TaxCodeRef');
gen.writeStartObject();
gen.writeStringField('value', 'NON' );
gen.writeEndObject();
gen.writeEndObject();
gen.writeEndObject();
}
}
gen.writeEndArray();
gen.writeBooleanField('ApplyTaxAfterDiscount', false);
gen.writeStringField('DocNumber', lo.name);
gen.writeBooleanField('sparse', false);
// ---------- CustomerRef + Email ----------
string QBCustomerIDField = (lo.New_QB__c == True)
? lo.FreightTM__Customer__r.QBCustomerIDNEW__c
: lo.FreightTM__Customer__r.QBCustomerID__c;
string CustomerEmailAdd = (lo.FreightTM__Customer__r.Accounting_Email__c != null)
? lo.FreightTM__Customer__r.Accounting_Email__c : '';
gen.writeFieldName('CustomerRef');
gen.writeStartObject();
gen.writeStringField('name', (lo.FreightTM__Customer__r.Name != null ? lo.FreightTM__Customer__r.Name : ''));
gen.writeStringField('value', QBCustomerIDField );
gen.writeEndObject();
gen.writeFieldName('BillEmail');
gen.writeStartObject();
gen.writeStringField('Address', CustomerEmailAdd );
gen.writeEndObject();
// ---------- ShipAddr ----------
string ShippingName = (lo.FreightTM__DeliveryFacility__r.Name != null) ? lo.FreightTM__DeliveryFacility__r.Name : '';
string ShippingStreet = (lo.FreightTM__DeliveryFacility__r.FreightTM__Street__c != null) ? lo.FreightTM__DeliveryFacility__r.FreightTM__Street__c : '';
string ShippingState = (lo.FreightTM__DeliveryFacility__r.FreightTM__State__c != null) ? lo.FreightTM__DeliveryFacility__r.FreightTM__State__c : '';
string ShippingCity = (lo.FreightTM__DeliveryFacility__r.FreightTM__City__c != null) ? lo.FreightTM__DeliveryFacility__r.FreightTM__City__c : '';
string ShippingCountry = (lo.FreightTM__DeliveryFacility__r.FreightTM__Country__c != null) ? lo.FreightTM__DeliveryFacility__r.FreightTM__Country__c : '';
string ShippingPostalCode = (lo.FreightTM__DeliveryFacility__r.FreightTM__Zip_Code__c != null) ? lo.FreightTM__DeliveryFacility__r.FreightTM__Zip_Code__c : '';
gen.writeFieldName('ShipAddr');
gen.writeStartObject();
gen.writeStringField('Line1', ShippingName );
gen.writeStringField('Line2', ShippingStreet );
gen.writeStringField('City', ShippingCity );
gen.writeStringField('CountrySubDivisionCode', ShippingState );
gen.writeStringField('PostalCode', ShippingPostalCode);
gen.writeStringField('Country', ShippingCountry);
gen.writeEndObject();
// ---------- Terms (New vs Old) ----------
String pt = (lo.FreightTM__Customer__r.Payment_Terms__c != null)
? String.valueOf(lo.FreightTM__Customer__r.Payment_Terms__c).trim() : null;
String PaymentTermsID = '1';
if (lo.New_QB__c == true) {
Map<String, String> newQBMap = new Map<String, String>{
'Due Upon Receipt' => '1',
'Net 7' => '9',
'Net 10' => '8',
'Net 15' => '2',
'Net 25' => '10',
'Net 30' => '3',
'Net 45' => '7',
'Net 60' => '4'
};
PaymentTermsID = (pt != null && newQBMap.containsKey(pt)) ? newQBMap.get(pt) : '1';
} else {
Map<String, String> oldQBMap = new Map<String, String>{
'Due Upon Receipt' => '100',
'Net 7' => '109',
'Net 10' => '108',
'Net 15' => '102',
'Net 25' => '110',
'Net 30' => '103',
'Net 45' => '107',
'Net 60' => '104'
};
PaymentTermsID = (pt != null && oldQBMap.containsKey(pt)) ? oldQBMap.get(pt) : '1';
}
// ---------- Bill Ref (CustomField) ----------
string BillReference = (lo.Bill_Reference__c != null) ? lo.Bill_Reference__c : '';
gen.writeFieldName('CustomField');
gen.writeStartArray();
gen.writeStartObject();
gen.writeStringField('DefinitionId', '1' );
gen.writeStringField('Name', 'Bill Ref' );
gen.writeStringField('Type', 'StringType');
gen.writeStringField('StringValue', BillReference );
gen.writeEndObject();
gen.writeEndArray();
gen.writeFieldName('SalesTermRef');
gen.writeStartObject();
gen.writeStringField('value', PaymentTermsID);
gen.writeEndObject();
gen.writeStringField('SyncToken', synctoken);
gen.writeFieldName('LinkedTxn'); gen.writeStartArray(); gen.writeEndArray();
gen.writeStringField('Id', QBInvoiceID);
gen.writeEndObject();
String jsonPayload = gen.getAsString();
System.debug(jsonPayload);
HttpRequest updateReq = new HttpRequest();
updateReq.setEndpoint('callout:'+NEWQB+'/invoice');
updateReq.setHeader('Content-Type', 'application/json');
updateReq.setMethod('POST');
updateReq.setBody(jsonPayload);
Http http = new Http();
HttpResponse updateRes = http.send(updateReq);
if (updateRes.getStatusCode() >= 200 && updateRes.getStatusCode() < 300) {
qbInvoiceid = qbi.ID;
if(lo.New_QB__c == True) updateLoad2(lo.Id,qbInvoiceid);
else updateLoad(lo.Id,qbInvoiceid);
ApexPages.addMessage(new ApexPages.message(ApexPages.Severity.CONFIRM, 'Invoice has been Updated on QB.'));
} else {
ApexPages.addMessage(new ApexPages.message(ApexPages.Severity.ERROR, 'Invoice could NOT be Updated in QB. Please contact your Administrator.'));
return null;
}
}
}
}
// ================= CREATE IF NOT FOUND =================
else {
string Deliverydatestring;
date DeliveryDate;
if(lo.FreightTM__Delivery_Date__c != null) {
DeliveryDate = lo.FreightTM__Delivery_Date__c;
Deliverydatestring = string.valueof(DeliveryDate);
} else {
Deliverydatestring = '';
}
string TrackingNumber = (lo.FreightTM__Delivery_Remarks__c != null) ? lo.FreightTM__Delivery_Remarks__c : '';
// ---- Terms on CREATE (prefer explicit QB ID, else map by New/Old) ----
String PaymentTermsID;
if(lo.FreightTM__Customer__r.Payment_Terms_QB_ID__c != null) {
PaymentTermsID = lo.FreightTM__Customer__r.Payment_Terms_QB_ID__c;
} else {
String ptCreate = (lo.FreightTM__Customer__r.Payment_Terms__c != null)
? String.valueOf(lo.FreightTM__Customer__r.Payment_Terms__c).trim() : null;
if (lo.New_QB__c == true) {
Map<String, String> newQBMap = new Map<String, String>{
'Due Upon Receipt' => '1',
'Net 7' => '9',
'Net 10' => '8',
'Net 15' => '2',
'Net 25' => '10',
'Net 30' => '3',
'Net 45' => '7',
'Net 60' => '4'
};
PaymentTermsID = (ptCreate != null && newQBMap.containsKey(ptCreate)) ? newQBMap.get(ptCreate) : '1';
} else {
Map<String, String> oldQBMap = new Map<String, String>{
'Due Upon Receipt' => '100',
'Net 7' => '109',
'Net 10' => '108',
'Net 15' => '102',
'Net 25' => '110',
'Net 30' => '103',
'Net 45' => '107',
'Net 60' => '104'
};
PaymentTermsID = (ptCreate != null && oldQBMap.containsKey(ptCreate)) ? oldQBMap.get(ptCreate) : '1';
}
}
string BillReference = (lo.Bill_Reference__c != null) ? lo.Bill_Reference__c : '';
JSONGenerator gen = JSON.createGenerator(true);
gen.writeStartObject();
// Bill Ref custom field
gen.writeFieldName('CustomField');
gen.writeStartArray();
gen.writeStartObject();
gen.writeStringField('DefinitionId', '1' );
gen.writeStringField('Name', 'Bill Ref' );
gen.writeStringField('Type', 'StringType');
gen.writeStringField('StringValue', BillReference );
gen.writeEndObject();
gen.writeEndArray();
gen.writeFieldName('SalesTermRef');
gen.writeStartObject();
gen.writeStringField('value', PaymentTermsID);
gen.writeEndObject();
// Lines
gen.writeFieldName('Line');
gen.writeStartArray();
if (lo.FreightTM__Line_Items__r != null) {
for(integer i = 0; i < lo.FreightTM__Line_Items__r.size(); i++) {
string QBIDstring;
if(lo.New_QB__c == True ) {
QBIDstring = (lo.FreightTM__Line_Items__r[i].Product__r.LQB_QB_Id2__c != null)
? lo.FreightTM__Line_Items__r[i].Product__r.LQB_QB_Id2__c : '1';
} else {
QBIDstring = (lo.FreightTM__Line_Items__r[i].Product__r.LQB_QB_Id__c != null)
? lo.FreightTM__Line_Items__r[i].Product__r.LQB_QB_Id__c : '1';
}
decimal UnitPrice = (lo.FreightTM__Line_Items__r[i].FreightTM__Unit_Price__c != null)
? lo.FreightTM__Line_Items__r[i].FreightTM__Unit_Price__c : 0;
Double Quantity = (lo.FreightTM__Line_Items__r[i].FreightTM__Number_of_Units__c != null)
? lo.FreightTM__Line_Items__r[i].FreightTM__Number_of_Units__c : 0;
decimal TotalPrice = (lo.FreightTM__Line_Items__r[i].FreightTM__Amount__c != null)
? lo.FreightTM__Line_Items__r[i].FreightTM__Amount__c : 0;
string ContainerSize = (lo.FreightTM__Container_Size__c != null) ? lo.FreightTM__Container_Size__c : '';
string PickupFacilityCity = (lo.FreightTM__PickupFacility__r.FreightTM__City__c != null) ? lo.FreightTM__PickupFacility__r.FreightTM__City__c : '';
string PickupFacilitystate = (lo.FreightTM__PickupFacility__r.FreightTM__state__c != null) ? lo.FreightTM__PickupFacility__r.FreightTM__state__c : '';
string DeliveryFacilityCity = (lo.FreightTM__DeliveryFacility__r.FreightTM__City__c != null) ? lo.FreightTM__DeliveryFacility__r.FreightTM__City__c : '';
string DeliveryFacilitystate = (lo.FreightTM__DeliveryFacility__r.FreightTM__state__c != null) ? lo.FreightTM__DeliveryFacility__r.FreightTM__state__c : '';
gen.writeStartObject();
gen.writeStringField('Description', ContainerSize + ' - ' + PickupFacilityCity + ', ' + PickupFacilitystate + ' to ' + DeliveryFacilityCity + ', ' + DeliveryFacilitystate);
gen.writeNumberField('Amount', TotalPrice);
gen.writeStringField('DetailType', 'SalesItemLineDetail');
gen.writeFieldName('SalesItemLineDetail');
gen.writeStartObject();
gen.writeFieldName('ItemRef');
gen.writeStartObject();
gen.writeStringField('value', QBIDstring);
gen.writeStringField('name', 'Services' );
gen.writeEndObject();
gen.writeNumberField('UnitPrice', UnitPrice );
gen.writeNumberField('Qty', Quantity );
gen.writeFieldName('TaxCodeRef');
gen.writeStartObject();
gen.writeStringField('value', 'NON' );
gen.writeEndObject();
gen.writeEndObject();
gen.writeEndObject();
}
}
gen.writeEndArray();
// CustomerRef / Ship / Email
string QBCustomerIDField = (lo.New_QB__c == True)
? lo.FreightTM__Customer__r.QBCustomerIDNEW__c
: lo.FreightTM__Customer__r.QBCustomerID__c;
string CustomerEmailAdd = (lo.FreightTM__Customer__r.Accounting_Email__c != null)
? lo.FreightTM__Customer__r.Accounting_Email__c : '';
gen.writeFieldName('CustomerRef');
gen.writeStartObject();
gen.writeStringField('value', QBCustomerIDField );
gen.writeEndObject();
string ShippingName = (lo.FreightTM__DeliveryFacility__r.Name != null) ? lo.FreightTM__DeliveryFacility__r.Name : '';
string ShippingStreet = (lo.FreightTM__DeliveryFacility__r.FreightTM__Street__c != null) ? lo.FreightTM__DeliveryFacility__r.FreightTM__Street__c : '';
string ShippingState = (lo.FreightTM__DeliveryFacility__r.FreightTM__State__c != null) ? lo.FreightTM__DeliveryFacility__r.FreightTM__State__c : '';
string ShippingCity = (lo.FreightTM__DeliveryFacility__r.FreightTM__City__c != null) ? lo.FreightTM__DeliveryFacility__r.FreightTM__City__c : '';
string ShippingCountry = (lo.FreightTM__DeliveryFacility__r.FreightTM__Country__c != null) ? lo.FreightTM__DeliveryFacility__r.FreightTM__Country__c : '';
string ShippingPostalCode = (lo.FreightTM__DeliveryFacility__r.FreightTM__Zip_Code__c != null) ? lo.FreightTM__DeliveryFacility__r.FreightTM__Zip_Code__c : '';
gen.writeFieldName('ShipAddr');
gen.writeStartObject();
gen.writeStringField('Line1', ShippingName );
gen.writeStringField('Line2', ShippingStreet );
gen.writeStringField('City', ShippingCity );
gen.writeStringField('CountrySubDivisionCode', ShippingState );
gen.writeStringField('PostalCode', ShippingPostalCode);
gen.writeStringField('Country', ShippingCountry);
gen.writeEndObject();
gen.writeFieldName('BillEmail');
gen.writeStartObject();
gen.writeStringField('Address', CustomerEmailAdd );
gen.writeEndObject();
gen.writeStringField('DocNumber', lo.name );
gen.writeEndObject();
String jsonS = gen.getAsString();
System.debug(jsonS);
HttpRequest req = new HttpRequest();
req.setEndpoint('callout:'+NEWQB+'/invoice');
req.setHeader('Content-Type','application/json');
req.setMethod('POST');
req.setTimeout(2000);
req.setbody(jsonS);
Http http = new Http();
HTTPResponse res = http.send(req);
System.debug(res);
if(lo.New_QB__c == True) {
if ((res.getStatusCode() >= 200 && res.getStatusCode() < 300) && (lo.New_QuickBooks_ID__c == null || lo.New_QuickBooks_ID__c == '')) {
HttpRequest reqinv2 = new HttpRequest();
reqinv2.setEndpoint('callout:'+NEWQB+'/query?query=select%20%2a%20from%20Invoice%20where%20DocNumber%20%3d%20%27'+ lo.name +'%27');
reqinv2.setHeader('Accept','application/json');
reqinv2.setMethod('GET');
reqinv2.setTimeout(2000);
Http httpinv2 = new Http();
HTTPResponse resinv2 = httpinv2.send(reqinv2);
String invbod = resinv2.getBody();
String invbod2 = invbod.replace('"BillAddr":', '"BillAddr_i":');
String invbod3 = invbod2.replace('"QueryResponse":', '"QueryResponse_i":');
String invbod4 = invbod3.replace('"MetaData":', '"MetaData_i":');
String invbod5 = invbod4.replace('"CurrencyRef":', '"CurrencyRef_i":');
String invbod_x = invbod5.replace('"time":', '"time_i":');
system.debug('III: ' + invbod_x);
if (resinv2.getStatusCode() >= 200 && resinv2.getStatusCode() < 300) {
InvoiceControllerUpdate.Inv invt2 = (InvoiceControllerUpdate.Inv)JSON.deserialize(invbod_x, InvoiceControllerUpdate.Inv.class);
QueryResponse_i v2 = invt2.QueryResponse_i;
List<Invoice> invlist2 = v2.Invoice;
if (!Test.isRunningTest()) {
for(Invoice qbc : invlist2) {
qbInvoiceid = qbc.ID;
updateLoad2(lo.Id,qbInvoiceid);
ApexPages.addMessage(new ApexPages.message(ApexPages.Severity.CONFIRM, 'Invoice has been added to QB.'));
}
}
}
} else {
ApexPages.addMessage(new ApexPages.message(ApexPages.Severity.ERROR, 'Invoice could NOT be created in QB. Please contact your Administrator.'));
return null;
}
} else {
if ((res.getStatusCode() >= 200 && res.getStatusCode() < 300) && (lo.LQB_QB_Id__c == null || lo.LQB_QB_Id__c == '')) {
HttpRequest reqinv2 = new HttpRequest();
reqinv2.setEndpoint('callout:'+NEWQB+'/query?query=select%20%2a%20from%20Invoice%20where%20DocNumber%20%3d%20%27'+ lo.name +'%27');
reqinv2.setHeader('Accept','application/json');
reqinv2.setMethod('GET');
reqinv2.setTimeout(2000);
Http httpinv2 = new Http();
HTTPResponse resinv2 = httpinv2.send(reqinv2);
String invbod = resinv2.getBody();
String invbod2 = invbod.replace('"BillAddr":', '"BillAddr_i":');
String invbod3 = invbod2.replace('"QueryResponse":', '"QueryResponse_i":');
String invbod4 = invbod3.replace('"MetaData":', '"MetaData_i":');
String invbod5 = invbod4.replace('"CurrencyRef":', '"CurrencyRef_i":');
String invbod_x = invbod5.replace('"time":', '"time_i":');
system.debug('III: ' + invbod_x);
if (resinv2.getStatusCode() >= 200 && resinv2.getStatusCode() < 300) {
InvoiceControllerUpdate.Inv invt2 = (InvoiceControllerUpdate.Inv)JSON.deserialize(invbod_x, InvoiceControllerUpdate.Inv.class);
QueryResponse_i v2 = invt2.QueryResponse_i;
List<Invoice> invlist2 = v2.Invoice;
if (!Test.isRunningTest()) {
for(Invoice qbc : invlist2) {
qbInvoiceid = qbc.ID;
updateLoad(lo.Id,qbInvoiceid);
ApexPages.addMessage(new ApexPages.message(ApexPages.Severity.CONFIRM, 'Invoice has been added to QB.'));
}
}
}
} else {
ApexPages.addMessage(new ApexPages.message(ApexPages.Severity.ERROR, 'Invoice could NOT be created in QB. Please contact your Administrator.'));
return null;
}
}
}
} else {
ApexPages.addMessage(new ApexPages.message(ApexPages.Severity.error, 'There was a query issue in QB. Please contact your Administrator.'));
}
}
}
catch(DmlException ex){
// ApexPages.addMessages(ex);
}
return null;
}
public String getName() {
return 'InvoiceController';
}
private static void updateLoad(Id Loadid,String qbInvoiceid) {
FreightTM__Load__c Loadrecupdate = new FreightTM__Load__c(Id = Loadid,Invoice_Sent_to_QB__c = true,LQB_QB_Id__c =qbInvoiceid,LQB_QB_Error__c = 'Success');
update Loadrecupdate;
}
private static void updateLoad2(Id Loadid,String qbInvoiceid) {
FreightTM__Load__c Loadrecupdate2 = new FreightTM__Load__c(Id = Loadid,Invoice_Sent_to_QB__c = true,New_QuickBooks_ID__c =qbInvoiceid,LQB_QB_Error__c = 'Success');
update Loadrecupdate2;
}
}
Step 6: Automatic Balance Updates
FTM automatically syncs outstanding balances from QuickBooks every 15 minutes. This ensures your records remain up to date without manual intervention.
Troubleshooting
- If the invoice is not showing a QuickBooks ID after syncing, refresh the page and ensure the Customer QB ID was present beforehand.
- If using sandbox and it looks different from the guide, switch between classic and modern views using your profile icon (top right).

- If credentials or verification codes are required for access, please coordinate with your IT administrator.
Questions
If you need help at any step, please reach out to your integration engineer or contact us at [email protected]