The last document in the load lifecycle. Auto-generated from delivery data. Ready to send to the customer.
The freight invoice is how you get paid. It summarizes what was moved, where it went, and what it costs — and it goes to the customer after the load is delivered. For accounting teams, it’s the record that closes the loop on every shipment.
In FTM, the Invoice is generated from the Load record with a single click. The customer details, routing, and pay items are already in the system — no separate billing tool, no manual line-item entry. When the load is done, the invoice is ready.
What FTM’s Freight Invoice Includes
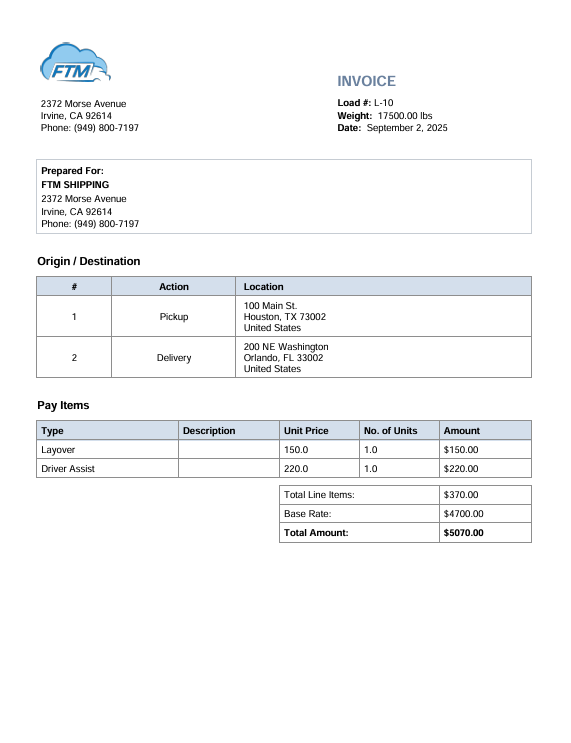
Header Information
- Load number — ties the invoice directly to the load record
- Total weight (lbs)
- Date issued
Prepared For (Customer Details)
The invoice is addressed directly to the customer tied to the load. This section shows:
- Customer company name
- Billing address
- Phone number
Origin / Destination
A clean routing table showing the pickup and delivery addresses — giving the customer a clear record of what was moved and where:
- Stop number and action type (Pickup / Delivery)
- Full address for each stop
Pay Items
This is the billing section — a line-item breakdown of all charges on the load:
- Type — charge category (e.g. fuel surcharge, accessorial, detention)
- Description — details on the charge
- Unit price and number of units
- Amount per line item
- Total Line Items — sum of all extra charges
- Base Rate — the core freight charge
- Total Amount — the final amount due
How It Works Inside FTM
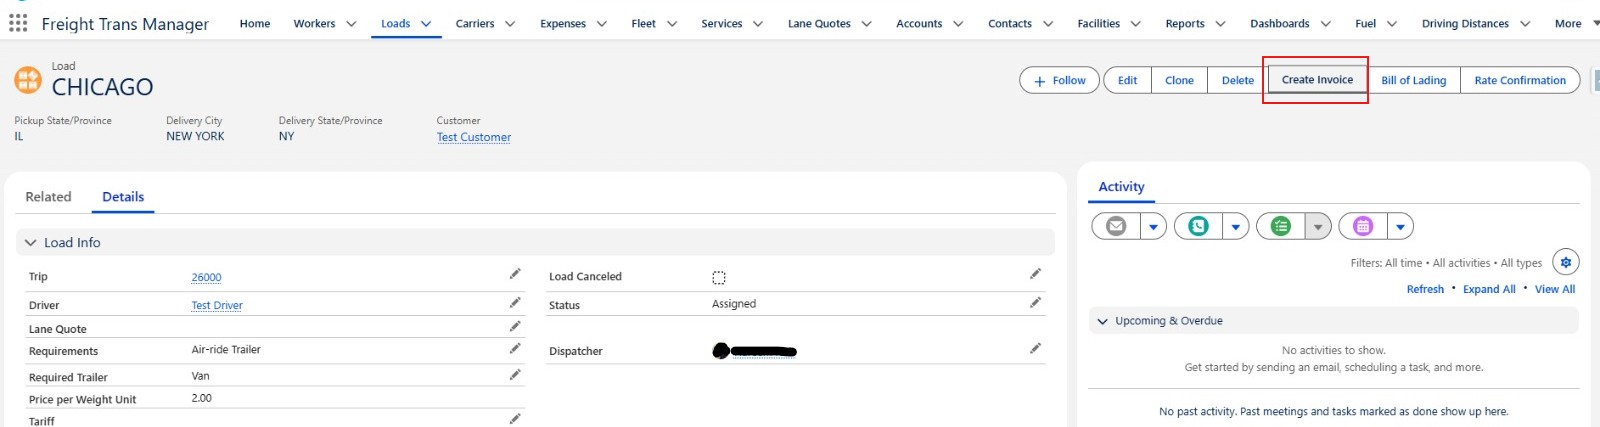
The Invoice is created from the Load record using the Create Invoice button in the top action bar. FTM pulls the customer, routing, and pay item data that’s already been entered on the load — no separate billing module, no re-entry.
Step by step
- Open the Load record in FTM after delivery is complete
- Click the Create Invoice button in the top action bar
- FTM generates the invoice with the customer’s billing details, the routing, and all pay items
- Review, download, and send to the customer
💡 The invoice and the load always match. Because the invoice is generated from live load data in Salesforce, the routing, customer, and charges on the invoice are always consistent with what’s in the system — no discrepancies between operations and accounting.
Making the Invoice Your Own
Company Logo
Your logo appears in the top-left corner of every invoice. To upload or update it:
- In Salesforce Setup, navigate to Custom Code → Static Resources
- Click New, upload your logo file (PNG format), set Cache Control to Public
- Give it the name referenced in the Invoice template
- Save — the next invoice generated will show your new logo
→ See Step #2 of the setup guide for the full logo upload walkthrough.
Company Information
The following fields are pulled from your Salesforce Organization settings and appear at the top of every invoice:
- Company name
- Street address, city, state, zip
- Phone
To update these, go to Salesforce Setup → Company Settings → Company Information. Changes apply immediately to all new documents.
The Invoice in the Freight Document Lifecycle
The Invoice is the final document in the load lifecycle — it closes the operational loop and triggers the billing process. It follows the BOL and Rate Confirmation, and it shares the same underlying load data as both.
Signed before the first load. Governs the entire relationship.
Shipper requests a price. Broker or carrier responds with a quote.
Shipper formally offers the load. Carrier accepts or declines.
Sent immediately after acceptance. Locks in the lane, rate, and terms.
Generated at dispatch. Travels with the driver.
Signed at delivery. Triggers invoicing.
Invoice
Sent to the customer after confirmed delivery.
Ready to see FTM in action?
Book a live demo and we’ll walk you through the full document workflow — BOL, Rate Con, Invoice, and Lane Quote — directly inside the platform.